
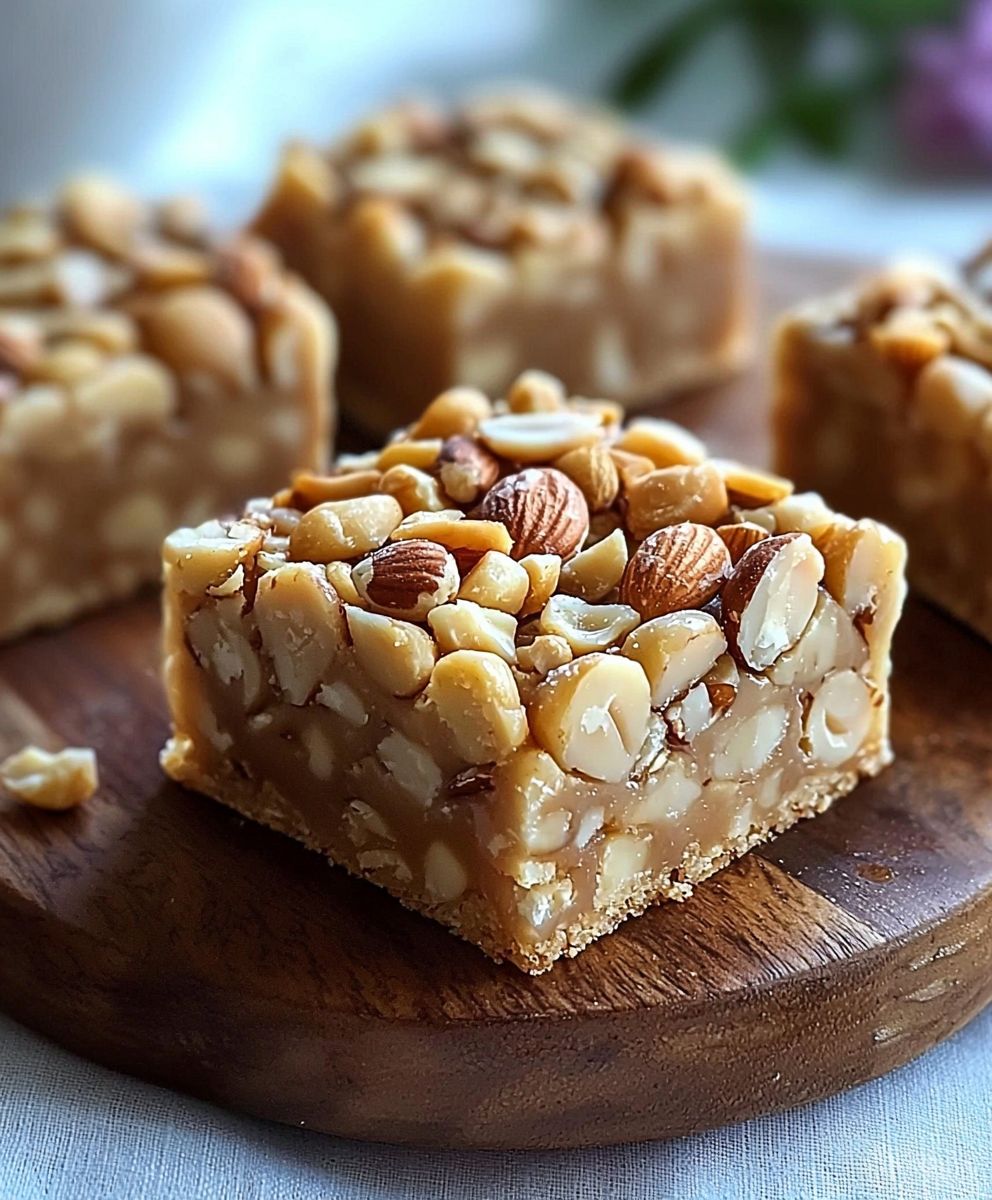
No-Bake Payday Nut Squares are a delightful treat that combines the rich flavors of caramel, peanuts, and chocolate, all without the need for an oven. As someone who loves to whip up quick and easy desserts, I find these squares to be a perfect solution for satisfying my sweet tooth without the hassle of baking. The history of this recipe is rooted in the classic Payday candy bar, which has been a favorite for many since its introduction in the 1930s. People adore No-Bake Payday Nut Squares not only for their incredible taste and chewy texture but also for their convenienceperfect for those busy days when you want something sweet without spending hours in the kitchen. Trust me, once you try these squares, you’ll understand why they have become a beloved go-to treat in my household!
Ingredients:
- 1 cup unsalted peanuts, roasted and unsalted
- 1 cup creamy peanut butter
- 1 cup honey
- 2 cups rolled oats
- 1 cup chocolate chips (semi-sweet or dark, based on preference)
- 1 teaspoon vanilla extract
- 1/4 teaspoon salt
- 1/2 cup chopped pecans (optional)
- 1/2 cup shredded coconut (optional)
Preparing the Mixture
Lets get started on these delicious No-Bake Payday Nut Squares! First, we need to prepare our mixture. This is the heart of the recipe, and its super simple.
- In a large mixing bowl, combine the creamy peanut butter and honey. I like to use a microwave-safe bowl for this step. Microwave the mixture for about 30 seconds to 1 minute, just until its warm and easier to mix. Stir it well until its completely combined.
- Add in the vanilla extract and salt. Stir again until everything is well incorporated. The mixture should be smooth and creamy.
- Next, its time to add the rolled oats. Pour them into the bowl and mix until the oats are fully coated with the peanut butter and honey mixture. This is where the magic starts to happen!
- If youre using chopped pecans or shredded coconut, now is the time to fold them in. They add a lovely texture and flavor to the squares. Mix until everything is evenly distributed.
- Finally, fold in the roasted peanuts. I love the crunch they add to the squares. Make sure theyre evenly mixed throughout the batter.
Setting Up the Pan
Now that our mixture is ready, we need to prepare the pan for setting the squares.
- Grab an 8×8 inch or 9×9 inch square baking pan. You can also use a parchment-lined dish if you prefer easier removal later.
- Lightly grease the pan with a bit of cooking spray or a thin layer of coconut oil. This will help prevent sticking.
- Transfer the mixture into the prepared pan. Use a spatula or your hands to press it down firmly. Make sure its evenly spread out and compacted. This step is crucial for ensuring that the squares hold together once theyre set.
Chilling the Mixture
Now that we have our mixture pressed into the pan, its time to let it chill and set.
- Cover the pan with plastic wrap or aluminum foil. This will help keep the moisture in while they chill.
- Place the pan in the refrigerator for at least 2 hours. If youre in a hurry, you can also place it in the freezer for about 30-45 minutes. Just keep an eye on it to ensure it doesnt freeze solid.
Melting the Chocolate
While the mixture is chilling, lets prepare the chocolate topping. This step is optional, but I highly recommend it for that classic Payday flavor!
- In a microwave-safe bowl, add the chocolate chips. You can use semi-sweet or dark chocolate, depending on your preference.
- Microwave the chocolate in 30-second intervals, stirring in between, until its completely melted and smooth. Be careful not to overheat it, as chocolate can burn easily.
- Once melted, let the chocolate cool slightly before pouring it over the chilled nut mixture. This will prevent it from melting the squares underneath.
Assembling the Squares
Now that everything is ready, its time to assemble our No-Bake Payday Nut Squares!
- Remove the pan from the refrigerator. If you used parchment paper, lift the mixture out of the pan for easier cutting.
- Pour the melted chocolate over the top of the nut mixture. Use a spatula to spread it evenly across the surface. Make sure to cover all the edges!
- For an extra touch, you can sprinkle some additional chopped peanuts or sea salt on top of the chocolate before it sets. This adds a nice contrast and enhances the flavor
Conclusion:
In summary, these No-Bake Payday Nut Squares are an absolute must-try for anyone looking to indulge in a deliciously sweet and nutty treat without the hassle of baking. The combination of creamy peanut butter, crunchy nuts, and a hint of sweetness creates a delightful flavor profile that is sure to satisfy your cravings. Plus, the best part is that they come together in just a few simple steps, making them perfect for busy days or last-minute gatherings. For serving suggestions, I love to cut these squares into bite-sized pieces and serve them alongside a warm cup of coffee or tea. They also make a fantastic addition to a dessert platter at parties or family gatherings. If you’re feeling adventurous, consider adding a drizzle of melted chocolate on top or mixing in some dried fruits for an extra burst of flavor. The possibilities are endless! I encourage you to give this No-Bake Payday Nut Squares recipe a try and experience the joy of creating something so delicious with minimal effort. Once youve made them, Id love to hear about your experience! Share your thoughts, variations, or even a photo of your creation. Lets spread the love for these delightful squares together! Happy cooking! PrintNo-Bake Payday Nut Squares: Easy Recipe for a Delicious Treat
- Total Time: 135 minutes
- Yield: 16 squares 1x
Description
Enjoy these No-Bake Payday Nut Squares, a delicious blend of peanut butter, honey, and chocolate. Quick and easy to prepare, they make for a perfect snack or dessert without the need for baking!
Ingredients
- 1 cup unsalted peanuts, roasted and unsalted
- 1 cup creamy peanut butter
- 1 cup honey
- 2 cups rolled oats
- 1 cup chocolate chips (semi-sweet or dark)
- 1 teaspoon vanilla extract
- 1/4 teaspoon salt
- 1/2 cup chopped pecans (optional)
- 1/2 cup shredded coconut (optional)
Instructions
- In a large mixing bowl, combine the creamy peanut butter and honey. Microwave for about 30 seconds to 1 minute until warm and easier to mix. Stir until completely combined.
- Add the vanilla extract and salt, stirring until well incorporated. The mixture should be smooth and creamy.
- Add the rolled oats and mix until fully coated with the peanut butter and honey mixture.
- If using, fold in the chopped pecans and shredded coconut until evenly distributed.
- Finally, fold in the roasted peanuts until evenly mixed throughout the batter.
- Grab an 8×8 inch or 9×9 inch square baking pan. Optionally, line with parchment paper for easier removal.
- Lightly grease the pan with cooking spray or a thin layer of coconut oil to prevent sticking.
- Transfer the mixture into the prepared pan, pressing it down firmly with a spatula or your hands to ensure its compacted and evenly spread.
- Cover the pan with plastic wrap or aluminum foil to retain moisture while chilling.
- Place the pan in the refrigerator for at least 2 hours, or in the freezer for about 30-45 minutes if you’re in a hurry.
- In a microwave-safe bowl, add the chocolate chips.
- Microwave in 30-second intervals, stirring in between, until completely melted and smooth. Be careful not to overheat.
- Let the melted chocolate cool slightly before pouring it over the chilled nut mixture.
- Remove the pan from the refrigerator. If using parchment paper, lift the mixture out for easier cutting.
- Pour the melted chocolate over the top of the nut mixture, spreading it evenly with a spatula.
- Optionally, sprinkle additional chopped peanuts or sea salt on top of the chocolate before it sets.
Notes
- For a nut-free version, substitute the peanuts and pecans with sunflower seeds or pumpkin seeds.
- Store the squares in an airtight container in the refrigerator for up to a week.
- Prep Time: 15 minutes
- Cook Time: 0 minutes


Leave a Comment