
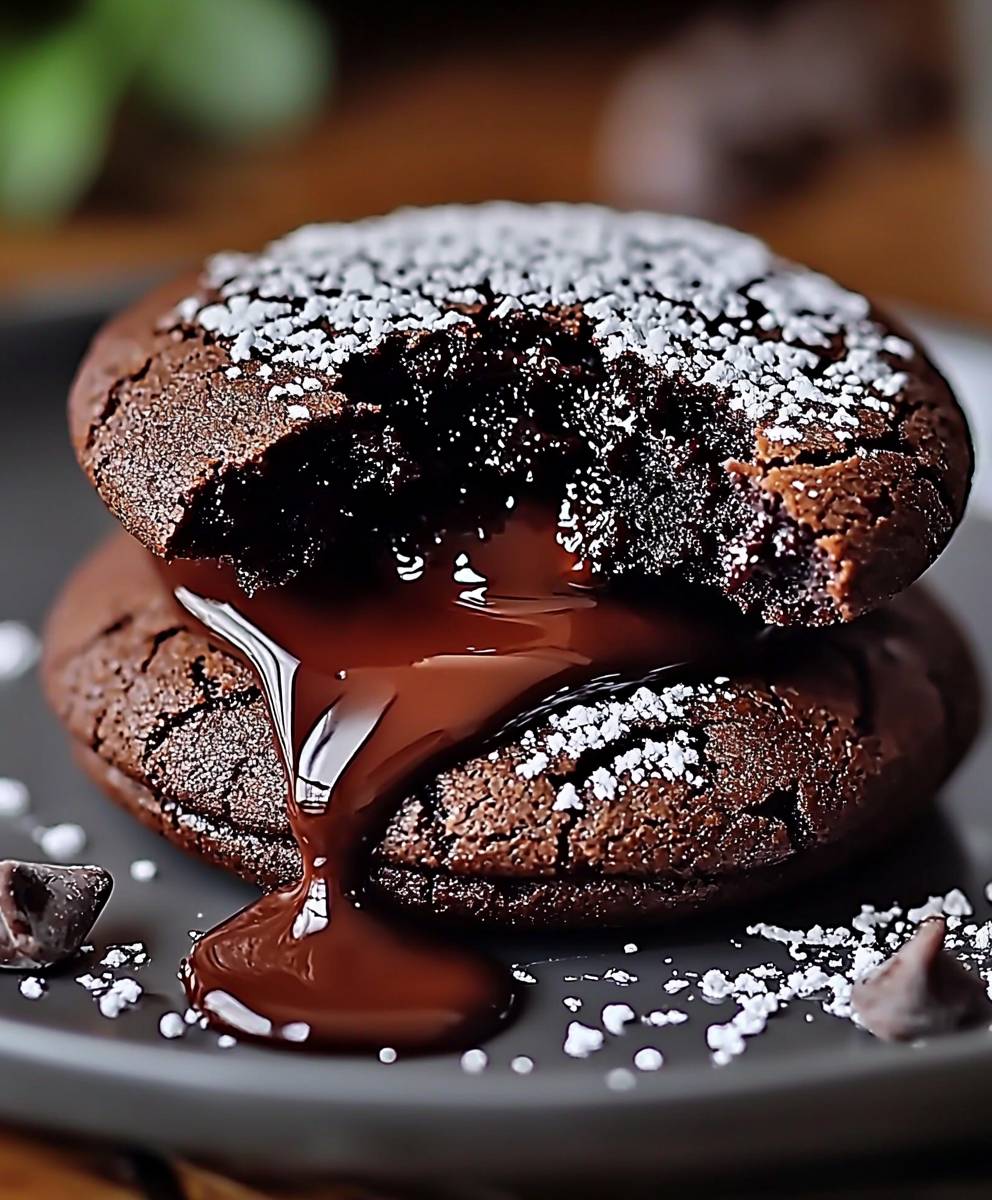
Chocolate Lava Cake Cookies: Prepare to be amazed! Imagine the decadent, molten center of a chocolate lava cake, but conveniently packaged in a soft, chewy cookie. Yes, you read that right! These aren’t just any cookies; they’re a delightful fusion of two beloved desserts, creating a symphony of textures and flavors that will leave you craving more.
While the exact origins of this hybrid treat are shrouded in mystery, the inspiration is clear: the timeless appeal of the chocolate lava cake. This rich dessert, with its warm, flowing center, has captivated dessert lovers for decades. The idea of transforming that experience into a portable, shareable cookie is pure genius, if I do say so myself!
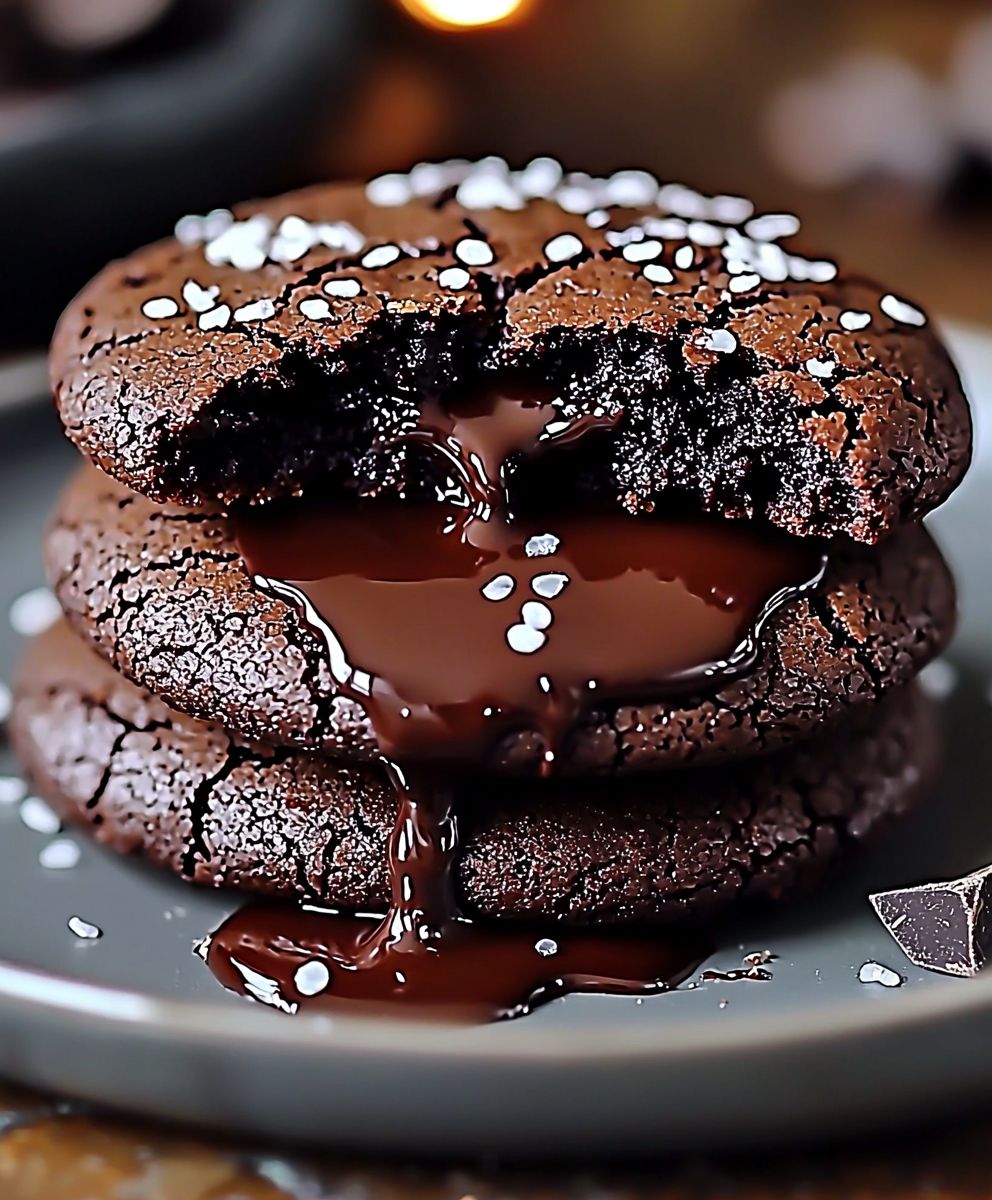
What makes these Chocolate Lava Cake Cookies so irresistible? It’s the perfect combination of textures the slightly crisp edges, the soft, chewy cookie base, and that glorious, gooey chocolate center that oozes out with every bite. The intense chocolate flavor is another major draw, satisfying even the most ardent chocoholic. Plus, they’re surprisingly easy to make, making them perfect for a quick weeknight treat or a show-stopping dessert for your next gathering. Get ready to experience chocolate bliss in every bite!
Ingredients:
- For the Chocolate Lava Center:
- 1/2 cup (1 stick) unsalted butter, cut into cubes
- 4 ounces bittersweet chocolate, chopped (at least 70% cacao)
- 2 large egg yolks
- 2 tablespoons granulated sugar
- 1/4 teaspoon vanilla extract
- Pinch of salt
- For the Chocolate Cookie Dough:
- 1 cup (2 sticks) unsalted butter, softened
- 1 cup granulated sugar
- 1 cup packed light brown sugar
- 2 large eggs
- 1 teaspoon vanilla extract
- 1/2 teaspoon almond extract (optional, but highly recommended!)
- 2 1/4 cups all-purpose flour
- 3/4 cup unsweetened cocoa powder
- 1 teaspoon baking soda
- 1/2 teaspoon salt
- 1 cup semi-sweet chocolate chips
Preparing the Chocolate Lava Centers:
- Melt the Butter and Chocolate: In a heatproof bowl set over a saucepan of simmering water (double boiler), combine the butter and chopped bittersweet chocolate. Make sure the bottom of the bowl doesn’t touch the water. Stir frequently until the butter and chocolate are completely melted and smooth. Remove from heat.
- Whisk in the Egg Yolks: In a separate bowl, whisk together the egg yolks, granulated sugar, vanilla extract, and salt until slightly pale and thickened. This usually takes about 1-2 minutes of vigorous whisking.
- Temper the Egg Yolks: Slowly drizzle a small amount of the melted chocolate mixture into the egg yolk mixture while whisking constantly. This process is called tempering and prevents the egg yolks from scrambling when added to the hot chocolate. Continue adding the chocolate mixture in a slow, steady stream until fully incorporated.
- Pour into Molds: Pour the chocolate mixture into silicone molds. I like to use mini muffin tins or small silicone ice cube trays. This makes it easy to pop them out later. Fill each mold almost to the top.
- Freeze: Place the molds in the freezer for at least 2 hours, or preferably overnight. The lava centers need to be completely frozen solid for easy handling.
Making the Chocolate Cookie Dough:
- Cream the Butter and Sugars: In a large bowl (or the bowl of a stand mixer), cream together the softened butter, granulated sugar, and brown sugar until light and fluffy. This usually takes about 3-5 minutes. Make sure to scrape down the sides of the bowl occasionally to ensure everything is evenly mixed.
- Beat in the Eggs and Extracts: Beat in the eggs one at a time, mixing well after each addition. Then, stir in the vanilla extract and almond extract (if using). The almond extract really enhances the chocolate flavor, so I highly recommend it!
- Combine Dry Ingredients: In a separate bowl, whisk together the flour, cocoa powder, baking soda, and salt. This ensures that the baking soda and salt are evenly distributed throughout the dough.
- Gradually Add Dry Ingredients to Wet Ingredients: Gradually add the dry ingredients to the wet ingredients, mixing on low speed until just combined. Be careful not to overmix the dough, as this can result in tough cookies.
- Stir in Chocolate Chips: Stir in the semi-sweet chocolate chips until evenly distributed throughout the dough.
- Chill the Dough: Cover the bowl with plastic wrap and chill the dough in the refrigerator for at least 30 minutes. This will help prevent the cookies from spreading too much during baking. You can chill it for longer, even overnight, if you prefer.
Assembling and Baking the Cookies:
- Preheat Oven: Preheat your oven to 350°F (175°C). Line baking sheets with parchment paper or silicone baking mats.
- Scoop the Dough: Scoop out about 2 tablespoons of cookie dough. Flatten the dough slightly into a disc shape in the palm of your hand.
- Add the Frozen Lava Center: Remove the frozen chocolate lava centers from the molds. Place one frozen lava center in the middle of the flattened cookie dough disc.
- Wrap the Dough Around the Lava Center: Gently wrap the cookie dough around the frozen lava center, completely sealing it in. Make sure there are no cracks or openings, or the lava center will leak out during baking. Roll the dough into a smooth ball.
- Place on Baking Sheet: Place the cookie dough balls on the prepared baking sheets, leaving about 2 inches between each cookie.
- Bake: Bake for 10-12 minutes, or until the edges of the cookies are set but the centers are still slightly soft. Be careful not to overbake, as you want the lava center to remain molten.
- Cool: Let the cookies cool on the baking sheets for a few minutes before transferring them to a wire rack to cool completely. However, they are best enjoyed warm, when the lava center is still gooey and molten.
Tips for Success:
- Don’t Overbake: The key to a perfect lava cake cookie is to not overbake them. The edges should be set, but the center should still be soft. If you overbake them, the lava center will be cooked through and won’t be as gooey.
- Freeze the Lava Centers Well: Make sure the lava centers are completely frozen solid before wrapping them in the cookie dough. This will make them easier to handle and prevent them from melting too quickly during baking.
- Use High-Quality Chocolate: The quality of the chocolate you use will greatly affect the flavor of the cookies. Use a good-quality bittersweet chocolate for the lava centers and semi-sweet chocolate chips for the dough.
- Chill the Dough: Chilling the dough is important for preventing the cookies from spreading too much during baking. It also allows the flavors to meld together.
- Make Ahead: You can make the cookie dough and lava centers ahead of time and store them in the refrigerator or freezer until you’re ready to bake.
- Serving Suggestions: These cookies are delicious on their own, but you can also serve them with a scoop of vanilla ice cream, a dusting of powdered sugar, or a drizzle of chocolate sauce.
Variations:
- Peanut Butter Lava Center: Substitute the bittersweet chocolate in the lava center with peanut butter chips for a peanut butter lava center.
- White Chocolate Lava Center: Use white chocolate instead of bittersweet chocolate for a white chocolate lava center.
- Mint Chocolate Chip: Add 1/2 teaspoon of peppermint extract to the cookie dough and use mint chocolate chips instead of semi-sweet chocolate chips.
- Espresso Chocolate: Add 1 teaspoon of instant espresso powder to the cookie dough to enhance the chocolate flavor.
Conclusion:
Okay, friends, let’s be honest: you’ve scrolled this far because you’re intrigued, and rightfully so! These Chocolate Lava Cake Cookies are not just another cookie recipe; they’re an experience. They’re the answer to that late-night chocolate craving, the perfect dessert to impress your friends, and a guaranteed mood booster on a gloomy day. The fudgy center, the slightly crisp edges, and the intense chocolate flavor combine to create a symphony of textures and tastes that will leave you wanting more. Trust me, once you bite into one of these warm, gooey delights, you’ll understand why I’m so passionate about them.
What makes these cookies a must-try? It’s the simplicity combined with the sheer decadence. You don’t need to be a master baker to achieve cookie perfection here. The recipe is straightforward, the ingredients are readily available, and the results are consistently amazing. Plus, the “lava” effect that molten chocolate center is a total showstopper. Imagine serving these at your next gathering and watching everyone’s faces light up with delight. It’s pure magic, I tell you!
Serving Suggestions and Variations:
Now, let’s talk about how to elevate these cookies even further. While they’re absolutely divine on their own, a few simple additions can take them to the next level. For a classic pairing, serve them warm with a scoop of vanilla ice cream. The cold ice cream against the warm, gooey cookie is a match made in heaven. Or, if you’re feeling adventurous, try a scoop of salted caramel ice cream for a salty-sweet explosion of flavor.
Another fantastic option is to dust them with a light coating of powdered sugar. This adds a touch of elegance and visual appeal. You could also drizzle them with melted white chocolate or dark chocolate for an extra layer of richness. For a festive touch, sprinkle them with crushed peppermint candies during the holidays.
Want to get creative with the recipe itself? Consider adding a pinch of espresso powder to the dough to enhance the chocolate flavor. Or, stir in some chopped nuts, like walnuts or pecans, for added texture and crunch. You could even experiment with different types of chocolate. Try using a combination of dark chocolate and milk chocolate for a more complex flavor profile. White chocolate chips could also be added for a sweeter taste.
For those who love a little spice, a dash of cayenne pepper in the dough will add a subtle kick that complements the chocolate beautifully. And if you’re a fan of sea salt, a sprinkle of flaky sea salt on top of the baked cookies will create a delightful contrast of sweet and salty.
The possibilities are endless! Feel free to experiment and customize these Chocolate Lava Cake Cookies to your liking. That’s the beauty of baking it’s all about creating something that you truly love.
So, what are you waiting for? Preheat your oven, gather your ingredients, and get ready to embark on a chocolatey adventure. I promise you won’t regret it. These cookies are a guaranteed crowd-pleaser, and they’re sure to become a staple in your baking repertoire.
I’m so excited for you to try this recipe! Once you’ve made these incredible cookies, please come back and share your experience in the comments below. I’d love to hear what you think, what variations you tried, and how much everyone enjoyed them. Happy baking!
Print
Chocolate Lava Cake Cookies: The Ultimate Decadent Recipe
- Total Time: 57 minutes
- Yield: 18–24 cookies 1x
Description
Decadent chocolate cookies with a molten chocolate lava center. A rich and gooey treat perfect for chocolate lovers!
Ingredients
- 1/2 cup (1 stick) unsalted butter, cut into cubes
- 4 ounces bittersweet chocolate, chopped (at least 70% cacao)
- 2 large egg yolks
- 2 tablespoons granulated sugar
- 1/4 teaspoon vanilla extract
- Pinch of salt
- 1 cup (2 sticks) unsalted butter, softened
- 1 cup granulated sugar
- 1 cup packed light brown sugar
- 2 large eggs
- 1 teaspoon vanilla extract
- 1/2 teaspoon almond extract (optional, but highly recommended!)
- 2 1/4 cups all-purpose flour
- 3/4 cup unsweetened cocoa powder
- 1 teaspoon baking soda
- 1/2 teaspoon salt
- 1 cup semi-sweet chocolate chips
Instructions
- In a heatproof bowl set over a saucepan of simmering water (double boiler), combine the butter and chopped bittersweet chocolate. Make sure the bottom of the bowl doesn’t touch the water. Stir frequently until the butter and chocolate are completely melted and smooth. Remove from heat.
- In a separate bowl, whisk together the egg yolks, granulated sugar, vanilla extract, and salt until slightly pale and thickened. This usually takes about 1-2 minutes of vigorous whisking.
- Slowly drizzle a small amount of the melted chocolate mixture into the egg yolk mixture while whisking constantly. This process is called tempering and prevents the egg yolks from scrambling when added to the hot chocolate. Continue adding the chocolate mixture in a slow, steady stream until fully incorporated.
- Pour the chocolate mixture into silicone molds. I like to use mini muffin tins or small silicone ice cube trays. This makes it easy to pop them out later. Fill each mold almost to the top.
- Place the molds in the freezer for at least 2 hours, or preferably overnight. The lava centers need to be completely frozen solid for easy handling.
- In a large bowl (or the bowl of a stand mixer), cream together the softened butter, granulated sugar, and brown sugar until light and fluffy. This usually takes about 3-5 minutes. Make sure to scrape down the sides of the bowl occasionally to ensure everything is evenly mixed.
- Beat in the eggs one at a time, mixing well after each addition. Then, stir in the vanilla extract and almond extract (if using). The almond extract really enhances the chocolate flavor, so I highly recommend it!
- In a separate bowl, whisk together the flour, cocoa powder, baking soda, and salt. This ensures that the baking soda and salt are evenly distributed throughout the dough.
- Gradually add the dry ingredients to the wet ingredients, mixing on low speed until just combined. Be careful not to overmix the dough, as this can result in tough cookies.
- Stir in the semi-sweet chocolate chips until evenly distributed throughout the dough.
- Cover the bowl with plastic wrap and chill the dough in the refrigerator for at least 30 minutes. This will help prevent the cookies from spreading too much during baking. You can chill it for longer, even overnight, if you prefer.
- Preheat your oven to 350°F (175°C). Line baking sheets with parchment paper or silicone baking mats.
- Scoop out about 2 tablespoons of cookie dough. Flatten the dough slightly into a disc shape in the palm of your hand.
- Remove the frozen chocolate lava centers from the molds. Place one frozen lava center in the middle of the flattened cookie dough disc.
- Gently wrap the cookie dough around the frozen lava center, completely sealing it in. Make sure there are no cracks or openings, or the lava center will leak out during baking. Roll the dough into a smooth ball.
- Place the cookie dough balls on the prepared baking sheets, leaving about 2 inches between each cookie.
- Bake for 10-12 minutes, or until the edges of the cookies are set but the centers are still slightly soft. Be careful not to overbake, as you want the lava center to remain molten.
- Let the cookies cool on the baking sheets for a few minutes before transferring them to a wire rack to cool completely. However, they are best enjoyed warm, when the lava center is still gooey and molten.
Notes
- Don’t Overbake: The key to a perfect lava cake cookie is to not overbake them. The edges should be set, but the center should still be soft. If you overbake them, the lava center will be cooked through and won’t be as gooey.
- Freeze the Lava Centers Well: Make sure the lava centers are completely frozen solid before wrapping them in the cookie dough. This will make them easier to handle and prevent them from melting too quickly during baking.
- Use High-Quality Chocolate: The quality of the chocolate you use will greatly affect the flavor of the cookies. Use a good-quality bittersweet chocolate for the lava centers and semi-sweet chocolate chips for the dough.
- Chill the Dough: Chilling the dough is important for preventing the cookies from spreading too much during baking. It also allows the flavors to meld together.
- Make Ahead: You can make the cookie dough and lava centers ahead of time and store them in the refrigerator or freezer until you’re ready to bake.
- Serving Suggestions: These cookies are delicious on their own, but you can also serve them with a scoop of vanilla ice cream, a dusting of powdered sugar, or a drizzle of chocolate sauce.
- Prep Time: 45 minutes
- Cook Time: 12 minutes

Leave a Comment