
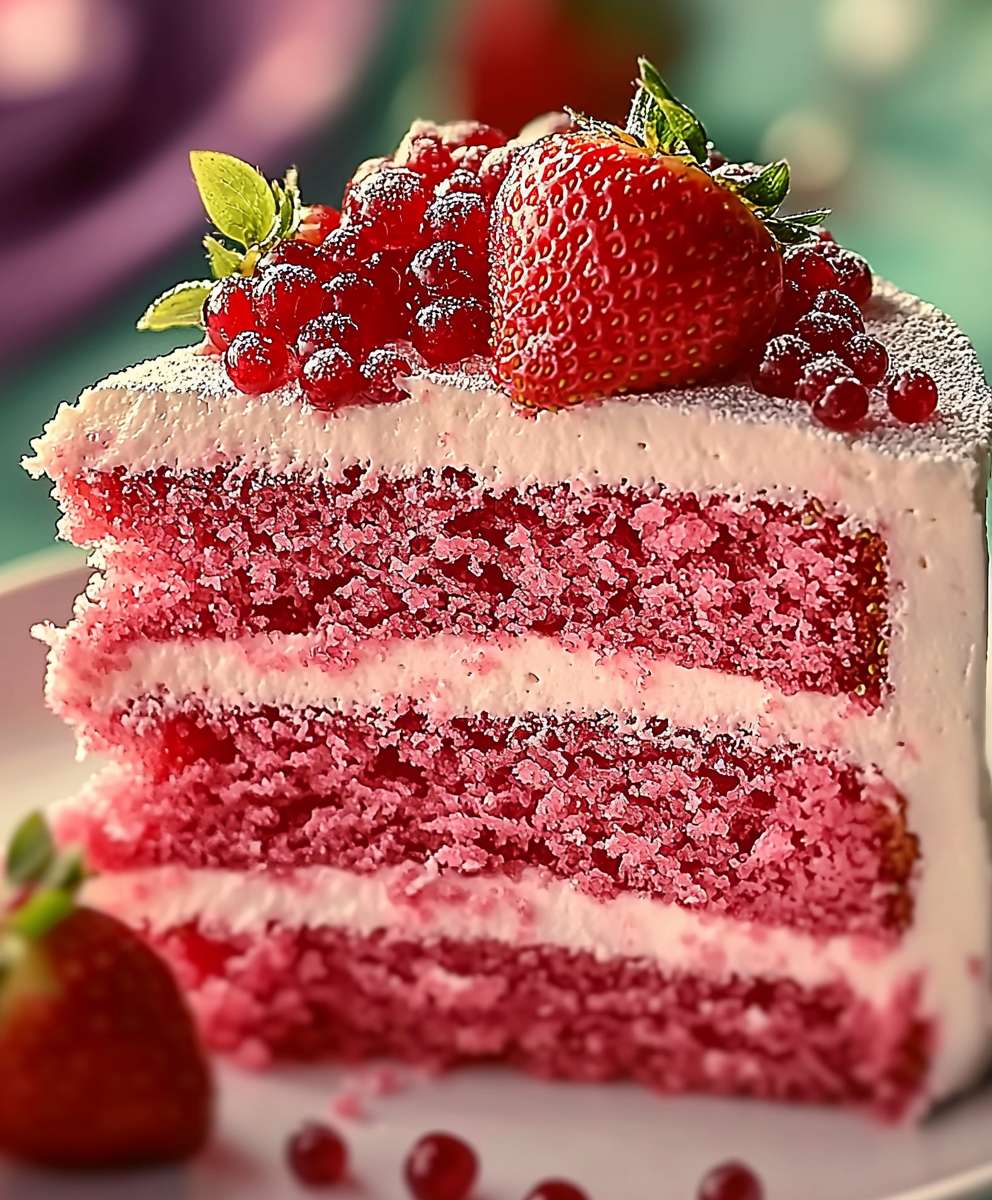
Strawberry Layer Cake: just the name conjures up images of sunshine, picnics, and pure, unadulterated joy, doesn’t it? Imagine sinking your fork into a cloud of fluffy, vanilla-infused cake, layered with sweet, juicy strawberries and a luscious, creamy frosting. This isn’t just dessert; it’s an experience, a celebration of simple pleasures, and a guaranteed crowd-pleaser.
While the exact origins of layer cakes are debated, the concept of stacking cakes with fillings dates back centuries. Strawberries, however, have long been associated with love and fertility, making a Strawberry Layer Cake the perfect centerpiece for special occasions. From birthdays to anniversaries, this cake speaks volumes.
What makes this dessert so universally loved? It’s the perfect balance of flavors and textures. The slight tang of the strawberries cuts through the richness of the cake and frosting, creating a symphony in your mouth. Plus, let’s be honest, it’s visually stunning! A beautifully decorated Strawberry Layer Cake is a showstopper that will impress your guests and leave them wanting more. I find that it is also a very versatile dessert. You can use fresh or frozen strawberries, and you can customize the frosting to your liking. Whether you’re a seasoned baker or just starting out, this recipe is sure to become a favorite.
Ingredients:
- For the Cake Layers:
- 2 1/2 cups all-purpose flour
- 1 teaspoon baking powder
- 1/2 teaspoon baking soda
- 1/4 teaspoon salt
- 1 cup (2 sticks) unsalted butter, softened
- 1 3/4 cups granulated sugar
- 2 large eggs
- 1 teaspoon vanilla extract
- 1 cup buttermilk
- 1/2 cup strawberry puree (from about 1 pint fresh strawberries)
- 1/4 teaspoon red food coloring (optional, for enhanced color)
- For the Strawberry Cream Cheese Frosting:
- 8 ounces cream cheese, softened
- 1 cup (2 sticks) unsalted butter, softened
- 4 cups powdered sugar
- 1 teaspoon vanilla extract
- 1/2 cup strawberry puree (from about 1 pint fresh strawberries)
- Pinch of salt
- For the Strawberry Filling:
- 1 pint fresh strawberries, hulled and sliced
- 1/4 cup granulated sugar
- 1 tablespoon lemon juice
- For Decoration (Optional):
- Fresh strawberries
- Edible flowers
- Strawberry jam, warmed and strained
Preparing the Strawberry Filling:
- Combine Strawberries, Sugar, and Lemon Juice: In a medium bowl, gently toss the sliced strawberries with the 1/4 cup of granulated sugar and 1 tablespoon of lemon juice. The sugar will help draw out the natural juices from the strawberries, creating a delicious and slightly syrupy filling.
- Let the Mixture Macerate: Allow the strawberry mixture to sit at room temperature for at least 30 minutes, or up to an hour. This maceration process intensifies the strawberry flavor and softens the berries slightly. Stir occasionally to ensure the sugar is evenly distributed.
- Drain Excess Liquid (Optional): If the strawberry mixture has released a significant amount of liquid, you can drain some of it off before using it as a filling. This will prevent the cake layers from becoming soggy. However, don’t discard the liquid! You can use it to brush over the cake layers for added moisture and strawberry flavor.
Making the Cake Layers:
- Preheat Oven and Prepare Pans: Preheat your oven to 350°F (175°C). Grease and flour three 8-inch round cake pans. You can also line the bottoms of the pans with parchment paper rounds for easy release. This is a crucial step to prevent the cakes from sticking.
- Whisk Dry Ingredients: In a medium bowl, whisk together the flour, baking powder, baking soda, and salt. Whisking ensures that the leavening agents are evenly distributed throughout the flour, which is essential for a light and airy cake.
- Cream Butter and Sugar: In a large bowl, using an electric mixer, cream together the softened butter and sugar until light and fluffy. This usually takes about 3-5 minutes. The mixture should be pale in color and significantly increased in volume. This step is important for incorporating air into the batter, which contributes to the cake’s texture.
- Add Eggs and Vanilla: Beat in the eggs one at a time, mixing well after each addition. Then, stir in the vanilla extract. Make sure each egg is fully incorporated before adding the next to prevent the batter from curdling.
- Alternate Adding Dry and Wet Ingredients: Gradually add the dry ingredients to the wet ingredients, alternating with the buttermilk, beginning and ending with the dry ingredients. Mix until just combined. Be careful not to overmix, as this can develop the gluten in the flour and result in a tough cake. Start by adding about one-third of the dry ingredients, then half of the buttermilk, then another third of the dry ingredients, the remaining buttermilk, and finally the last of the dry ingredients.
- Incorporate Strawberry Puree and Food Coloring (Optional): Gently fold in the strawberry puree and red food coloring (if using) until evenly distributed. The strawberry puree adds moisture and flavor to the cake, while the food coloring enhances the pink hue.
- Divide Batter Evenly: Divide the batter evenly among the prepared cake pans. I like to use a kitchen scale to ensure that each pan has the same amount of batter, which will result in evenly baked layers.
- Bake the Cakes: Bake for 25-30 minutes, or until a wooden skewer inserted into the center comes out clean. The cakes should be golden brown on top and spring back lightly when touched.
- Cool the Cakes: Let the cakes cool in the pans for 10 minutes before inverting them onto a wire rack to cool completely. Cooling the cakes completely before frosting is essential to prevent the frosting from melting.
Preparing the Strawberry Cream Cheese Frosting:
- Cream Cheese and Butter: In a large bowl, using an electric mixer, beat together the softened cream cheese and butter until smooth and creamy. Make sure both the cream cheese and butter are at room temperature to prevent lumps in the frosting.
- Add Powdered Sugar: Gradually add the powdered sugar, one cup at a time, beating well after each addition. Start on low speed to prevent the powdered sugar from creating a cloud.
- Incorporate Vanilla and Strawberry Puree: Stir in the vanilla extract and strawberry puree. Mix until well combined. The strawberry puree adds a delicious strawberry flavor to the frosting.
- Add Salt: Add a pinch of salt to balance the sweetness.
- Adjust Consistency: If the frosting is too thick, add a tablespoon of milk or cream at a time until you reach the desired consistency. If it’s too thin, add a little more powdered sugar.
- Chill (Optional): If the frosting is too soft, chill it in the refrigerator for 30 minutes to an hour before using. This will make it easier to spread.
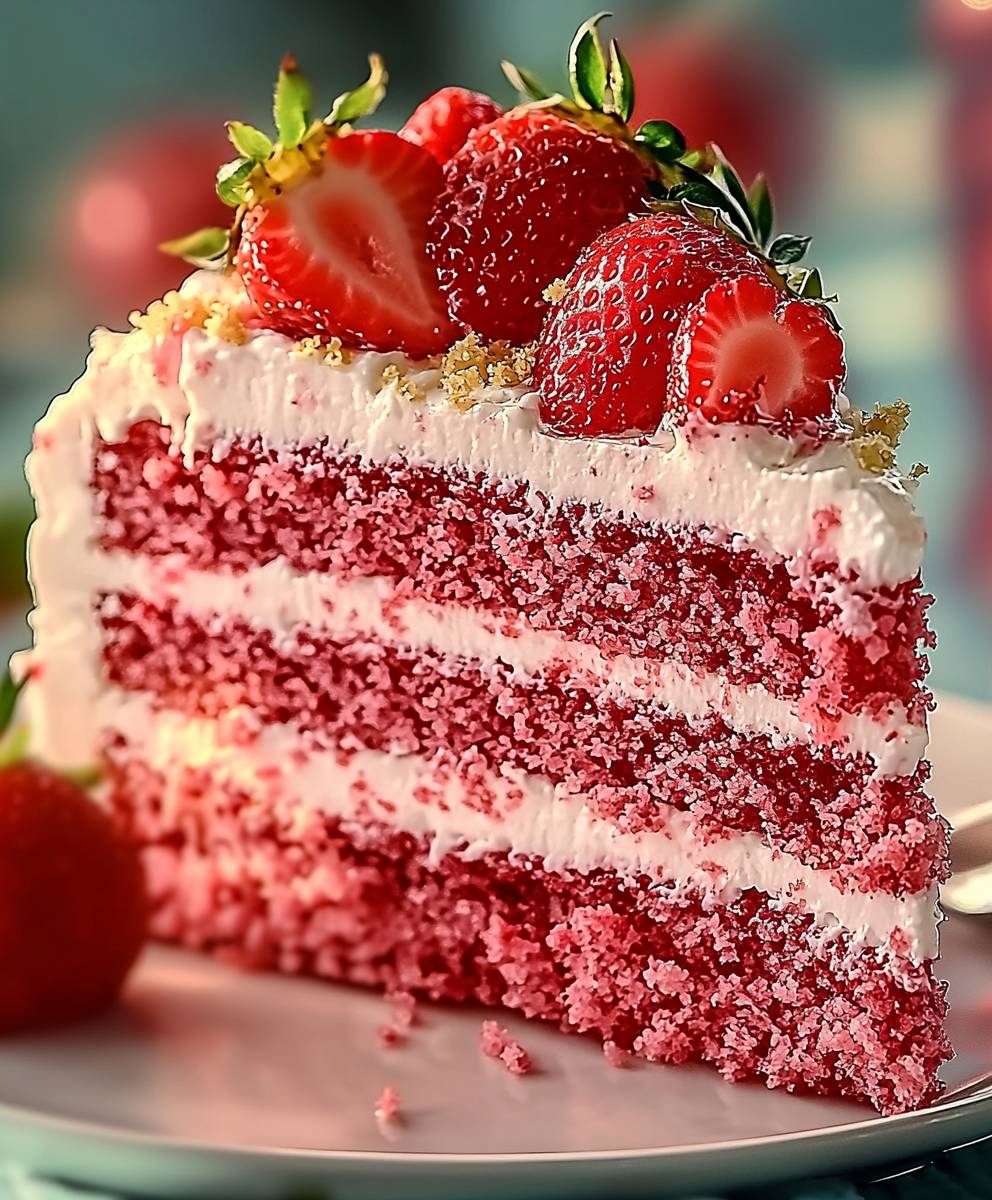
Assembling the Strawberry Layer Cake:
- Level the Cake Layers (Optional): If the cake layers are uneven, use a serrated knife to level the tops. This will ensure that the cake is stable and that the frosting is evenly distributed.
- Place First Layer on Serving Plate: Place one cake layer on a serving plate or cake stand.
- Add First Layer of Frosting: Spread a generous layer of strawberry cream cheese frosting evenly over the first cake layer.
- Add Strawberry Filling: Arrange half of the sliced strawberries over the frosting.
- Repeat Layers: Place the second cake layer on top of the strawberry filling. Repeat the frosting and strawberry filling layers.
- Top with Final Cake Layer: Place the final cake layer on top.
- Frost the Cake: Frost the entire cake with the remaining strawberry cream cheese frosting. You can create a smooth finish or a textured look, depending on your preference.
- Decorate (Optional): Decorate the cake with fresh strawberries, edible flowers, or a drizzle of warmed and strained strawberry jam. Get creative and have fun with it!
- Chill Before Serving: Chill the cake in the refrigerator for at least 30 minutes before serving. This will allow the frosting to set and the flavors to meld together.
- Slice and Serve: Slice the cake and serve. Enjoy!
Conclusion:
This Strawberry Layer Cake isn’t just a dessert; it’s a celebration on a plate, a burst of summer sunshine in every bite, and a guaranteed crowd-pleaser. From the tender, moist cake layers infused with real strawberry flavor to the luscious, creamy frosting, this recipe is a symphony of textures and tastes that will leave you wanting more. I truly believe this is a must-try for anyone who loves baking, or simply appreciates a truly delicious cake. Why is it a must-try? Because it’s more than just following instructions; it’s about creating something beautiful and delicious from scratch. It’s about the satisfaction of seeing the layers rise perfectly in the oven, the joy of swirling the frosting into elegant peaks, and the delight of sharing your creation with loved ones. The fresh strawberry puree in both the cake and the frosting elevates this cake beyond the ordinary, giving it a vibrant, authentic flavor that you just can’t get from artificial ingredients. Trust me, the extra effort is absolutely worth it! But the best part? It’s incredibly versatile! While I’ve shared my go-to recipe, feel free to experiment and make it your own. For a more intense strawberry flavor, consider adding a layer of homemade strawberry jam between the cake layers. Or, if you’re feeling adventurous, try incorporating other berries like raspberries or blueberries for a mixed berry sensation. Serving Suggestions and Variations: * Classic Presentation: Serve slices of the cake chilled or at room temperature with a dollop of whipped cream and a fresh strawberry garnish. * Elegant Touch: Drizzle a light strawberry sauce over each slice for an extra layer of flavor and visual appeal. * Summer Picnic: Pack individual slices in containers for a delightful treat at your next outdoor gathering. * Chocolate Twist: Add a hint of cocoa powder to the cake batter for a chocolate-strawberry combination. * Lemon Zest: Incorporate lemon zest into the frosting for a bright, citrusy counterpoint to the sweetness of the strawberries. * Mini Cakes: Bake the batter in muffin tins for adorable individual strawberry cakes. Adjust baking time accordingly. * Frosting Fun: Instead of the classic buttercream, try a cream cheese frosting for a tangier flavor profile. I’m so excited for you to try this recipe and experience the magic of this Strawberry Layer Cake for yourself. It’s perfect for birthdays, holidays, or any occasion that calls for a special treat. Don’t be intimidated by the multiple steps; I’ve broken it down into easy-to-follow instructions, and I’m confident that you’ll be able to create a stunning and delicious cake that you’ll be proud to share. So, grab your apron, preheat your oven, and get ready to embark on a baking adventure! And most importantly, don’t forget to share your creations with me! I’d love to see your photos and hear about your experiences. Tag me on social media using #StrawberryLayerCake or leave a comment below to let me know how it turned out. Happy baking! I can’t wait to see your beautiful cakes! Print
Strawberry Layer Cake: A Delicious & Easy Recipe
- Total Time: 240 minutes
- Yield: 12–16 servings 1x
Description
Moist strawberry cake layers with strawberry cream cheese frosting and fresh strawberry filling. Perfect for celebrations!
Ingredients
- 2 1/2 cups all-purpose flour
- 1 teaspoon baking powder
- 1/2 teaspoon baking soda
- 1/4 teaspoon salt
- 1 cup (2 sticks) unsalted butter, softened
- 1 1/4 cups granulated sugar
- 2 large eggs
- 1 teaspoon vanilla extract
- 1 cup buttermilk
- 1/2 cup strawberry puree (from about 1 pint fresh strawberries)
- 1/4 teaspoon red food coloring (optional, for enhanced color)
- 8 ounces cream cheese, softened
- 1 cup (2 sticks) unsalted butter, softened
- 4 cups powdered sugar
- 1 teaspoon vanilla extract
- 1/2 cup strawberry puree (from about 1 pint fresh strawberries)
- Pinch of salt
- 1 pint fresh strawberries, hulled and sliced
- 1/4 cup granulated sugar
- 1 tablespoon lemon juice
- Fresh strawberries
- Edible flowers
- Strawberry jam, warmed and strained
Instructions
- Combine Strawberries, Sugar, and Lemon Juice: In a medium bowl, gently toss the sliced strawberries with the 1/4 cup of granulated sugar and 1 tablespoon of lemon juice.
- Let the Mixture Macerate: Allow the strawberry mixture to sit at room temperature for at least 30 minutes, or up to an hour. Stir occasionally.
- Drain Excess Liquid (Optional): If the strawberry mixture has released a significant amount of liquid, you can drain some of it off before using it as a filling. Reserve the liquid for brushing the cake layers.
- Preheat Oven and Prepare Pans: Preheat your oven to 350°F (175°C). Grease and flour three 8-inch round cake pans, lining the bottoms with parchment paper rounds.
- Whisk Dry Ingredients: In a medium bowl, whisk together the flour, baking powder, baking soda, and salt.
- Cream Butter and Sugar: In a large bowl, using an electric mixer, cream together the softened butter and sugar until light and fluffy (3-5 minutes).
- Add Eggs and Vanilla: Beat in the eggs one at a time, mixing well after each addition. Then, stir in the vanilla extract.
- Alternate Adding Dry and Wet Ingredients: Gradually add the dry ingredients to the wet ingredients, alternating with the buttermilk, beginning and ending with the dry ingredients. Mix until just combined.
- Incorporate Strawberry Puree and Food Coloring (Optional): Gently fold in the strawberry puree and red food coloring (if using) until evenly distributed.
- Divide Batter Evenly: Divide the batter evenly among the prepared cake pans.
- Bake the Cakes: Bake for 25-30 minutes, or until a wooden skewer inserted into the center comes out clean.
- Cool the Cakes: Let the cakes cool in the pans for 10 minutes before inverting them onto a wire rack to cool completely.
- Cream Cheese and Butter: In a large bowl, using an electric mixer, beat together the softened cream cheese and butter until smooth and creamy.
- Add Powdered Sugar: Gradually add the powdered sugar, one cup at a time, beating well after each addition.
- Incorporate Vanilla and Strawberry Puree: Stir in the vanilla extract and strawberry puree. Mix until well combined.
- Add Salt: Add a pinch of salt to balance the sweetness.
- Adjust Consistency: If the frosting is too thick, add a tablespoon of milk or cream at a time until you reach the desired consistency. If it’s too thin, add a little more powdered sugar.
- Chill (Optional): If the frosting is too soft, chill it in the refrigerator for 30 minutes to an hour before using.
- Level the Cake Layers (Optional): If the cake layers are uneven, use a serrated knife to level the tops.
- Place First Layer on Serving Plate: Place one cake layer on a serving plate or cake stand.
- Add First Layer of Frosting: Spread a generous layer of strawberry cream cheese frosting evenly over the first cake layer.
- Add Strawberry Filling: Arrange half of the sliced strawberries over the frosting.
- Repeat Layers: Place the second cake layer on top of the strawberry filling. Repeat the frosting and strawberry filling layers.
- Top with Final Cake Layer: Place the final cake layer on top.
- Frost the Cake: Frost the entire cake with the remaining strawberry cream cheese frosting.
- Decorate (Optional): Decorate the cake with fresh strawberries, edible flowers, or a drizzle of warmed and strained strawberry jam.
- Chill Before Serving: Chill the cake in the refrigerator for at least 30 minutes before serving.
- Slice and Serve: Slice the cake and serve.
Notes
- Make sure all refrigerated ingredients (butter, cream cheese, buttermilk, eggs) are at room temperature for best results.
- Don’t overmix the cake batter, as this can lead to a tough cake.
- If you don’t have buttermilk, you can make a substitute by adding 1 tablespoon of lemon juice or white vinegar to a liquid measuring cup, then filling the cup to the 1-cup line with milk. Let it sit for 5 minutes before using.
- Adjust the amount of strawberry puree in the frosting to your liking.
- For a more intense strawberry flavor, brush the cake layers with the reserved liquid from the macerated strawberries before frosting.
- Prep Time: 1 hour
- Cook Time: 30 minutes

Leave a Comment