
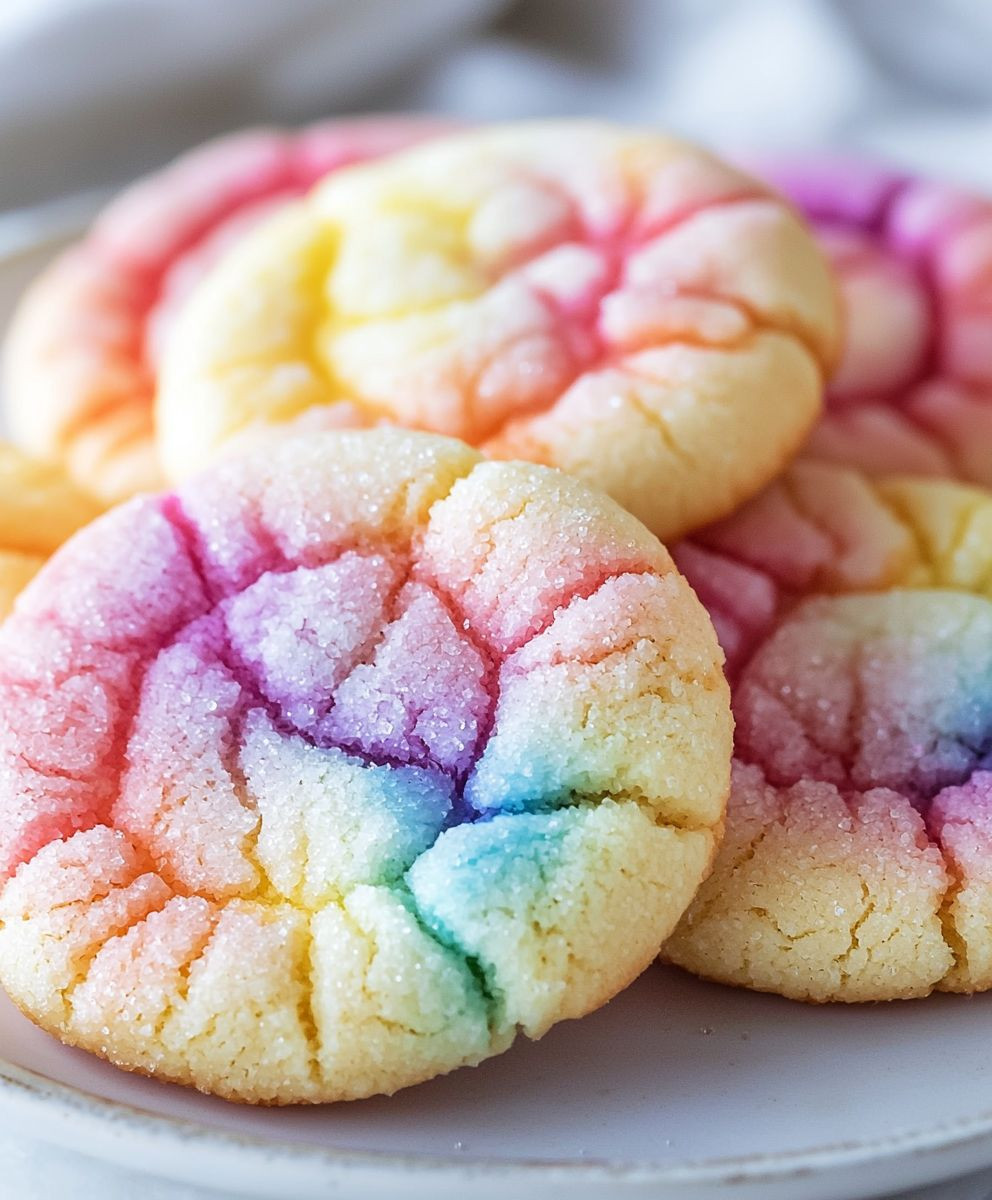
Tie Dye Cookies: Prepare to be amazed! Imagine biting into a soft, chewy sugar cookie that explodes with vibrant colors, a swirling kaleidoscope of sweetness that’s as fun to look at as it is to eat. These aren’t your average cookies; they’re edible works of art that are guaranteed to be the star of any party, bake sale, or even just a cozy night in.
While the exact origins of tie-dye patterns on food are difficult to pinpoint, the spirit of tie-dye itself is rooted in ancient resist-dyeing techniques found across various cultures. The modern tie-dye craze, however, blossomed in the 1960s, becoming a symbol of peace, love, and individuality. Bringing that same free-spirited energy to baking, tie dye cookies offer a delightful way to express your creativity and add a touch of whimsy to a classic treat.
What makes these cookies so irresistible? Beyond their stunning visual appeal, they boast a melt-in-your-mouth texture and a subtly sweet flavor that perfectly complements the colorful swirls. They are surprisingly easy to make, making them a fantastic project for bakers of all skill levels, especially when you want to impress your friends and family. Plus, who can resist the sheer joy of creating something so beautiful and delicious? Get ready to unleash your inner artist and bake up a batch of these unforgettable cookies!

Ingredients:
- For the Cookie Dough:
- 3 cups all-purpose flour
- 1 teaspoon baking soda
- 1/2 teaspoon salt
- 1 cup (2 sticks) unsalted butter, softened
- 1 1/2 cups granulated sugar
- 2 large eggs
- 1 teaspoon vanilla extract
- For the Tie Dye Effect:
- Gel food coloring (red, blue, green, yellow, purple or your favorite colors!)
- Optional Decorations:
- Sprinkles
- Edible glitter
Preparing the Cookie Dough:
- Combine Dry Ingredients: In a medium bowl, whisk together the flour, baking soda, and salt. This ensures that the baking soda and salt are evenly distributed throughout the flour, which is crucial for the cookies to rise properly and have a consistent flavor. Set this bowl aside for later.
- Cream Butter and Sugar: In a large bowl (or the bowl of your stand mixer), cream together the softened butter and granulated sugar until light and fluffy. This usually takes about 3-5 minutes. The mixture should be pale and airy. This step is important because it incorporates air into the dough, which helps to create a tender cookie. Make sure your butter is truly softened, but not melted. Melted butter will result in flat cookies.
- Add Eggs and Vanilla: Beat in the eggs one at a time, making sure each egg is fully incorporated before adding the next. Then, stir in the vanilla extract. The vanilla extract enhances the flavor of the cookies, so don’t skip it!
- Gradually Add Dry Ingredients: Gradually add the dry ingredients to the wet ingredients, mixing on low speed until just combined. Be careful not to overmix the dough, as this can develop the gluten in the flour and result in tough cookies. Mix until you no longer see streaks of flour.
- Chill the Dough: Wrap the dough in plastic wrap and chill in the refrigerator for at least 30 minutes. Chilling the dough helps to prevent the cookies from spreading too much during baking. It also makes the dough easier to handle. You can chill the dough for longer, even overnight, if needed.
Creating the Tie Dye Effect:
- Divide the Dough: Divide the chilled cookie dough into equal portions, one for each color you plan to use. For example, if you’re using five colors, divide the dough into five equal parts.
- Color the Dough: Add a few drops of gel food coloring to each portion of dough. Use a toothpick or small spoon to mix the color into the dough until it’s evenly distributed. Be careful not to add too much food coloring at once, as this can make the dough sticky. You can always add more color if needed. I recommend using gel food coloring because it’s more concentrated than liquid food coloring and won’t change the consistency of the dough as much.
- Combine the Colors: This is where the fun begins! Take small pieces of each colored dough and gently press them together. Don’t overmix them, as you want to maintain the distinct colors. The goal is to create a marbled effect.
- Form the Cookies: Roll the combined dough into balls, about 1-2 inches in diameter. Place the cookie dough balls onto a baking sheet lined with parchment paper.
- Slightly Flatten: Gently flatten the cookie dough balls with your hand or the bottom of a glass. This will help them bake evenly.
Baking the Cookies:
- Preheat Oven: Preheat your oven to 375°F (190°C). Make sure your oven is properly preheated before baking the cookies, as this will ensure that they bake evenly.
- Arrange Cookies on Baking Sheet: Place the cookie dough balls onto a baking sheet lined with parchment paper, leaving about 2 inches of space between each cookie. This will allow the cookies to spread slightly during baking without sticking together.
- Bake: Bake for 8-10 minutes, or until the edges are lightly golden brown. Keep a close eye on the cookies, as they can burn easily. The baking time may vary depending on your oven.
- Cool: Remove the baking sheet from the oven and let the cookies cool on the baking sheet for a few minutes before transferring them to a wire rack to cool completely. This will prevent the cookies from breaking apart.
Optional Decorations:
- Add Sprinkles (Optional): While the cookies are still warm, you can sprinkle them with sprinkles or edible glitter. The warmth of the cookies will help the sprinkles adhere to the surface.
- Frosting (Optional): If you want to add frosting, let the cookies cool completely before frosting them. You can use a simple buttercream frosting or a more elaborate frosting recipe.
Tips for Perfect Tie Dye Cookies:
- Don’t Overmix: Overmixing the dough can result in tough cookies. Mix until just combined.
- Chill the Dough: Chilling the dough is essential for preventing the cookies from spreading too much during baking.
- Use Gel Food Coloring: Gel food coloring is more concentrated than liquid food coloring and won’t change the consistency of the dough as much.
- Don’t Overbake: Overbaking the cookies can make them dry and crumbly. Bake until the edges are lightly golden brown.
- Let Cool Completely: Let the cookies cool completely before storing them. This will prevent them from becoming soggy.
Storage Instructions:
Store the cooled cookies in an airtight container at room temperature for up to 5 days. You can also freeze the cookies for longer storage. To freeze, place the cookies in a single layer on a baking sheet and freeze until solid. Then, transfer the frozen cookies to a freezer-safe bag or container. The cookies can be frozen for up to 3 months.
Variations:
- Chocolate Chip Tie Dye Cookies: Add chocolate chips to the cookie dough for a chocolatey twist.
- Peanut Butter Tie Dye Cookies: Add peanut butter to the cookie dough for a nutty flavor.
- Gluten-Free Tie Dye Cookies: Use gluten-free flour to make gluten-free tie dye cookies.
- Vegan Tie Dye Cookies: Use vegan butter and egg replacer to make vegan tie dye cookies.
Troubleshooting:
- Cookies are spreading too much: Make sure you’re chilling the dough for at least 30 minutes. You can also add a tablespoon or two of flour to the dough if it’s too sticky.
- Cookies are too dry: Don’t overbake the cookies. Bake until the edges are lightly golden brown.
- Cookies are too tough: Don’t overmix the dough. Mix until just combined.
- Colors are blending together too much: Be gentle when combining the colored dough. Don’t overmix them.
Conclusion:
So, there you have it! This Tie Dye Cookies recipe isn’t just about baking; it’s about creating edible art, a burst of color and joy in every bite. I truly believe this is a must-try recipe for anyone looking to add a little fun and whimsy to their baking repertoire. The vibrant swirls are guaranteed to impress, and the delicious, buttery flavor will keep everyone coming back for more. But why is this recipe a must-try, you ask? Well, beyond the sheer visual appeal, these cookies are surprisingly easy to make. The dough comes together quickly, and the tie-dye effect is simpler than it looks. Plus, it’s a fantastic activity to do with kids! Imagine the delight on their faces as they watch the colors blend and swirl together. It’s a baking project that’s as enjoyable to create as it is to eat. And the best part? The possibilities are endless! While I’ve shared my favorite color combinations, feel free to experiment with your own. Think pastel hues for a springtime treat, or bold, contrasting colors for a truly eye-catching effect. You could even tailor the colors to match a specific theme or holiday. Imagine red, white, and blue tie-dye cookies for the Fourth of July, or orange and black for Halloween! Beyond the colors, you can also play around with the flavors. Add a touch of lemon zest to the dough for a citrusy twist, or incorporate some chocolate chips for a richer, more decadent cookie. For a festive touch, consider adding sprinkles or edible glitter after baking. As for serving suggestions, these Tie Dye Cookies are perfect for any occasion. They make a delightful addition to a cookie platter, a charming gift for friends and family, or simply a fun treat to enjoy with a cup of coffee or tea. They’re also a great option for bake sales or school events, where their vibrant colors are sure to attract attention. Consider serving them with a scoop of vanilla ice cream for a truly indulgent dessert. Or, for a more sophisticated presentation, arrange them on a tiered stand with other colorful treats. You could even use them as edible decorations for a birthday cake or other special occasion. I’m so excited for you to try this recipe and experience the joy of creating your own tie-dye masterpieces. I truly believe that baking should be fun and creative, and this recipe embodies that spirit perfectly. So, what are you waiting for? Gather your ingredients, preheat your oven, and get ready to unleash your inner artist! I promise you won’t be disappointed. And most importantly, I’d love to hear about your experience! Once you’ve tried the recipe, please share your photos and comments with me. Let me know what color combinations you used, what variations you tried, and how much everyone loved them. Your feedback is invaluable, and it helps me to continue creating recipes that you’ll love. You can find me on [Social Media Platform 1] and [Social Media Platform 2] tag me in your posts! I can’t wait to see your beautiful Tie Dye Cookies creations! Happy baking! Print
Tie Dye Cookies: The Ultimate Guide to Swirling Success
- Total Time: 60 minutes
- Yield: 24 cookies 1x
Description
Fun and colorful tie-dye cookies that are as delicious as they are beautiful! Perfect for parties or a fun baking project.
Ingredients
- 3 cups all-purpose flour
- 1 teaspoon baking soda
- 1/2 teaspoon salt
- 1 cup (2 sticks) unsalted butter, softened
- 1 1/2 cups granulated sugar
- 2 large eggs
- 1 teaspoon vanilla extract
- Gel food coloring (red, blue, green, yellow, purple or your favorite colors!)
- Sprinkles
- Edible glitter
Instructions
- Combine Dry Ingredients: In a medium bowl, whisk together the flour, baking soda, and salt. Set aside.
- Cream Butter and Sugar: In a large bowl (or stand mixer), cream together the softened butter and granulated sugar until light and fluffy (3-5 minutes).
- Add Eggs and Vanilla: Beat in the eggs one at a time, then stir in the vanilla extract.
- Gradually Add Dry Ingredients: Gradually add the dry ingredients to the wet ingredients, mixing on low speed until just combined. Be careful not to overmix the dough.
- Chill the Dough: Wrap the dough in plastic wrap and chill in the refrigerator for at least 30 minutes.
- Divide the Dough: Divide the chilled cookie dough into equal portions, one for each color you plan to use.
- Color the Dough: Add a few drops of gel food coloring to each portion of dough. Use a toothpick or small spoon to mix the color into the dough until it’s evenly distributed.
- Combine the Colors: Take small pieces of each colored dough and gently press them together. Don’t overmix them, as you want to maintain the distinct colors. The goal is to create a marbled effect.
- Form the Cookies: Roll the combined dough into balls, about 1-2 inches in diameter. Place the cookie dough balls onto a baking sheet lined with parchment paper.
- Slightly Flatten: Gently flatten the cookie dough balls with your hand or the bottom of a glass.
- Preheat Oven: Preheat your oven to 375°F (190°C).
- Arrange Cookies on Baking Sheet: Place the cookie dough balls onto a baking sheet lined with parchment paper, leaving about 2 inches of space between each cookie.
- Bake: Bake for 8-10 minutes, or until the edges are lightly golden brown.
- Cool: Remove the baking sheet from the oven and let the cookies cool on the baking sheet for a few minutes before transferring them to a wire rack to cool completely.
- Add Sprinkles (Optional): While the cookies are still warm, you can sprinkle them with sprinkles or edible glitter.
- Frosting (Optional): If you want to add frosting, let the cookies cool completely before frosting them. You can use a simple buttercream frosting or a more elaborate frosting recipe.
Notes
- Don’t Overmix: Overmixing the dough can result in tough cookies. Mix until just combined.
- Chill the Dough: Chilling the dough is essential for preventing the cookies from spreading too much during baking.
- Use Gel Food Coloring: Gel food coloring is more concentrated than liquid food coloring and won’t change the consistency of the dough as much.
- Don’t Overbake: Overbaking the cookies can make them dry and crumbly. Bake until the edges are lightly golden brown.
- Let Cool Completely: Let the cookies cool completely before storing them. This will prevent them from becoming soggy.
- Storage Instructions: Store the cooled cookies in an airtight container at room temperature for up to 5 days. You can also freeze the cookies for longer storage. To freeze, place the cookies in a single layer on a baking sheet and freeze until solid. Then, transfer the frozen cookies to a freezer-safe bag or container. The cookies can be frozen for up to 3 months.
- Variations:
- Chocolate Chip Tie Dye Cookies: Add chocolate chips to the cookie dough for a chocolatey twist.
- Peanut Butter Tie Dye Cookies: Add peanut butter to the cookie dough for a nutty flavor.
- Gluten-Free Tie Dye Cookies: Use gluten-free flour to make gluten-free tie dye cookies.
- Vegan Tie Dye Cookies: Use vegan butter and egg replacer to make vegan tie dye cookies.
- Troubleshooting:
- Cookies are spreading too much: Make sure you’re chilling the dough for at least 30 minutes. You can also add a tablespoon or two of flour to the dough if it’s too sticky.
- Cookies are too dry: Don’t overbake the cookies. Bake until the edges are lightly golden brown.
- Cookies are too tough: Don’t overmix the dough. Mix until just combined.
- Colors are blending together too much: Be gentle when combining the colored dough. Don’t overmix them.
- Prep Time: 30 minutes
- Cook Time: 8 minutes


Leave a Comment