
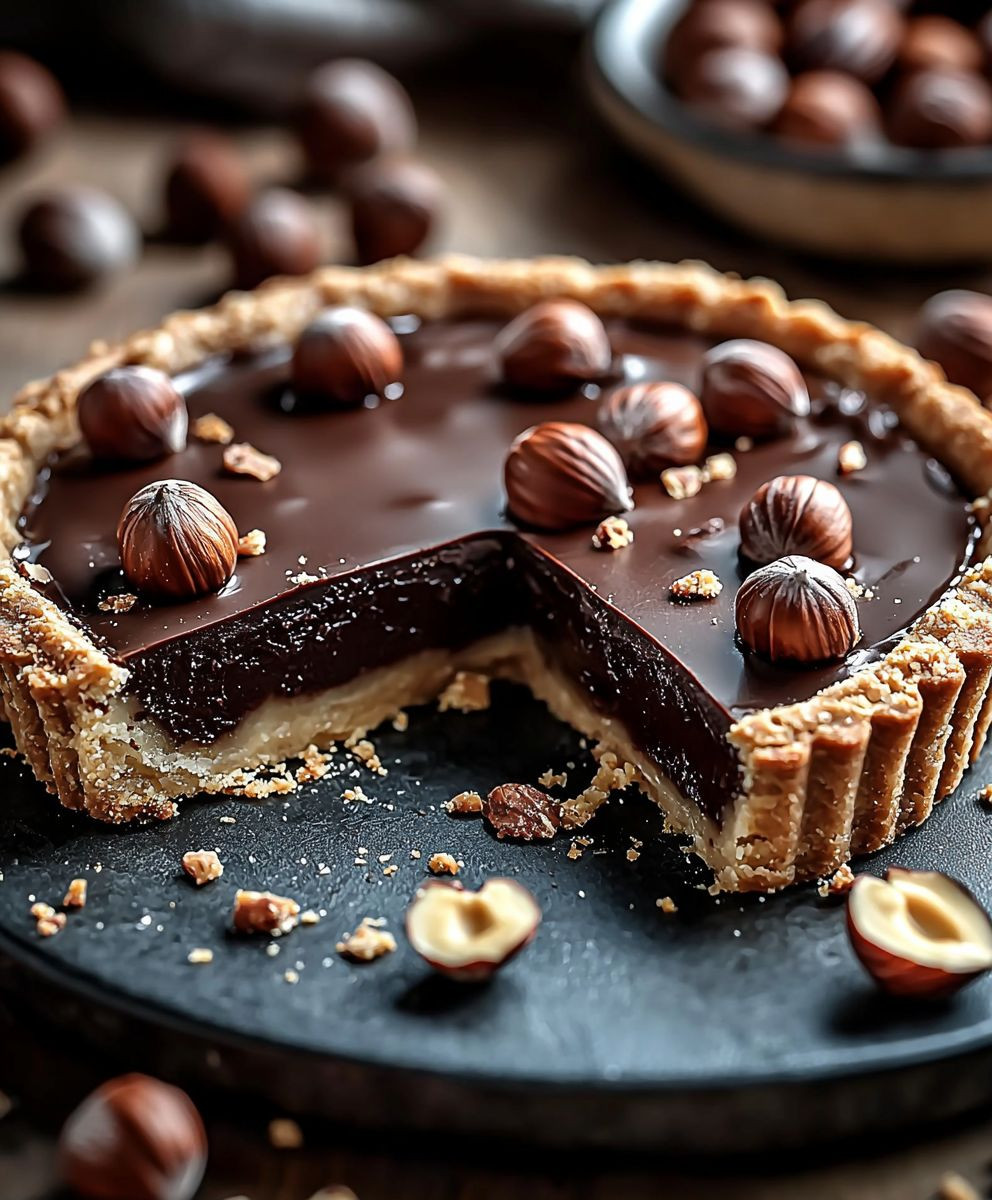
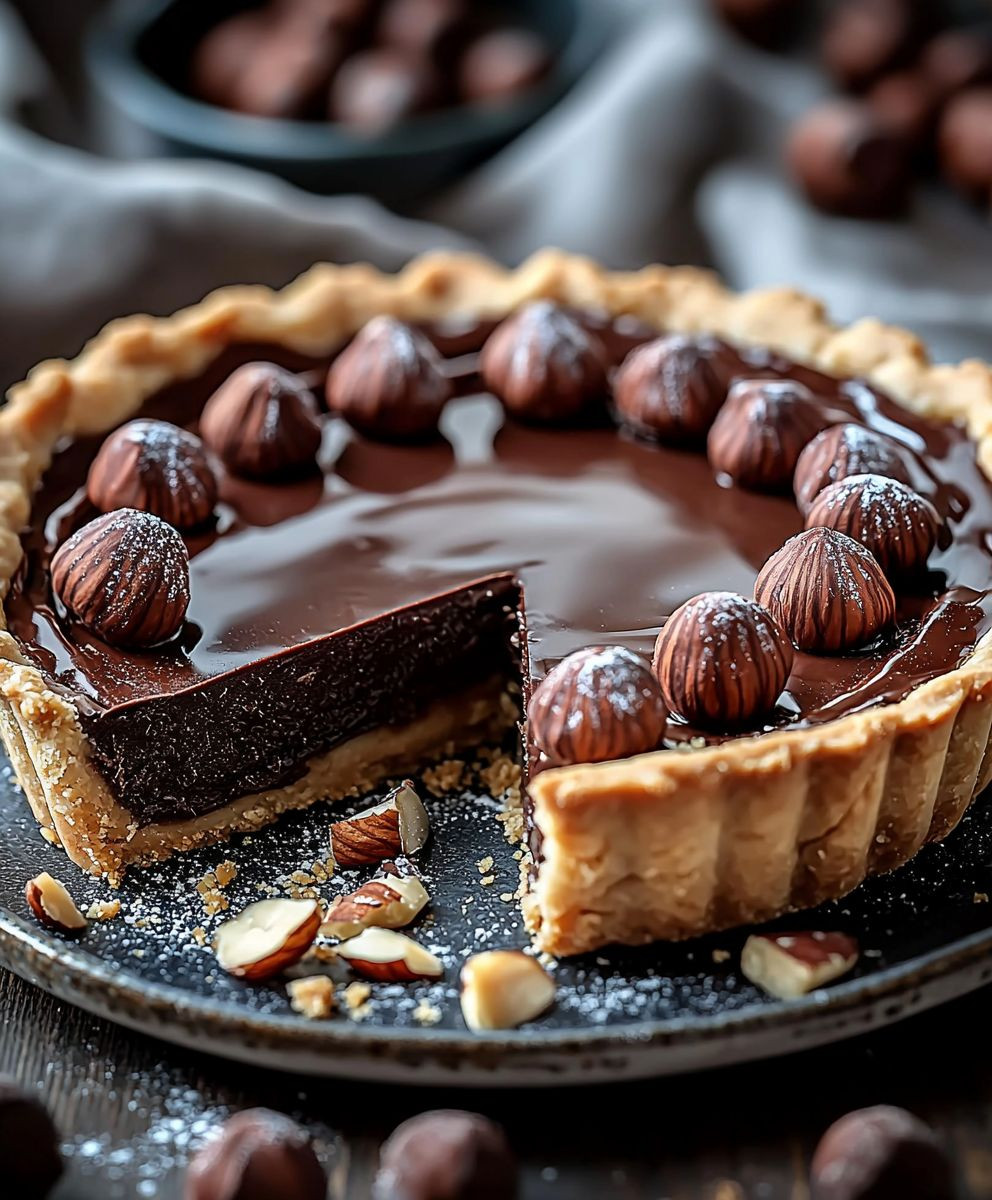
Hazelnut Chocolate Tart: just the name conjures images of decadent indulgence, doesn’t it? Imagine sinking your fork into a rich, velvety chocolate ganache, perfectly balanced by the nutty crunch of toasted hazelnuts, all nestled in a buttery, crisp crust. This isn’t just dessert; it’s an experience, a symphony of textures and flavors that will leave you craving more.
While the exact origins of the Hazelnut Chocolate Tart are debated, the combination of hazelnuts and chocolate has a long and storied history, particularly in European confectionery. Hazelnuts, prized for their delicate flavor and versatility, have been cultivated for centuries, and their marriage with chocolate, a New World treasure, created a culinary masterpiece. Think of the iconic Gianduja from Italy, a testament to the enduring love affair between these two ingredients.
But what is it about this particular tart that makes it so irresistible? For me, it’s the perfect balance. The bitterness of the dark chocolate is beautifully offset by the sweetness of the hazelnuts, and the buttery crust provides a delightful textural contrast. It’s elegant enough for a special occasion, yet simple enough to whip up for a weeknight treat. Plus, let’s be honest, who can resist the allure of chocolate and hazelnuts? Its a guaranteed crowd-pleaser, and I’m excited to share my version of this classic with you!
Ingredients:
- For the Crust:
- 1 1/2 cups (190g) all-purpose flour
- 1/2 cup (50g) confectioners’ sugar
- 1/4 teaspoon salt
- 1/2 cup (113g) cold unsalted butter, cut into cubes
- 1 large egg yolk
- 3-4 tablespoons ice water
- For the Hazelnut Filling:
- 1 cup (100g) hazelnuts, toasted and skinned
- 1/2 cup (100g) granulated sugar
- 1/4 cup (25g) all-purpose flour
- 1/4 teaspoon salt
- 1/2 cup (113g) unsalted butter, melted and cooled slightly
- 2 large eggs
- 1 teaspoon vanilla extract
- For the Chocolate Ganache:
- 8 ounces (225g) bittersweet chocolate, finely chopped
- 1 cup (240ml) heavy cream
- 2 tablespoons unsalted butter, softened
- 1 tablespoon light corn syrup (optional, for shine)
- For Decoration (Optional):
- Chopped toasted hazelnuts
- Cocoa powder
- Edible gold leaf
Preparing the Crust:
- Combine Dry Ingredients: In a large bowl, whisk together the flour, confectioners’ sugar, and salt. This ensures the sugar and salt are evenly distributed throughout the flour.
- Cut in the Butter: Add the cold, cubed butter to the dry ingredients. Using a pastry blender or your fingertips, cut the butter into the flour mixture until it resembles coarse crumbs. The butter should be in small pieces, about the size of peas. This is crucial for creating a flaky crust. If using your fingertips, work quickly to prevent the butter from melting.
- Add Egg Yolk and Ice Water: In a small bowl, whisk together the egg yolk and 3 tablespoons of ice water. Pour this mixture over the flour and butter mixture.
- Mix the Dough: Gently mix the ingredients together until the dough just comes together. Be careful not to overmix, as this will develop the gluten in the flour and result in a tough crust. If the dough is too dry, add the remaining tablespoon of ice water, one teaspoon at a time, until it forms a cohesive ball.
- Shape and Chill the Dough: Flatten the dough into a disc, wrap it tightly in plastic wrap, and chill in the refrigerator for at least 30 minutes, or preferably 1 hour. This allows the gluten to relax and prevents the crust from shrinking during baking.
- Roll Out the Dough: On a lightly floured surface, roll out the chilled dough into a 12-inch circle. The dough should be about 1/8 inch thick.
- Transfer to Tart Pan: Carefully transfer the rolled-out dough to a 9-inch tart pan with a removable bottom. Gently press the dough into the bottom and up the sides of the pan.
- Trim and Crimp the Edges: Trim any excess dough from the edges of the pan. You can use a rolling pin to roll over the top of the pan to trim the dough, or use a knife. Crimp the edges of the crust using a fork or your fingers to create a decorative border.
- Pre-Bake the Crust: Preheat your oven to 375°F (190°C). Line the tart crust with parchment paper and fill it with pie weights or dried beans. This will prevent the crust from puffing up during baking. Bake for 15 minutes.
- Remove Weights and Bake Again: Remove the parchment paper and pie weights. Bake for another 10-15 minutes, or until the crust is lightly golden brown. Watch it carefully to prevent burning.
- Cool the Crust: Let the crust cool completely in the tart pan on a wire rack before adding the filling.
Preparing the Hazelnut Filling:
- Prepare Hazelnuts: If you haven’t already, toast the hazelnuts. Preheat your oven to 350°F (175°C). Spread the hazelnuts on a baking sheet and toast for 10-12 minutes, or until the skins are cracked and fragrant. Let them cool slightly, then rub them in a clean kitchen towel to remove the skins. Don’t worry if you can’t get all the skins off.
- Grind Hazelnuts: In a food processor, grind the toasted and skinned hazelnuts until they are finely ground. Be careful not to over-process, as this can turn them into hazelnut butter. You want a fine, crumbly texture.
- Combine Dry Ingredients: In a medium bowl, whisk together the ground hazelnuts, granulated sugar, flour, and salt.
- Add Wet Ingredients: In a separate bowl, whisk together the melted and cooled butter, eggs, and vanilla extract.
- Combine Wet and Dry: Pour the wet ingredients into the dry ingredients and mix until just combined. Do not overmix.
- Pour Filling into Crust: Pour the hazelnut filling into the cooled tart crust, spreading it evenly.
- Bake the Tart: Bake in the preheated oven for 25-30 minutes, or until the filling is set and lightly golden brown. A toothpick inserted into the center should come out clean.
- Cool Completely: Let the tart cool completely on a wire rack before adding the chocolate ganache. This is important to prevent the ganache from melting.
Preparing the Chocolate Ganache:
- Chop the Chocolate: Finely chop the bittersweet chocolate and place it in a heatproof bowl. The finer the chocolate is chopped, the easier it will melt.
- Heat the Cream: In a saucepan, heat the heavy cream over medium heat until it just comes to a simmer. Do not boil.
- Pour Cream over Chocolate: Pour the hot cream over the chopped chocolate. Let it sit for 1 minute to allow the heat to melt the chocolate.
- Whisk Until Smooth: Gently whisk the cream and chocolate together until the chocolate is completely melted and the ganache is smooth and glossy.
- Add Butter and Corn Syrup: Add the softened butter and corn syrup (if using) to the ganache. Whisk until the butter is melted and the ganache is smooth and emulsified. The corn syrup will add a nice shine to the ganache.
- Let Ganache Cool Slightly: Let the ganache cool slightly for about 5-10 minutes before pouring it over the tart. This will help it thicken slightly and prevent it from running off the edges of the tart.
Assembling the Tart:
- Pour Ganache over Filling: Pour the slightly cooled chocolate ganache over the cooled hazelnut filling, spreading it evenly to cover the entire surface.
- Chill the Tart: Refrigerate the tart for at least 1 hour, or preferably 2 hours, to allow the ganache to set completely.
- Decorate (Optional): Before serving, decorate the tart with chopped toasted hazelnuts, a dusting of cocoa powder, or edible gold leaf, if desired.
- Serve: Carefully remove the tart from the tart pan by pushing up from the bottom. Slice and serve. Enjoy! This tart is best served at room temperature or slightly chilled.
Conclusion:
This Hazelnut Chocolate Tart isn’t just a dessert; it’s an experience. From the satisfying crunch of the hazelnut crust to the intensely rich and smooth chocolate filling, every bite is a symphony of textures and flavors that will leave you wanting more. I truly believe this recipe is a must-try for any chocolate lover, and I’m confident it will become a new favorite in your household. Why is it a must-try? Because it’s surprisingly easy to make! Don’t let the elegant presentation fool you. The steps are straightforward, and the result is a show-stopping dessert that will impress your friends and family. Plus, the combination of hazelnut and chocolate is simply divine a classic pairing that never fails to delight. The subtle nuttiness of the crust perfectly complements the deep, dark chocolate, creating a balanced and unforgettable flavor profile. It’s the perfect balance of sweet and savory, rich and delicate. But the best part? It’s incredibly versatile! While I adore this tart exactly as written, there are so many ways to customize it to your liking. For a more intense hazelnut flavor, try adding a tablespoon of hazelnut liqueur to the chocolate filling. Or, if you’re feeling adventurous, sprinkle some sea salt on top of the finished tart for a delightful salty-sweet contrast. Serving suggestions? This Hazelnut Chocolate Tart is wonderful on its own, but it’s even better with a scoop of vanilla ice cream or a dollop of whipped cream. A few fresh raspberries or strawberries on the side add a touch of brightness and acidity that cuts through the richness of the chocolate. You could also drizzle it with a bit of caramel sauce for an extra layer of indulgence. For a truly decadent experience, pair it with a glass of dessert wine or a strong cup of coffee.Variations to Explore:
* Espresso Infusion: Add a teaspoon of instant espresso powder to the chocolate filling for a mocha-inspired twist. * Citrus Zest: Grate some orange or lemon zest into the crust for a bright and aromatic flavor. * Spiced Chocolate: Incorporate a pinch of cinnamon, nutmeg, or chili powder into the filling for a warm and spicy kick. * Nutty Topping: Before baking, sprinkle chopped hazelnuts, almonds, or pecans on top of the crust for added texture and flavor. * Vegan Option: Substitute the butter in the crust with a vegan butter alternative and use a dairy-free chocolate for the filling. I’m so excited for you to try this recipe! I poured my heart into perfecting it, and I know you’ll love it as much as I do. Don’t be intimidated by the fancy name it’s truly a simple and rewarding baking project. So, what are you waiting for? Gather your ingredients, preheat your oven, and get ready to create a masterpiece. Once you’ve made your own Hazelnut Chocolate Tart, I’d love to hear about your experience! Share your photos and comments on social media using [Your Recipe Hashtag] or leave a review on my website. Let me know what variations you tried and how they turned out. I’m always eager to learn from my readers and see your creative takes on my recipes. Happy baking! I can’t wait to see your creations! Print
Hazelnut Chocolate Tart: A Decadent Dessert Recipe
- Total Time: 95
- Yield: 8–10 servings 1x
Description
Buttery shortbread crust filled with rich hazelnut and topped with smooth, glossy chocolate ganache.
Ingredients
- 1 1/2 cups (190g) all-purpose flour
- 1/2 cup (50g) confectioners’ sugar
- 1/4 teaspoon salt
- 1/2 cup (113g) cold unsalted butter, cut into cubes
- 1 large egg yolk
- 3–4 tablespoons ice water
- 1 cup (100g) hazelnuts, toasted and skinned
- 1/2 cup (100g) granulated sugar
- 1/4 cup (25g) all-purpose flour
- 1/4 teaspoon salt
- 1/2 cup (113g) unsalted butter, melted and cooled slightly
- 2 large eggs
- 1 teaspoon vanilla extract
- 8 ounces (225g) bittersweet chocolate, finely chopped
- 1 cup (240ml) heavy cream
- 2 tablespoons unsalted butter, softened
- 1 tablespoon light corn syrup (optional, for shine)
- Chopped toasted hazelnuts
- Cocoa powder
- Edible gold leaf
Instructions
- In a large bowl, whisk together the flour, confectioners’ sugar, and salt.
- Add the cold, cubed butter to the dry ingredients. Using a pastry blender or your fingertips, cut the butter into the flour mixture until it resembles coarse crumbs.
- In a small bowl, whisk together the egg yolk and 3 tablespoons of ice water. Pour this mixture over the flour and butter mixture.
- Gently mix the ingredients together until the dough just comes together. Be careful not to overmix. If the dough is too dry, add the remaining tablespoon of ice water, one teaspoon at a time, until it forms a cohesive ball.
- Flatten the dough into a disc, wrap it tightly in plastic wrap, and chill in the refrigerator for at least 30 minutes, or preferably 1 hour.
- On a lightly floured surface, roll out the chilled dough into a 12-inch circle. The dough should be about 1/8 inch thick.
- Carefully transfer the rolled-out dough to a 9-inch tart pan with a removable bottom. Gently press the dough into the bottom and up the sides of the pan.
- Trim any excess dough from the edges of the pan. Crimp the edges of the crust using a fork or your fingers to create a decorative border.
- Preheat your oven to 375°F (190°C). Line the tart crust with parchment paper and fill it with pie weights or dried beans. Bake for 15 minutes.
- Remove the parchment paper and pie weights. Bake for another 10-15 minutes, or until the crust is lightly golden brown.
- Let the crust cool completely in the tart pan on a wire rack before adding the filling.
- If you haven’t already, toast the hazelnuts. Preheat your oven to 350°F (175°C). Spread the hazelnuts on a baking sheet and toast for 10-12 minutes, or until the skins are cracked and fragrant. Let them cool slightly, then rub them in a clean kitchen towel to remove the skins.
- In a food processor, grind the toasted and skinned hazelnuts until they are finely ground. Be careful not to over-process.
- In a medium bowl, whisk together the ground hazelnuts, granulated sugar, flour, and salt.
- In a separate bowl, whisk together the melted and cooled butter, eggs, and vanilla extract.
- Pour the wet ingredients into the dry ingredients and mix until just combined. Do not overmix.
- Pour the hazelnut filling into the cooled tart crust, spreading it evenly.
- Bake in the preheated oven for 25-30 minutes, or until the filling is set and lightly golden brown. A toothpick inserted into the center should come out clean.
- Let the tart cool completely on a wire rack before adding the chocolate ganache.
- Finely chop the bittersweet chocolate and place it in a heatproof bowl.
- In a saucepan, heat the heavy cream over medium heat until it just comes to a simmer. Do not boil.
- Pour the hot cream over the chopped chocolate. Let it sit for 1 minute to allow the heat to melt the chocolate.
- Gently whisk the cream and chocolate together until the chocolate is completely melted and the ganache is smooth and glossy.
- Add the softened butter and corn syrup (if using) to the ganache. Whisk until the butter is melted and the ganache is smooth and emulsified.
- Let the ganache cool slightly for about 5-10 minutes before pouring it over the tart.
- Pour the slightly cooled chocolate ganache over the cooled hazelnut filling, spreading it evenly to cover the entire surface.
- Refrigerate the tart for at least 1 hour, or preferably 2 hours, to allow the ganache to set completely.
- Before serving, decorate the tart with chopped toasted hazelnuts, a dusting of cocoa powder, or edible gold leaf, if desired.
- Carefully remove the tart from the tart pan by pushing up from the bottom. Slice and serve. Enjoy!
Notes
- For the flakiest crust, ensure the butter is very cold and avoid overmixing the dough.
- Toasting the hazelnuts enhances their flavor.
- Be careful not to over-process the hazelnuts when grinding, as they can turn into hazelnut butter.
- Letting the ganache cool slightly before pouring it over the tart helps it thicken and prevents it from running off the edges.
- The tart is best served at room temperature or slightly chilled.
- Prep Time: 45 minutes
- Cook Time: 50 minutes

Leave a Comment