
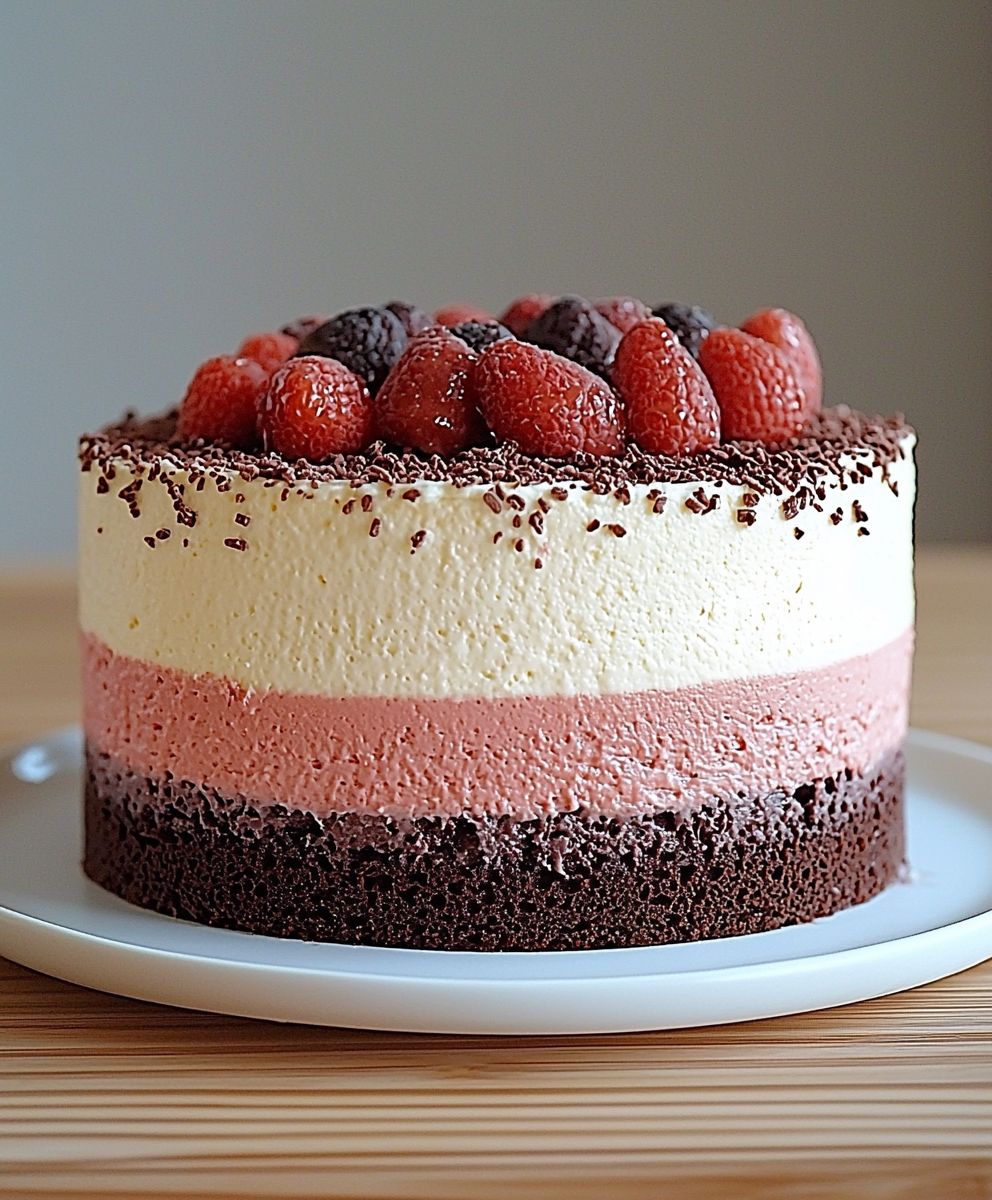
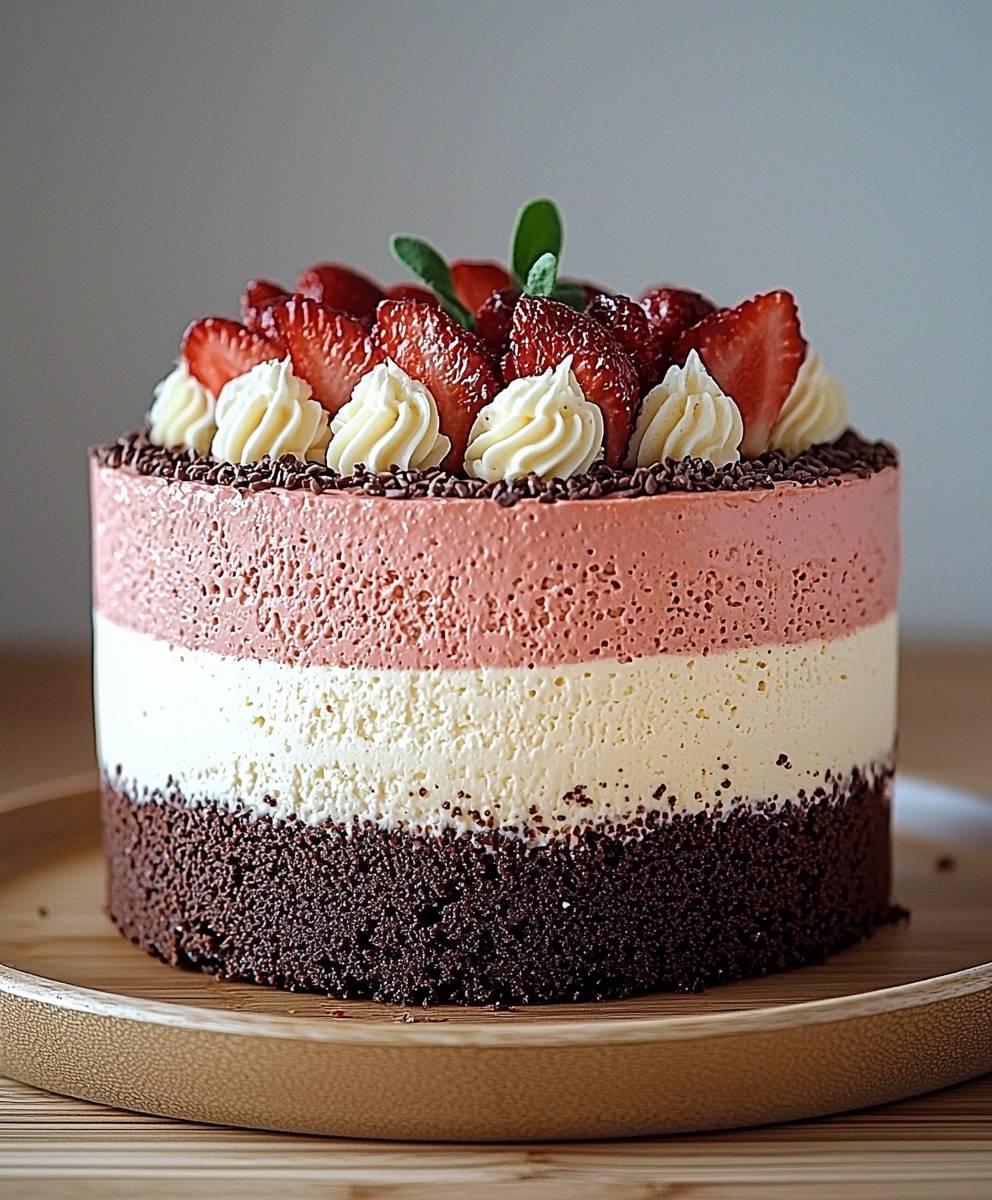
Neapolitan Layer Cake: Just the name conjures up images of vibrant colors and irresistible flavors, doesn’t it? This isn’t just a cake; it’s a celebration of classic tastes, all stacked into one stunning dessert. Imagine slicing through layers of rich chocolate, sweet vanilla, and fruity strawberry cake, all held together with a luscious frosting. It’s a showstopper that’s surprisingly simple to create, and I’m so excited to share my version with you!
While the exact origins of the Neapolitan flavor combination are debated, its popularity exploded in the late 19th century, particularly in America. It cleverly mimics the Italian flag’s colors, though the connection to Naples is more about the shared Italian heritage than a specific Neapolitan invention. Regardless of its precise history, the combination of chocolate, vanilla, and strawberry has become a beloved classic, instantly recognizable and universally appealing.
Why do people adore this Neapolitan Layer Cake so much? It’s the perfect balance of flavors! The rich, decadent chocolate contrasts beautifully with the delicate vanilla and the bright, refreshing strawberry. The soft, moist cake layers combined with the creamy frosting create a delightful texture that’s simply irresistible. Plus, it’s visually stunning! The vibrant colors make it a perfect centerpiece for any occasion, from birthdays to holidays. Get ready to impress your friends and family with this delightful treat!
Ingredients:
- For the Cake Layers:
- 3 cups all-purpose flour
- 1 tablespoon baking powder
- 1/2 teaspoon baking soda
- 1 teaspoon salt
- 1 cup (2 sticks) unsalted butter, softened
- 2 cups granulated sugar
- 4 large eggs
- 1 teaspoon vanilla extract
- 1 1/4 cups buttermilk
- Red food coloring (gel or liquid), enough to achieve desired red color (usually 2-3 tablespoons)
- 1 tablespoon white vinegar
- 1 teaspoon baking soda (yes, another teaspoon!)
- For the Cream Cheese Frosting:
- 8 ounces cream cheese, softened
- 1 cup (2 sticks) unsalted butter, softened
- 4 cups powdered sugar, sifted
- 1 teaspoon vanilla extract
- 1/4 cup heavy cream (optional, for desired consistency)
- For the Chocolate Ganache Drip (Optional):
- 4 ounces semi-sweet chocolate, finely chopped
- 1/2 cup heavy cream
Preparing the Cake Layers:
- Preheat and Prep: First things first, preheat your oven to 350°F (175°C). Grease and flour three 9-inch round cake pans. I like to use parchment paper rounds in the bottom of the pans for extra insurance against sticking. Trust me, it’s worth the extra step!
- Dry Ingredients: In a large bowl, whisk together the flour, baking powder, 1/2 teaspoon of baking soda, and salt. Make sure everything is well combined. This ensures even distribution of the leavening agents.
- Cream Butter and Sugar: In a separate large bowl (or the bowl of your stand mixer), cream together the softened butter and granulated sugar until light and fluffy. This usually takes about 3-5 minutes. Don’t rush this step; it’s crucial for a tender cake.
- Add Eggs and Vanilla: Beat in the eggs one at a time, making sure each egg is fully incorporated before adding the next. Then, stir in the vanilla extract.
- Alternate Wet and Dry Ingredients: Gradually add the dry ingredients to the wet ingredients, alternating with the buttermilk. Begin and end with the dry ingredients. So, add about a third of the dry ingredients, then half of the buttermilk, then another third of the dry ingredients, then the remaining buttermilk, and finally the last third of the dry ingredients. Mix until just combined. Be careful not to overmix! Overmixing develops the gluten in the flour, resulting in a tough cake.
- Red Color Magic: Stir in the red food coloring until you reach your desired shade of red. Remember, the color will deepen slightly during baking.
- The Secret Ingredient: In a small bowl, combine the 1 tablespoon of white vinegar and the remaining 1 teaspoon of baking soda. It will fizz! Quickly add this mixture to the cake batter and stir until just combined. This reaction helps to create a light and airy texture and enhances the red color.
- Divide and Conquer: Divide the batter evenly among the prepared cake pans. I like to use a kitchen scale to ensure each pan has the same amount of batter. This helps the cakes bake evenly.
- Bake: Bake for 25-30 minutes, or until a wooden skewer inserted into the center comes out clean.
- Cooling Time: Let the cakes cool in the pans for 10 minutes before inverting them onto a wire rack to cool completely. Make sure the cakes are completely cool before frosting. Warm cakes will melt the frosting!
Making the Cream Cheese Frosting:
- Cream Cheese and Butter: In a large bowl (or the bowl of your stand mixer), beat the softened cream cheese and butter together until smooth and creamy. It’s important that both the cream cheese and butter are at room temperature to avoid lumps in your frosting.
- Add Powdered Sugar: Gradually add the sifted powdered sugar, one cup at a time, beating well after each addition. Sifting the powdered sugar helps to prevent lumps in the frosting.
- Vanilla Extract: Stir in the vanilla extract.
- Adjust Consistency (Optional): If the frosting is too thick, add the heavy cream, one tablespoon at a time, until you reach your desired consistency. I prefer a slightly thinner frosting for easy spreading.
Assembling the Cake:
- Level the Cakes (If Necessary): If your cake layers are uneven, use a serrated knife to level the tops. This will ensure a stable and even cake.
- First Layer: Place one cake layer on a serving plate or cake stand.
- Frosting Time: Spread a generous layer of cream cheese frosting evenly over the first cake layer.
- Second Layer: Carefully place the second cake layer on top of the frosting.
- More Frosting: Spread another generous layer of cream cheese frosting evenly over the second cake layer.
- Final Layer: Place the final cake layer on top of the frosting.
- Crumb Coat: Apply a thin layer of frosting over the entire cake. This is called a crumb coat, and it helps to trap any loose crumbs. Refrigerate the cake for 30 minutes to allow the crumb coat to set.
- Final Frosting: Apply a final, thicker layer of frosting over the entire cake, smoothing it out as much as possible. You can use an offset spatula or a cake smoother to achieve a professional finish.
Optional Chocolate Ganache Drip:
- Heat the Cream: Place the heavy cream in a microwave-safe bowl and heat until just simmering (about 1-2 minutes). You can also do this in a saucepan over medium heat.
- Pour Over Chocolate: Pour the hot cream over the finely chopped chocolate in a heat-proof bowl.
- Let it Sit: Let the mixture sit for 1 minute to allow the heat to melt the chocolate.
- Stir Until Smooth: Gently stir the mixture until the chocolate is completely melted and the ganache is smooth and glossy.
- Cool Slightly: Let the ganache cool slightly for about 5-10 minutes, or until it reaches a pourable consistency. If it’s too hot, it will be too thin and runny.
- Drip Time: Carefully pour the ganache around the edges of the cake, allowing it to drip down the sides. You can use a spoon or a piping bag to control the drips.
- Spread the Remaining Ganache: Spread any remaining ganache over the top of the cake.
Final Touches and Serving:
- Chill: Refrigerate the cake for at least 30 minutes to allow the frosting and ganache (if using) to set.
- Serve: Slice and serve! This cake is best served cold.
Tips for Success:
- Room Temperature Ingredients: Using room temperature ingredients, especially the butter, cream cheese, and eggs, is crucial for a smooth and well-emulsified batter and frosting.
- Don’t Overmix: Overmixing the cake batter will develop the gluten in the flour, resulting in a tough cake. Mix until just combined.
- Sift Powdered Sugar: Sifting the powdered sugar helps to prevent lumps in the frosting.
- Parchment Paper: Using parchment paper rounds in the bottom of the cake pans makes it much easier to remove the cakes without sticking.
- Cool Completely: Make sure the cakes are completely cool before frosting to prevent the frosting from melting.
- Crumb Coat: Don’t skip the crumb coat! It’s essential for a smooth and professional-looking finish.
- Food Coloring: Gel food coloring is more concentrated than liquid food coloring, so you’ll need less of it to achieve the desired color.
- Storage: Store leftover cake in the refrigerator for up to 3 days.
Variations:
- Chocolate Cake Layers: For a richer flavor, add 1/2 cup of unsweetened cocoa powder to the dry ingredients.
- Different Frosting: If you’re not a fan of cream cheese frosting, you can use a classic buttercream frosting or a whipped cream frosting instead.
- Nuts: Add chopped nuts, such as pecans or walnuts, to the frosting or sprinkle them on top of the
Conclusion:
This Neapolitan Layer Cake isn’t just a dessert; it’s a delightful journey through your favorite childhood flavors, all grown up and presented in a stunning, show-stopping package. From the moist, tender cake layers infused with rich chocolate, sweet vanilla, and vibrant strawberry, to the creamy, decadent frosting that perfectly complements each flavor, every bite is an explosion of pure joy. I truly believe this recipe is a must-try for anyone who loves baking, enjoys sharing delicious treats with loved ones, or simply wants to create a memorable dessert experience. Why is this Neapolitan Layer Cake a must-try? Because it’s more than just a cake; it’s an experience. It’s the perfect centerpiece for birthdays, holidays, or any special occasion that calls for a touch of sweetness and elegance. The combination of classic flavors is universally appealing, making it a crowd-pleaser that will have everyone asking for seconds. Plus, the visual appeal of the layered cake is undeniable it’s a dessert that’s as beautiful to look at as it is delicious to eat. But the best part? It’s surprisingly achievable! While it may look impressive, this recipe is broken down into easy-to-follow steps, ensuring that even novice bakers can create a masterpiece. I’ve included plenty of tips and tricks along the way to help you avoid common pitfalls and achieve perfect results every time. Looking for serving suggestions? A simple dusting of cocoa powder or a scattering of fresh berries adds a touch of elegance. For a more decadent presentation, consider drizzling melted chocolate or strawberry sauce over each slice. And if you’re feeling adventurous, why not add a scoop of vanilla ice cream on the side? Variations to make it your own: Feel free to experiment with different extracts to customize the flavors to your liking. A touch of almond extract in the vanilla layer or a hint of raspberry extract in the strawberry layer can add a unique twist. You could also try using different types of chocolate, such as dark chocolate or white chocolate, to create a more intense or subtle flavor profile. For a vegan version, substitute the butter and eggs with plant-based alternatives. There are many great vegan butter and egg replacement products available that work wonderfully in baking. You can also use a vegan cream cheese frosting or a coconut cream-based frosting. Don’t be intimidated by the multiple layers! You can bake the cake layers a day in advance and store them in the refrigerator until you’re ready to assemble and frost the cake. This will save you time and allow you to focus on the decorating process. I poured my heart into perfecting this recipe, and I’m confident that you’ll love it as much as I do. So, gather your ingredients, preheat your oven, and get ready to embark on a baking adventure. I can’t wait to see your creations! Now it’s your turn! I encourage you to try this Neapolitan Layer Cake recipe and share your experience with me. Did you make any modifications? What did your friends and family think? Post a picture of your cake on social media and tag me so I can see your beautiful creations. I’m always eager to hear your feedback and learn from your experiences. Happy baking! Print
Neapolitan Layer Cake: A Delicious Recipe & Baking Guide
- Total Time: 180 minutes
- Yield: 12–16 servings 1x
Description
Classic Red Velvet Cake with tangy cream cheese frosting and optional decadent chocolate ganache drip. A show-stopping dessert perfect for any occasion!
Ingredients
- 3 cups all-purpose flour
- 1 tablespoon baking powder
- 1/2 teaspoon baking soda
- 1 teaspoon salt
- 1 cup (2 sticks) unsalted butter, softened
- 2 cups granulated sugar
- 4 large eggs
- 1 teaspoon vanilla extract
- 1 1/4 cups buttermilk
- Red food coloring (gel or liquid), enough to achieve desired red color (usually 2-3 tablespoons)
- 1 tablespoon white vinegar
- 1 teaspoon baking soda (yes, another teaspoon!)
- 8 ounces cream cheese, softened
- 1 cup (2 sticks) unsalted butter, softened
- 4 cups powdered sugar, sifted
- 1 teaspoon vanilla extract
- 1/4 cup heavy cream (optional, for desired consistency)
- 4 ounces semi-sweet chocolate, finely chopped
- 1/2 cup heavy cream
Instructions
- Preheat your oven to 350°F (175°C). Grease and flour three 9-inch round cake pans. Use parchment paper rounds in the bottom of the pans.
- In a large bowl, whisk together the flour, baking powder, 1/2 teaspoon of baking soda, and salt.
- In a separate large bowl (or the bowl of your stand mixer), cream together the softened butter and granulated sugar until light and fluffy (3-5 minutes).
- Beat in the eggs one at a time, incorporating each fully before adding the next. Stir in the vanilla extract.
- Gradually add the dry ingredients to the wet ingredients, alternating with the buttermilk. Begin and end with the dry ingredients. Mix until just combined. Do not overmix.
- Stir in the red food coloring until you reach your desired shade of red.
- In a small bowl, combine the 1 tablespoon of white vinegar and the remaining 1 teaspoon of baking soda. Quickly add this mixture to the cake batter and stir until just combined.
- Divide the batter evenly among the prepared cake pans. Use a kitchen scale to ensure each pan has the same amount of batter.
- Bake for 25-30 minutes, or until a wooden skewer inserted into the center comes out clean.
- Let the cakes cool in the pans for 10 minutes before inverting them onto a wire rack to cool completely.
- In a large bowl (or the bowl of your stand mixer), beat the softened cream cheese and butter together until smooth and creamy.
- Gradually add the sifted powdered sugar, one cup at a time, beating well after each addition.
- Stir in the vanilla extract.
- If the frosting is too thick, add the heavy cream, one tablespoon at a time, until you reach your desired consistency.
- If your cake layers are uneven, use a serrated knife to level the tops.
- Place one cake layer on a serving plate or cake stand.
- Spread a generous layer of cream cheese frosting evenly over the first cake layer.
- Carefully place the second cake layer on top of the frosting.
- Spread another generous layer of cream cheese frosting evenly over the second cake layer.
- Place the final cake layer on top of the frosting.
- Apply a thin layer of frosting over the entire cake. Refrigerate the cake for 30 minutes to allow the crumb coat to set.
- Apply a final, thicker layer of frosting over the entire cake, smoothing it out as much as possible.
- Place the heavy cream in a microwave-safe bowl and heat until just simmering (about 1-2 minutes).
- Pour the hot cream over the finely chopped chocolate in a heat-proof bowl.
- Let the mixture sit for 1 minute to allow the heat to melt the chocolate.
- Gently stir the mixture until the chocolate is completely melted and the ganache is smooth and glossy.
- Let the ganache cool slightly for about 5-10 minutes, or until it reaches a pourable consistency.
- Carefully pour the ganache around the edges of the cake, allowing it to drip down the sides.
- Spread any remaining ganache over the top of the cake.
- Refrigerate the cake for at least 30 minutes to allow the frosting and ganache (if using) to set.
- Slice and serve! This cake is best served cold.
Notes
- Using room temperature ingredients, especially the butter, cream cheese, and eggs, is crucial for a smooth and well-emulsified batter and frosting.
- Overmixing the cake batter will develop the gluten in the flour, resulting in a tough cake. Mix until just combined.
- Sifting the powdered sugar helps to prevent lumps in the frosting.
- Using parchment paper rounds in the bottom of the cake pans makes it much easier to remove the cakes without sticking.
- Make sure the cakes are completely cool before frosting to prevent the frosting from melting.
- Don’t skip the crumb coat! It’s essential for a smooth and professional-looking finish.
- Gel food coloring is more concentrated than liquid food coloring, so you’ll need less of it to achieve the desired color.
- Store leftover cake in the refrigerator for up to 3 days.
- Prep Time: 45 minutes
- Cook Time: 30 minutes


Leave a Comment