
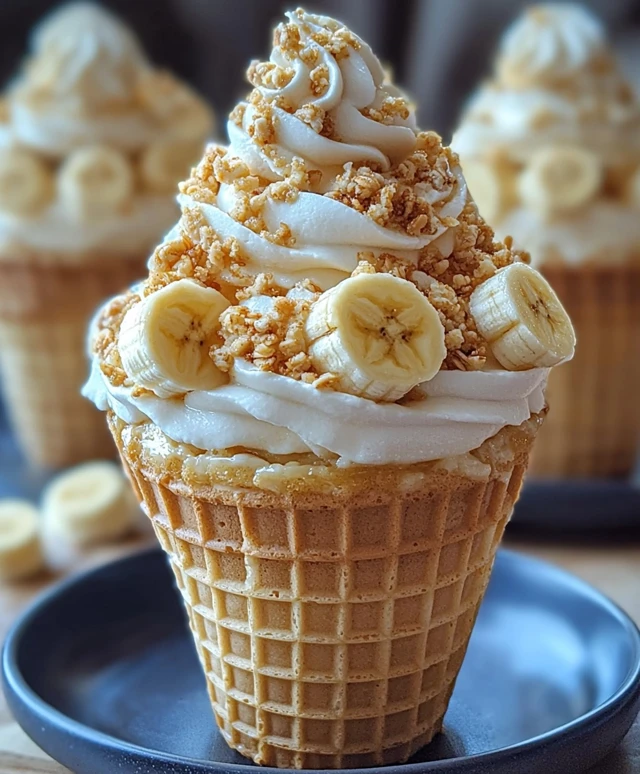
Banana Pudding Cheesecake Cones are a delightful twist on two beloved desserts, combining the creamy richness of cheesecake with the nostalgic flavors of banana pudding. As a fan of both treats, I was thrilled to discover this innovative recipe that not only satisfies my sweet tooth but also brings a sense of joy and comfort. The origins of banana pudding can be traced back to the Southern United States, where it has long been a staple at family gatherings and potlucks, evoking warm memories of home-cooked meals and shared laughter.
What makes Banana Pudding Cheesecake Cones so irresistible is their perfect balance of flavors and textures. The smooth, velvety cheesecake filling pairs beautifully with the soft, sweet bananas, all nestled in a crunchy cone that adds an exciting crunch to each bite. This dessert is not only delicious but also incredibly convenient, making it an ideal choice for parties, picnics, or simply a sweet treat at home. I cant wait to share this recipe with you, so you can experience the joy of Banana Pudding Cheesecake Cones for yourself!

Ingredients:
- For the Cheesecake Filling:
- 16 oz cream cheese, softened
- 1 cup powdered sugar
- 1 teaspoon vanilla extract
- 1 cup heavy whipping cream
- 2 ripe bananas, mashed
- For the Banana Pudding:
- 1 box (3.4 oz) instant vanilla pudding mix
- 2 cups milk
- 1 teaspoon vanilla extract
- For Assembly:
- 12 ice cream cones (waffle cones work best)
- 1 cup sliced bananas (for topping)
- Whipped cream (for garnish)
- Crushed vanilla wafers (for garnish)
Preparing the Cheesecake Filling
- In a large mixing bowl, add the softened cream cheese. Using an electric mixer, beat the cream cheese on medium speed until its smooth and creamy, about 2-3 minutes.
- Gradually add the powdered sugar to the cream cheese, mixing on low speed until combined. Scrape down the sides of the bowl as needed.
- Add the vanilla extract and continue to mix until fully incorporated.
- In a separate bowl, pour in the heavy whipping cream. Using a clean electric mixer, whip the cream on high speed until stiff peaks form, about 3-5 minutes.
- Gently fold the whipped cream into the cream cheese mixture using a spatula. Be careful not to deflate the whipped cream; you want to keep it light and fluffy.
- Finally, fold in the mashed bananas until evenly distributed throughout the cheesecake filling. Set this mixture aside while you prepare the banana pudding.
Making the Banana Pudding
- In a medium mixing bowl, combine the instant vanilla pudding mix and milk. Whisk together until the mixture is smooth and begins to thicken, about 2 minutes.
- Add the vanilla extract to the pudding mixture and stir until well combined. Let the pudding sit for about 5 minutes to fully set.
- Once the pudding has thickened, gently fold it into the cheesecake filling mixture. This will create a deliciously creamy and flavorful filling for your cones.
Assembling the Banana Pudding Cheesecake Cones
- Take your ice cream cones and place them upright in a sturdy container or muffin tin to keep them stable while you fill them.
- Using a piping bag or a large spoon, fill each cone with the cheesecake and banana pudding mixture. Start from the bottom and work your way up, making sure to pack the filling in tightly.
- Once the cones are filled to the top, add a few slices of fresh banana on top of each cone for added flavor and decoration.
- Top each cone with a generous dollop of whipped cream. You can use store-bought whipped cream or make your own by whipping heavy cream with a bit of sugar until soft peaks form.
- Sprinkle crushed vanilla wafers over the whipped cream for a delightful crunch and extra flavor.
Chilling and Serving
- Once all the cones are assembled, place them in the refrigerator for at least 30 minutes to allow the filling to set and chill. This will enhance the flavors and make them even more refreshing.
- When youre ready to serve, take the cones out of the fridge and enjoy them immediately. They are best served fresh, but you can keep any leftovers in the refrigerator for a day or two.
Tips for Success
- Make sure your cream cheese is at room temperature for easy mixing. If its too cold, it will be lumpy and hard to incorporate.
- For the best flavor, use ripe bananas. They should be speckled with brown spots for maximum sweetness.
- If you want to add a little extra flavor, consider drizzling some caramel or chocolate sauce over the top before serving.
Conclusion:
In wrapping up this delightful journey into the world of Banana Pudding Cheesecake Cones, I can confidently say that this recipe is a must-try for anyone looking to impress friends and family with a unique and delicious dessert. The combination of creamy cheesecake filling, sweet banana slices, and the nostalgic flavor of banana pudding all nestled in a crunchy cone creates a treat that is not only visually appealing but also bursting with flavor. For serving suggestions, consider topping your cones with a dollop of whipped cream and a sprinkle of crushed vanilla wafers for that extra crunch. You can also experiment with variations by adding a drizzle of caramel or chocolate sauce, or even incorporating other fruits like strawberries or blueberries for a refreshing twist. I wholeheartedly encourage you to give this Banana Pudding Cheesecake Cones recipe a try. I promise you wont be disappointed! Once youve made them, Id love to hear about your experience. Share your thoughts, any tweaks you made, or even a picture of your creations. Lets spread the joy of this delicious dessert together! Happy baking! PrintBanana Pudding Cheesecake Cones: A Delicious Twist on a Classic Dessert
- Total Time: 30 minutes
- Yield: 12 cones 1x
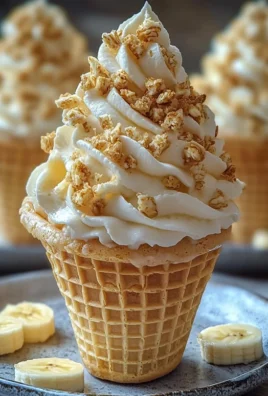
Description
Enjoy a fun and delicious treat with these Banana Pudding Cheesecake Cones, featuring a creamy blend of cheesecake and banana pudding in a crispy cone. Perfect for gatherings, these delightful desserts are easy to assemble and sure to impress!
Ingredients
- 16 oz cream cheese, softened
- 1 cup powdered sugar
- 1 teaspoon vanilla extract
- 1 cup heavy whipping cream
- 2 ripe bananas, mashed
- 1 box (3.4 oz) instant vanilla pudding mix
- 2 cups milk
- 1 teaspoon vanilla extract
- 12 ice cream cones (waffle cones work best)
- 1 cup sliced bananas (for topping)
- Whipped cream (for garnish)
- Crushed vanilla wafers (for garnish)
Instructions
- In a large mixing bowl, add the softened cream cheese. Using an electric mixer, beat the cream cheese on medium speed until its smooth and creamy, about 2-3 minutes.
- Gradually add the powdered sugar to the cream cheese, mixing on low speed until combined. Scrape down the sides of the bowl as needed.
- Add the vanilla extract and continue to mix until fully incorporated.
- In a separate bowl, pour in the heavy whipping cream. Using a clean electric mixer, whip the cream on high speed until stiff peaks form, about 3-5 minutes.
- Gently fold the whipped cream into the cream cheese mixture using a spatula. Be careful not to deflate the whipped cream; you want to keep it light and fluffy.
- Finally, fold in the mashed bananas until evenly distributed throughout the cheesecake filling. Set this mixture aside while you prepare the banana pudding.
- In a medium mixing bowl, combine the instant vanilla pudding mix and milk. Whisk together until the mixture is smooth and begins to thicken, about 2 minutes.
- Add the vanilla extract to the pudding mixture and stir until well combined. Let the pudding sit for about 5 minutes to fully set.
- Once the pudding has thickened, gently fold it into the cheesecake filling mixture. This will create a deliciously creamy and flavorful filling for your cones.
- Take your ice cream cones and place them upright in a sturdy container or muffin tin to keep them stable while you fill them.
- Using a piping bag or a large spoon, fill each cone with the cheesecake and banana pudding mixture. Start from the bottom and work your way up, making sure to pack the filling in tightly.
- Once the cones are filled to the top, add a few slices of fresh banana on top of each cone for added flavor and decoration.
- Top each cone with a generous dollop of whipped cream. You can use store-bought whipped cream or make your own by whipping heavy cream with a bit of sugar until soft peaks form.
- Sprinkle crushed vanilla wafers over the whipped cream for a delightful crunch and extra flavor.
- Once all the cones are assembled, place them in the refrigerator for at least 30 minutes to allow the filling to set and chill. This will enhance the flavors and make them even more refreshing.
- When youre ready to serve, take the cones out of the fridge and enjoy them immediately. They are best served fresh, but you can keep any leftovers in the refrigerator for a day or two.
Notes
- Make sure your cream cheese is at room temperature for easy mixing. If its too cold, it will be lumpy and hard to incorporate.
- For the best flavor, use ripe bananas. They should be speckled with brown spots for maximum sweetness.
- If you want to add a little extra flavor, consider drizzling some caramel or chocolate sauce over the top before serving.
- Prep Time: 30 minutes
- Cook Time: 0 minutes

Leave a Comment