

Chocolate pie is a timeless dessert that never fails to delight the senses. As I take a bite of this rich, velvety treat, I am reminded of family gatherings where laughter and joy filled the air, all centered around this beloved dish. The history of chocolate pie dates back to the early 19th century, with roots in Southern cuisine, where it quickly became a staple at celebrations and holidays. People adore this dessert not only for its indulgent taste and creamy texture but also for its convenience; it can be prepared ahead of time, making it the perfect finale to any meal. Join me as we explore the delightful world of chocolate pie, a dish that brings comfort and happiness to every table.
Ingredients:
- 1 pre-made pie crust (store-bought or homemade)
- 1 cup granulated sugar
- 1/3 cup unsweetened cocoa powder
- 1/4 cup cornstarch
- 1/4 teaspoon salt
- 2 3/4 cups whole milk
- 3 large egg yolks, lightly beaten
- 2 tablespoons unsalted butter
- 1 teaspoon pure vanilla extract
- Whipped cream (for topping)
- Chocolate shavings or cocoa powder (for garnish)
Preparing the Pie Crust
1. If youre using a store-bought pie crust, follow the package instructions for pre-baking. Typically, youll want to preheat your oven to 350°F (175°C) and bake the crust for about 10-12 minutes until its lightly golden. 2. If youre making a homemade pie crust, roll out your dough on a floured surface to fit your pie dish. Transfer it to the dish, trim the edges, and prick the bottom with a fork to prevent bubbling. Bake as directed above. 3. Once baked, remove the crust from the oven and let it cool completely on a wire rack while you prepare the filling.Preparing the Chocolate Filling
1. In a medium saucepan, combine the granulated sugar, cocoa powder, cornstarch, and salt. Whisk these dry ingredients together until they are well mixed. 2. Gradually add the whole milk to the dry mixture, whisking continuously to ensure there are no lumps. This step is crucial for a smooth filling. 3. Place the saucepan over medium heat and continue to whisk the mixture as it heats. Youll want to keep an eye on it to prevent it from sticking to the bottom of the pan. 4. Once the mixture starts to thicken and bubble (this usually takes about 5-7 minutes), reduce the heat to low. 5. In a separate bowl, lightly beat the egg yolks. To temper the yolks and prevent them from scrambling, slowly add a few spoonfuls of the hot chocolate mixture to the yolks while whisking constantly. This step is essential for a creamy filling. 6. After tempering, pour the egg yolk mixture back into the saucepan with the remaining chocolate mixture. Continue to cook on low heat for another 2-3 minutes, stirring constantly until the filling is thick and glossy. 7. Remove the saucepan from the heat and stir in the unsalted butter and vanilla extract. Mix until the butter is fully melted and incorporated into the filling.Assembling the Pie
1. Once the chocolate filling is ready, pour it into the cooled pie crust. Use a spatula to spread it evenly and smooth the top. 2. Cover the pie with plastic wrap or aluminum foil, making sure it doesnt touch the filling to prevent a skin from forming. 3. Refrigerate the pie for at least 4 hours, or overnight if you have the time. This allows the filling to set properly and develop its rich flavor.Serving the Chocolate Pie
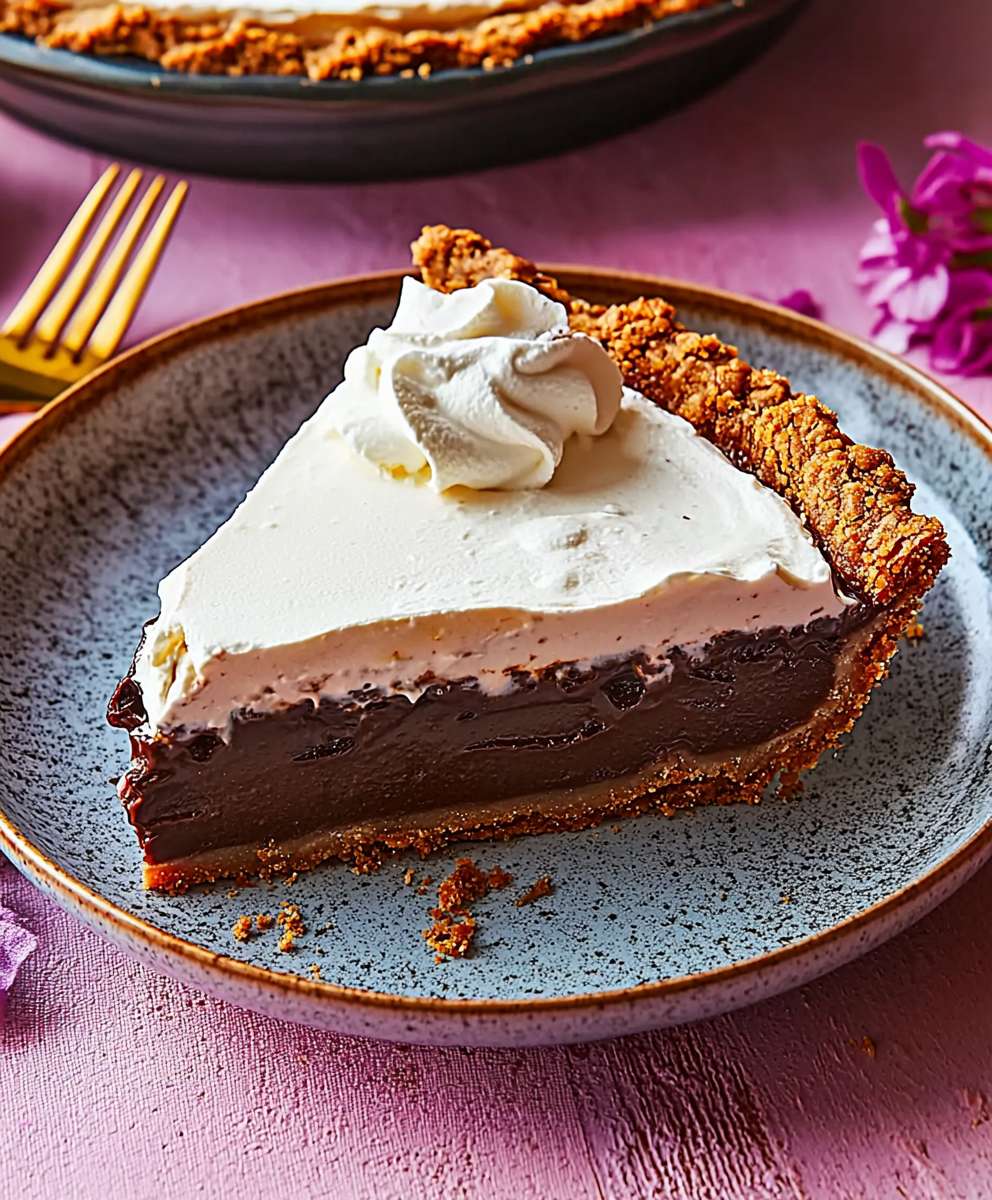
1. Once the pie has set, remove it from the refrigerator. Carefully take off the plastic wrap or foil. 2. Before serving, I like to top the pie with a generous layer of whipped cream. You can either use store-bought whipped cream or make your own by whipping heavy cream with a bit of sugar and vanilla until soft peaks form. 3. For an extra touch, sprinkle chocolate shavings or a dusting of cocoa powder on top of the whipped cream. This not only adds a beautiful presentation but also enhances the chocolate flavor. 4. Slice the pie into wedges using a sharp knife. If you find it difficult to cut through the filling, dipping the knife in hot water and wiping it dry can help make cleaner cuts. 5. Serve each slice on a plate, and if youre feeling indulgent, add an extra dollop of whipped cream on the side.Tips for the Perfect Chocolate Pie
– Make sure to whisk continuously while cooking the filling to avoid lumps and ensure a smooth texture. – If you prefer a richer chocolate flavor, you can use dark cocoa powder instead of regular unsweetened cocoa powder. – For a twist, consider adding a pinch of espresso powder to the filling to enhance the chocolate flavor. – If you want to make this pie ahead of time, it can be stored in the refrigerator for up to 3 days. Just make sure to keep it covered to maintain freshness. Enjoy
Conclusion:
In summary, this chocolate pie recipe is an absolute must-try for anyone who loves a rich, decadent dessert thats surprisingly easy to make. The combination of a buttery crust, velvety chocolate filling, and a light whipped cream topping creates a delightful experience that will have your taste buds dancing with joy. Whether youre celebrating a special occasion or simply indulging in a sweet treat after dinner, this pie is sure to impress your family and friends. For serving suggestions, consider pairing your chocolate pie with fresh berries for a pop of color and a hint of tartness that beautifully complements the sweetness of the chocolate. You can also experiment with variations by adding a sprinkle of sea salt on top for a gourmet touch or incorporating a splash of espresso into the filling for an extra depth of flavor. If youre feeling adventurous, try swapping out the chocolate for a different flavor, like peanut butter or caramel, to create your own unique twist on this classic dessert. I encourage you to give this chocolate pie recipe a try and share your experience with me! Id love to hear how it turned out for you and any creative variations you came up with. Remember, baking is all about having fun and making it your own, so dont hesitate to get a little creative in the kitchen. Happy baking! PrintChocolate Pie: The Ultimate Recipe for a Decadent Dessert Delight
- Total Time: 280 minutes
- Yield: 8 servings 1x
Description
Enjoy a decadent chocolate pie with a creamy cocoa filling in a flaky crust, topped with whipped cream and chocolate shavings. Perfect for any celebration!
Ingredients
- 1 pre-made pie crust (store-bought or homemade)
- 1 cup granulated sugar
- 1/3 cup unsweetened cocoa powder
- 1/4 cup cornstarch
- 1/4 teaspoon salt
- 2 3/4 cups whole milk
- 3 large egg yolks, lightly beaten
- 2 tablespoons unsalted butter
- 1 teaspoon pure vanilla extract
- Whipped cream (for topping)
- Chocolate shavings or cocoa powder (for garnish)
Instructions
- If using a store-bought pie crust, follow the package instructions for pre-baking. Preheat your oven to 350°F (175°C) and bake the crust for about 10-12 minutes until lightly golden.
- For a homemade pie crust, roll out the dough on a floured surface to fit your pie dish. Transfer it to the dish, trim the edges, and prick the bottom with a fork to prevent bubbling. Bake as directed above.
- Once baked, remove the crust from the oven and let it cool completely on a wire rack while preparing the filling.
- In a medium saucepan, combine the granulated sugar, cocoa powder, cornstarch, and salt. Whisk until well mixed.
- Gradually add the whole milk to the dry mixture, whisking continuously to avoid lumps.
- Place the saucepan over medium heat, whisking as it heats to prevent sticking.
- Once the mixture thickens and bubbles (about 5-7 minutes), reduce the heat to low.
- In a separate bowl, lightly beat the egg yolks. Slowly add a few spoonfuls of the hot chocolate mixture to the yolks while whisking constantly to temper them.
- Pour the tempered yolk mixture back into the saucepan with the remaining chocolate mixture. Cook on low heat for another 2-3 minutes, stirring constantly until thick and glossy.
- Remove from heat and stir in the unsalted butter and vanilla extract until fully melted and incorporated.
- Pour the chocolate filling into the cooled pie crust, spreading it evenly with a spatula.
- Cover the pie with plastic wrap or aluminum foil, ensuring it doesnt touch the filling to prevent a skin from forming.
- Refrigerate for at least 4 hours, or overnight for best results.
- Once set, remove the pie from the refrigerator and carefully take off the cover.
- Top with a generous layer of whipped cream, either store-bought or homemade.
- Garnish with chocolate shavings or a dusting of cocoa powder for an elegant touch.
- Slice into wedges using a sharp knife, dipping it in hot water for cleaner cuts if needed.
- Serve each slice on a plate, adding an extra dollop of whipped cream if desired.
Notes
- Whisk continuously while cooking the filling to avoid lumps and ensure a smooth texture.
- For a richer chocolate flavor, consider using dark cocoa powder.
- Adding a pinch of espresso powder can enhance the chocolate flavor.
- The pie can be stored in the refrigerator for up to 3 days, covered to maintain freshness.
- Prep Time: 20 minutes
- Cook Time: 20 minutes


Leave a Comment