
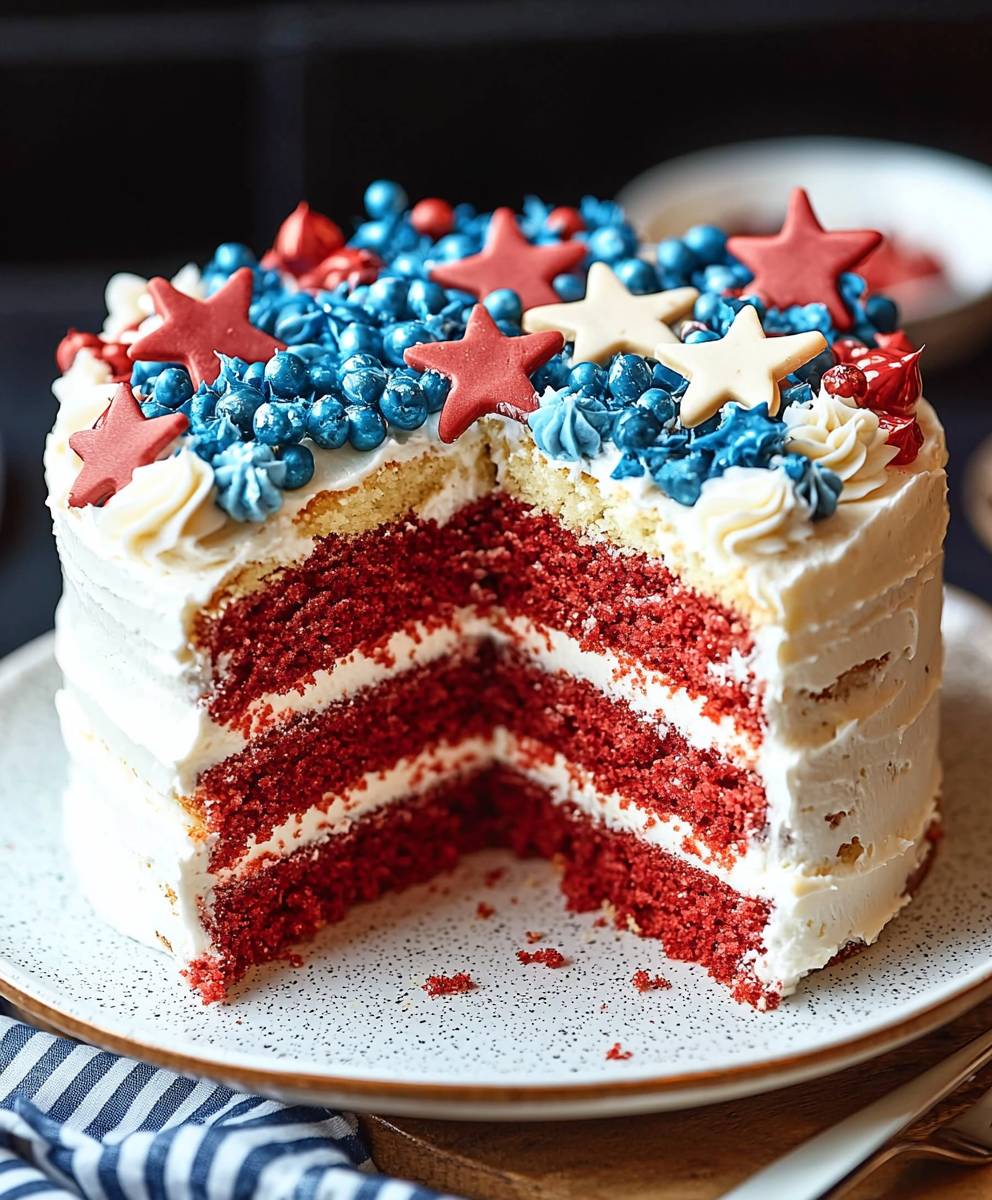
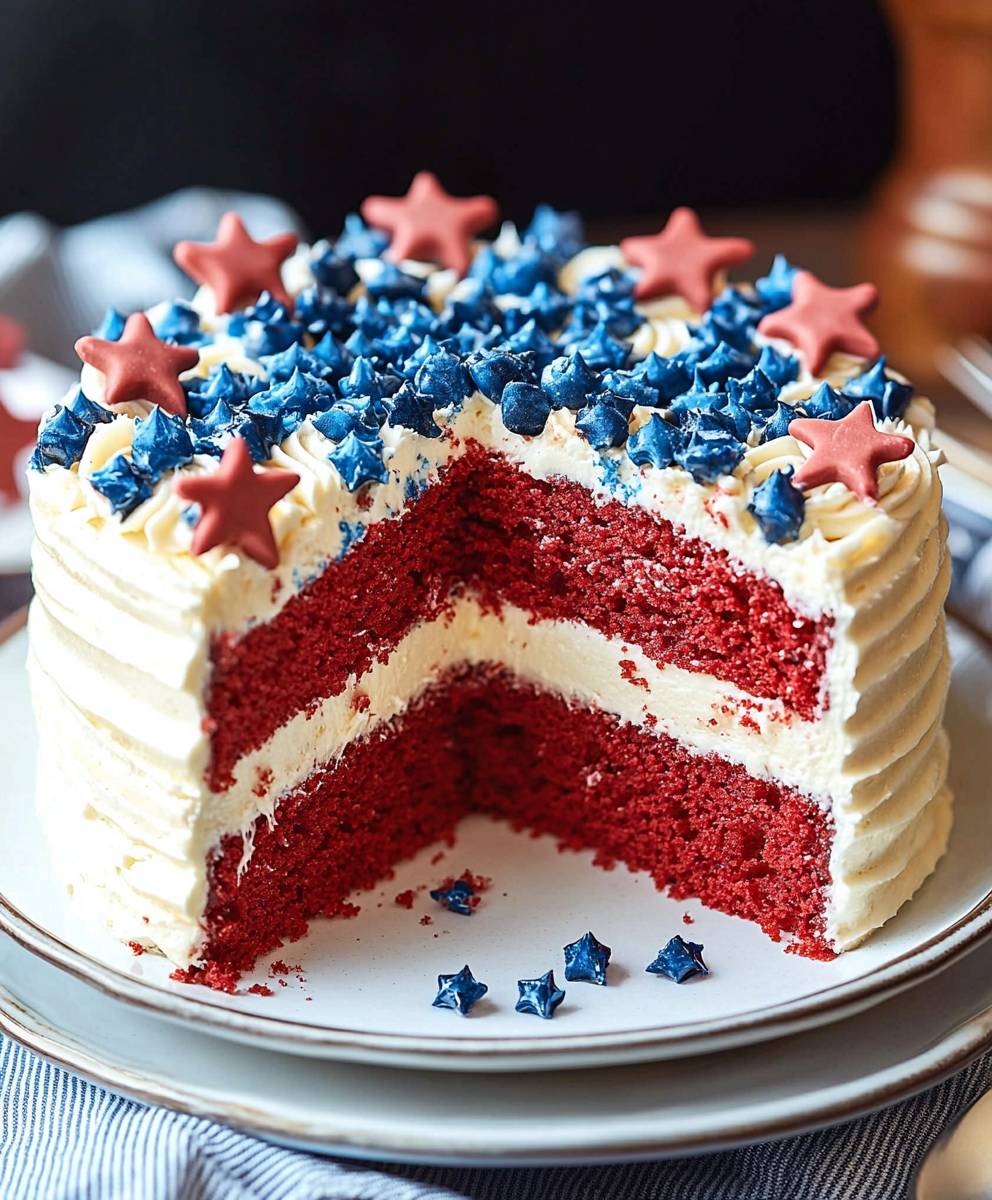
Fourth of July Cake: the ultimate showstopper for your Independence Day celebration! Imagine a dessert so vibrant, so patriotic, and so utterly delicious that it steals the spotlight from the fireworks themselves. This isn’t just any cake; it’s a red, white, and blue masterpiece that embodies the spirit of American pride.
While the exact origins of celebratory cakes for the Fourth of July are a bit hazy, the tradition of marking this important day with special foods has been around since the very beginning. Think about it: what better way to commemorate freedom and togetherness than by sharing a sweet treat with loved ones? This Fourth of July Cake is a modern take on that time-honored tradition.
People adore this cake for several reasons. First, the visual appeal is undeniable. The layers of vibrant colors are incredibly festive and create a sense of excitement. Second, the taste is simply irresistible. A moist, tender crumb combined with a sweet, creamy frosting makes for a truly delightful experience. Finally, while it looks impressive, this cake is surprisingly easy to make, especially with my step-by-step instructions. It’s the perfect way to add a touch of homemade love to your Fourth of July festivities. Get ready to bake a cake that will have everyone cheering!
Ingredients:
- For the Cake:
- 3 cups all-purpose flour
- 1 tablespoon baking powder
- 1 teaspoon baking soda
- 1 teaspoon salt
- 1 cup (2 sticks) unsalted butter, softened
- 2 cups granulated sugar
- 4 large eggs
- 1 teaspoon vanilla extract
- 1 ½ cups buttermilk
- For the Vanilla Buttercream Frosting:
- 1 cup (2 sticks) unsalted butter, softened
- 4 cups powdered sugar
- ½ cup heavy cream
- 2 teaspoons vanilla extract
- Pinch of salt
- For the Red, White, and Blue Decoration:
- Red gel food coloring
- Blue gel food coloring
- Assorted red, white, and blue sprinkles
- Fresh strawberries, blueberries, and raspberries (optional)
Preparing the Cake Batter:
- Preheat and Prepare: First things first, let’s preheat your oven to 350°F (175°C). While it’s heating up, grease and flour three 9-inch round cake pans. This will prevent the cakes from sticking and ensure they come out cleanly. I like to use baking spray with flour already in it for extra insurance!
- Combine Dry Ingredients: In a large bowl, whisk together the flour, baking powder, baking soda, and salt. Make sure everything is evenly distributed this helps the cake rise properly and have a consistent texture. I usually whisk for about 30 seconds to a minute.
- Cream Butter and Sugar: In a separate large bowl (or the bowl of your stand mixer), cream together the softened butter and granulated sugar until light and fluffy. This usually takes about 3-5 minutes on medium speed. You want the mixture to be pale and airy this is crucial for a tender cake.
- Add Eggs: Beat in the eggs one at a time, making sure each egg is fully incorporated before adding the next. After all the eggs are in, stir in the vanilla extract.
- Alternate Wet and Dry Ingredients: Gradually add the dry ingredients to the wet ingredients, alternating with the buttermilk. Begin and end with the dry ingredients. So, add about a third of the dry ingredients, then half of the buttermilk, then another third of the dry ingredients, the remaining buttermilk, and finally the last of the dry ingredients. Mix until just combined. Be careful not to overmix overmixing develops the gluten in the flour, which can result in a tough cake.
- Divide the Batter: Divide the batter evenly among the three prepared cake pans. I like to use a kitchen scale to ensure each pan has the same amount of batter, but you can also eyeball it.
Baking the Cakes:
- Bake: Bake for 25-30 minutes, or until a wooden skewer inserted into the center comes out clean. Keep a close eye on them baking times can vary depending on your oven.
- Cool: Let the cakes cool in the pans for 10 minutes before inverting them onto a wire rack to cool completely. Make sure they are completely cool before frosting otherwise, the frosting will melt!
Preparing the Vanilla Buttercream Frosting:
- Cream Butter: In a large bowl (or the bowl of your stand mixer), cream the softened butter until light and fluffy. This usually takes about 3-5 minutes on medium speed.
- Add Powdered Sugar: Gradually add the powdered sugar, one cup at a time, beating well after each addition. Start on low speed to prevent a powdered sugar cloud!
- Add Heavy Cream and Vanilla: Add the heavy cream, vanilla extract, and salt. Beat until smooth and creamy. If the frosting is too thick, add a little more heavy cream, one tablespoon at a time, until you reach the desired consistency. If it’s too thin, add a little more powdered sugar.
Coloring the Frosting:
- Divide the Frosting: Divide the frosting into three bowls.
- Color the Frosting: Add red gel food coloring to one bowl, blue gel food coloring to another bowl, and leave the third bowl white. Mix each bowl until the color is evenly distributed. Remember, gel food coloring is much more concentrated than liquid food coloring, so start with a small amount and add more until you achieve the desired shade.
Assembling and Decorating the Cake:
- Level the Cakes (Optional): If your cakes have a dome on top, use a serrated knife to level them. This will make stacking and frosting much easier.
- Frost the First Layer: Place one cake layer on a serving plate or cake stand. Spread a generous layer of white frosting over the top.
- Add the Second Layer: Carefully place the second cake layer on top of the frosting. Spread a generous layer of blue frosting over the top.
- Add the Third Layer: Carefully place the third cake layer on top of the blue frosting.
- Crumb Coat: Apply a thin layer of white frosting over the entire cake. This is called a crumb coat, and it seals in any loose crumbs, preventing them from getting into the final layer of frosting. Refrigerate the cake for 30 minutes to allow the crumb coat to set.
- Final Frosting: Apply a final, thicker layer of white frosting over the entire cake. Smooth the frosting with a spatula or icing smoother.
- Decorate: Now for the fun part! Decorate the cake with red, white, and blue sprinkles. You can create patterns, designs, or simply sprinkle them all over.
- Add Fresh Berries (Optional): Arrange fresh strawberries, blueberries, and raspberries on top of the cake for an extra touch of patriotic flair.
- Chill: Refrigerate the cake for at least 30 minutes before serving to allow the frosting to set. This will also make it easier to slice.
Tips for Success:
- Room Temperature Ingredients: Make sure your butter, eggs, and buttermilk are at room temperature. This helps them emulsify properly, resulting in a smoother batter and a more tender cake.
- Don’t Overmix: Overmixing the batter develops the gluten in the flour, which can lead to a tough cake. Mix until just combined.
- Cool Completely: Make sure the cakes are completely cool before frosting. Otherwise, the frosting will melt.
- Use Gel Food Coloring: Gel food coloring is more concentrated than liquid food coloring, so you’ll need less of it to achieve the desired color. It also won’t thin out the frosting as much as liquid food coloring.
- Crumb Coat is Key: Don’t skip the crumb coat! It’s essential for preventing crumbs from getting into the final layer of frosting.
- Get Creative with Decorations: Don’t be afraid to get creative with your decorations! Use different types of sprinkles, candies, or even edible glitter to create a unique and festive cake.
Variations:
- Different Flavors: You can easily adapt this recipe to create different flavors. Try adding lemon zest to the batter for a lemon cake, or cocoa powder for a chocolate cake.
- Different Frosting: If you’re not a fan of vanilla buttercream, you can use a different type of frosting, such as cream cheese frosting or chocolate ganache.
- Cupcakes: This recipe can also be used to make cupcakes. Simply fill cupcake liners about two-thirds full and bake for 18-20 minutes.
- Layer Cake Alternatives: If you don’t want to make a three-layer cake, you can bake the batter in a 9×13 inch pan for a sheet cake. Adjust baking time accordingly.
Storage:
- Store the cake in an airtight container in the refrigerator for up to 3 days. Let it come to room temperature before serving.
Conclusion:
This Fourth of July Cake isn’t just a dessert; it’s a celebration on a plate! From the moist, tender crumb to the burst of fresh berries and the creamy, dreamy frosting, every bite is an explosion of flavor and festive spirit. I truly believe this recipe is a must-try for anyone looking to add a touch of magic to their Independence Day festivities. It’s relatively simple to make, yet the results are so impressive that your guests will think you spent hours slaving away in the kitchen. And let’s be honest, who doesn’t love a show-stopping cake that tastes as good as it looks? But the real beauty of this recipe lies in its versatility. While I’ve presented my favorite combination of flavors and decorations, feel free to get creative and adapt it to your own preferences. For a lighter twist, you could use a whipped cream frosting instead of buttercream. Or, if you’re feeling adventurous, try adding a layer of lemon curd between the cake layers for a tangy surprise. Serving Suggestions and Variations: * Individual Cupcakes: Transform the cake batter into cupcakes for easy serving and portion control. Decorate each cupcake with a swirl of frosting and a few fresh berries. * Berry Parfaits: Crumble leftover cake into individual glasses and layer with whipped cream and fresh berries for a delightful parfait. * Ice Cream Cake: Use the cake layers as the base for an ice cream cake. Alternate layers of cake with your favorite ice cream flavors and freeze until solid. * Grilled Cake: For a unique twist, grill slices of the cake for a smoky flavor. Serve with a scoop of vanilla ice cream and a drizzle of chocolate sauce. * Boozy Berries: Macerate the berries in a little bit of Grand Marnier or Chambord for an extra touch of sophistication. Don’t be afraid to experiment with different types of berries, too. Blueberries and raspberries are classic choices, but strawberries, blackberries, and even cherries would work beautifully. You could also add a sprinkle of edible glitter or star-shaped sprinkles for an extra touch of sparkle. I’ve poured my heart and soul into perfecting this Fourth of July Cake recipe, and I’m confident that you’ll love it as much as I do. It’s the perfect way to end your Fourth of July barbecue or picnic on a sweet note. Its a guaranteed crowd-pleaser, and its a fun project to get the whole family involved in. So, what are you waiting for? Gather your ingredients, preheat your oven, and get ready to bake up a slice of patriotic perfection. I promise you won’t regret it! And most importantly, I want to hear all about your baking adventures. Did you make any modifications to the recipe? Did you have any challenges along the way? What did your friends and family think? Share your photos and stories in the comments below. I can’t wait to see your creations and celebrate the Fourth of July with you, one delicious slice of cake at a time! Happy baking, and happy Fourth of July! Print
Fourth of July Cake: Recipes, Decorations, and More!
- Total Time: 180 minutes
- Yield: 12–16 servings 1x
Description
A festive red, white, and blue layer cake perfect for patriotic holidays! This vanilla cake is layered with vanilla buttercream frosting, colored red and blue, and decorated with sprinkles and fresh berries.
Ingredients
- 3 cups all-purpose flour
- 1 tablespoon baking powder
- 1 teaspoon baking soda
- 1 teaspoon salt
- 1 cup (2 sticks) unsalted butter, softened
- 2 cups granulated sugar
- 4 large eggs
- 1 teaspoon vanilla extract
- 1 ½ cups buttermilk
- 1 cup (2 sticks) unsalted butter, softened
- 4 cups powdered sugar
- ½ cup heavy cream
- 2 teaspoons vanilla extract
- Pinch of salt
- Red gel food coloring
- Blue gel food coloring
- Assorted red, white, and blue sprinkles
- Fresh strawberries, blueberries, and raspberries (optional)
Instructions
- Preheat oven to 350°F (175°C). Grease and flour three 9-inch round cake pans.
- In a large bowl, whisk together the flour, baking powder, baking soda, and salt.
- In a separate large bowl (or stand mixer), cream together the softened butter and granulated sugar until light and fluffy (3-5 minutes).
- Beat in the eggs one at a time, then stir in the vanilla extract.
- Gradually add the dry ingredients to the wet ingredients, alternating with the buttermilk. Begin and end with the dry ingredients. Mix until just combined.
- Divide the batter evenly among the three prepared cake pans.
- Bake for 25-30 minutes, or until a wooden skewer inserted into the center comes out clean.
- Let the cakes cool in the pans for 10 minutes before inverting them onto a wire rack to cool completely.
- In a large bowl (or stand mixer), cream the softened butter until light and fluffy (3-5 minutes).
- Gradually add the powdered sugar, one cup at a time, beating well after each addition.
- Add the heavy cream, vanilla extract, and salt. Beat until smooth and creamy. Adjust consistency with more cream or powdered sugar as needed.
- Divide the frosting into three bowls.
- Add red gel food coloring to one bowl, blue gel food coloring to another bowl, and leave the third bowl white. Mix each bowl until the color is evenly distributed.
- If your cakes have a dome on top, use a serrated knife to level them.
- Place one cake layer on a serving plate or cake stand. Spread a generous layer of white frosting over the top.
- Carefully place the second cake layer on top of the frosting. Spread a generous layer of blue frosting over the top.
- Carefully place the third cake layer on top of the blue frosting.
- Apply a thin layer of white frosting over the entire cake. Refrigerate the cake for 30 minutes to allow the crumb coat to set.
- Apply a final, thicker layer of white frosting over the entire cake. Smooth the frosting with a spatula or icing smoother.
- Decorate the cake with red, white, and blue sprinkles.
- Arrange fresh strawberries, blueberries, and raspberries on top of the cake.
- Refrigerate the cake for at least 30 minutes before serving.
Notes
- Make sure your butter, eggs, and buttermilk are at room temperature.
- Don’t overmix the batter.
- Cool cakes completely before frosting.
- Use gel food coloring for vibrant colors.
- Don’t skip the crumb coat!
- Get creative with decorations.
- Store the cake in an airtight container in the refrigerator for up to 3 days. Let it come to room temperature before serving.
- Prep Time: 45 minutes
- Cook Time: 30 minutes
Leave a Comment