
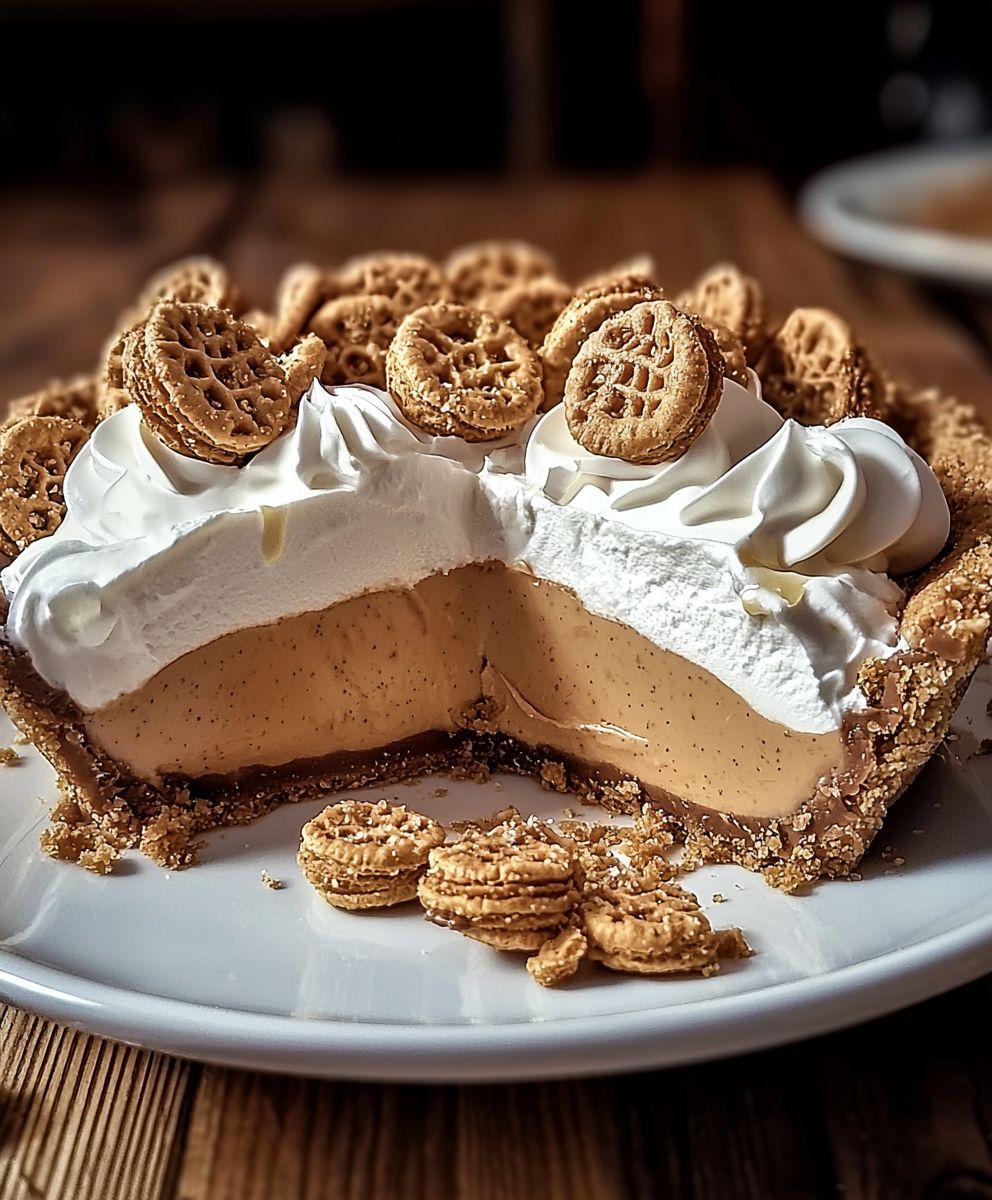
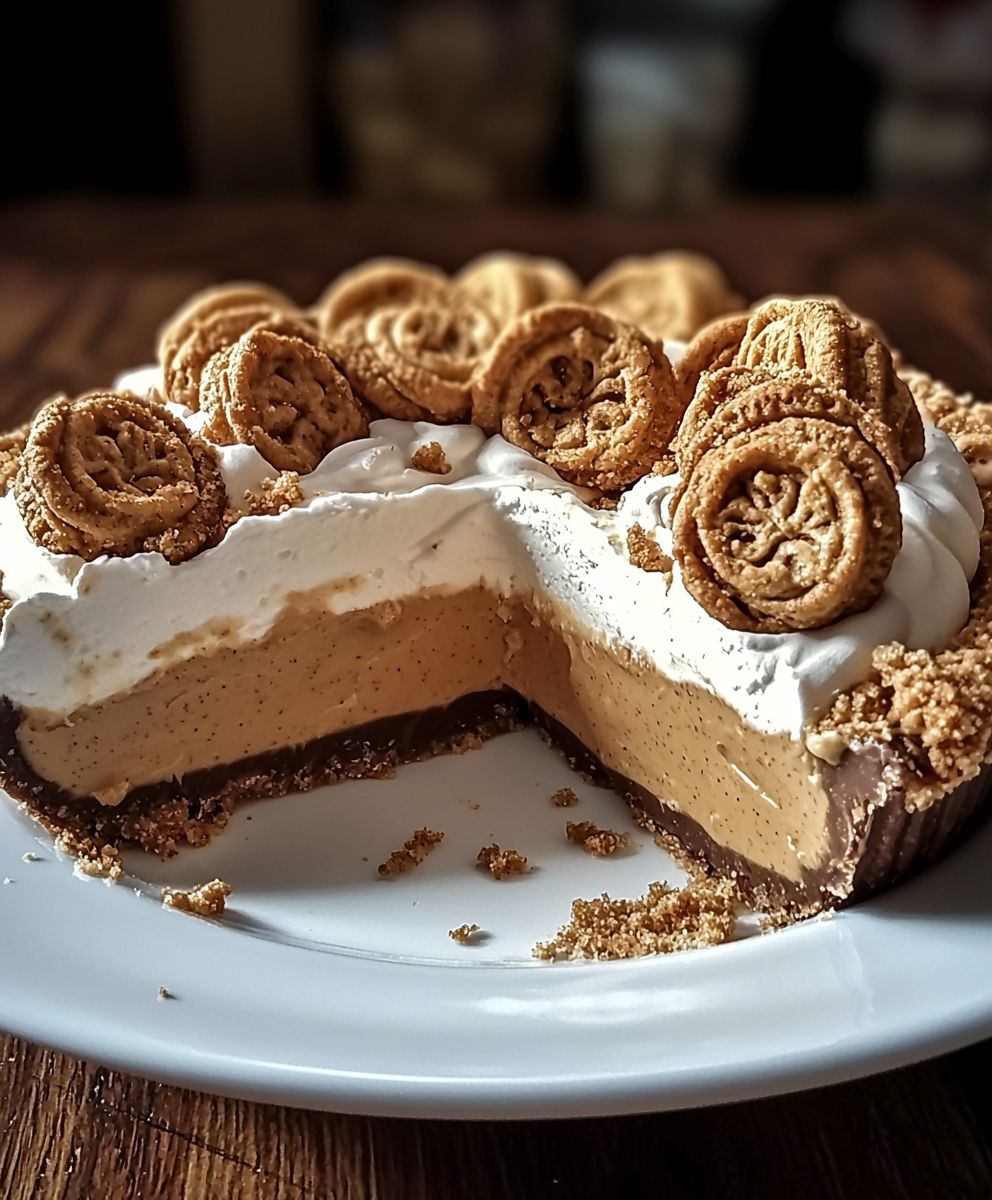
Nutter Butter Pie: Prepare to be amazed by this no-bake dessert that’s as easy to make as it is utterly irresistible! Imagine a creamy, peanut buttery dream encased in a crisp, chocolatey crust. This isn’t just a pie; it’s a nostalgic trip back to childhood, reimagined for the sophisticated dessert lover.
While the exact origins of Nutter Butter Pie are shrouded in delicious mystery, its inspiration is clear: the iconic Nutter Butter cookie. First introduced by Nabisco in 1969, these peanut-shaped delights quickly became a beloved snack. This pie takes that familiar flavor and elevates it to a whole new level of indulgence. It’s a celebration of peanut butter in its purest, most decadent form.
People adore this pie for its simplicity and satisfying flavor profile. The creamy, smooth filling, bursting with peanut butter goodness, perfectly complements the crunchy cookie crust. It’s a textural masterpiece! Plus, the no-bake aspect makes it a lifesaver for busy weeknights or when you need a show-stopping dessert without spending hours in the kitchen. Whether you’re a lifelong peanut butter fanatic or simply looking for a crowd-pleasing dessert, this Nutter Butter Pie is guaranteed to be a hit. Get ready to experience peanut butter perfection!
Ingredients:
- For the Crust:
- 1 ½ cups Nutter Butter cookies, finely crushed (about 36 cookies)
- 5 tablespoons unsalted butter, melted
- 2 tablespoons granulated sugar
- For the Filling:
- 8 ounces cream cheese, softened
- 1 cup creamy peanut butter
- 1 cup powdered sugar
- ½ cup heavy cream
- 1 teaspoon vanilla extract
- Pinch of salt
- For the Topping (Optional):
- ½ cup heavy cream
- 2 tablespoons powdered sugar
- ¼ teaspoon vanilla extract
- Mini Nutter Butter cookies, for garnish
- Chopped peanuts, for garnish
- Chocolate syrup, for drizzling
Preparing the Crust:
- Crush the Nutter Butters: The first step is to get those Nutter Butter cookies crushed into fine crumbs. You can do this in a food processor, pulsing until they’re finely ground. If you don’t have a food processor, no worries! Just place the cookies in a large zip-top bag, seal it tightly, and use a rolling pin to crush them into crumbs. Make sure there aren’t any large chunks left.
- Combine Crust Ingredients: In a medium bowl, combine the crushed Nutter Butter cookies, melted butter, and granulated sugar. Mix well until all the crumbs are evenly moistened. The mixture should resemble wet sand.
- Press into Pie Plate: Transfer the crumb mixture to a 9-inch pie plate. Use the bottom of a measuring cup or your fingers to firmly press the crumbs evenly across the bottom and up the sides of the pie plate. Make sure the crust is compact and well-formed. This is important for holding the filling later.
- Chill the Crust: Cover the pie plate with plastic wrap and refrigerate for at least 30 minutes. This will help the crust set and prevent it from becoming soggy when you add the filling. You can also bake the crust at 350°F (175°C) for 8-10 minutes for a firmer texture, but chilling works just fine too!
Making the Peanut Butter Filling:
- Beat the Cream Cheese: In a large bowl, using an electric mixer (either a stand mixer or a hand mixer), beat the softened cream cheese until it’s smooth and creamy. This is crucial for a lump-free filling. Make sure your cream cheese is truly softened; otherwise, you’ll end up with stubborn lumps.
- Add Peanut Butter: Add the creamy peanut butter to the bowl with the cream cheese. Beat until the peanut butter is fully incorporated and the mixture is smooth and well combined. Scrape down the sides of the bowl as needed to ensure everything is evenly mixed.
- Incorporate Powdered Sugar: Gradually add the powdered sugar to the cream cheese and peanut butter mixture, beating on low speed until it’s fully incorporated. Be careful not to add the powdered sugar all at once, or you’ll end up with a cloud of sugar dust! Mix until smooth, scraping down the sides of the bowl as needed.
- Add Heavy Cream and Vanilla: Pour in the heavy cream and add the vanilla extract. Beat on medium speed until the filling is light and fluffy. The heavy cream will help to lighten the filling and give it a wonderful creamy texture. Don’t overbeat, or the filling might become too thin.
- Add a Pinch of Salt: Add a pinch of salt to balance the sweetness of the filling. Mix until just combined.
Assembling the Nutter Butter Pie:
- Pour in the Filling: Remove the chilled Nutter Butter crust from the refrigerator. Pour the peanut butter filling into the crust, spreading it evenly with a spatula.
- Chill the Pie: Cover the pie with plastic wrap and refrigerate for at least 4 hours, or preferably overnight. This allows the filling to set completely and the flavors to meld together beautifully. Patience is key here!
Optional Topping and Garnish:
- Make the Whipped Cream (Optional): If you’re making the whipped cream topping, in a chilled bowl, combine the heavy cream, powdered sugar, and vanilla extract. Beat with an electric mixer until stiff peaks form. Be careful not to overwhip, or the cream will turn grainy.
- Decorate the Pie: Once the pie is chilled and set, you can decorate it as desired. You can spread the whipped cream evenly over the top of the pie, or pipe it on in decorative swirls.
- Garnish (Optional): Garnish the pie with mini Nutter Butter cookies, chopped peanuts, and a drizzle of chocolate syrup. Get creative and have fun with it! You can also use other toppings like peanut butter cups, Reese’s Pieces, or even a sprinkle of sea salt.
- Serve: Slice the Nutter Butter Pie and serve chilled. Enjoy! This pie is rich and decadent, so a small slice is usually enough.
Tips and Variations:
- Cookie Crust Variations: While Nutter Butters are the star here, you can experiment with other cookies for the crust. Oreos (with or without the filling), graham crackers, or even shortbread cookies would work well.
- Peanut Butter Options: Feel free to use your favorite type of peanut butter. Creamy is recommended for the smoothest texture, but you can also use chunky peanut butter for a bit of added texture.
- Chocolate Lovers: For a chocolatey twist, add a layer of melted chocolate to the bottom of the crust before adding the filling. You can also swirl melted chocolate into the peanut butter filling.
- Make it Vegan: To make this pie vegan, use vegan Nutter Butter cookies (some brands are accidentally vegan), vegan cream cheese, and vegan butter. You can also use coconut cream instead of heavy cream.
- Freezing Instructions: This pie can be frozen for up to 2 months. Wrap it tightly in plastic wrap and then in foil. Thaw in the refrigerator overnight before serving.
- No-Bake Option: This is a no-bake pie, which makes it perfect for hot summer days or when you don’t want to turn on the oven.
- Adjusting Sweetness: If you prefer a less sweet pie, you can reduce the amount of powdered sugar in the filling.
- Serving Suggestions: Serve this pie with a scoop of vanilla ice cream or a dollop of whipped cream for an extra special treat. It’s also delicious with a glass of cold milk or a cup of coffee.
Storage Instructions:
Store leftover Nutter Butter Pie in the refrigerator, covered, for up to 3-4 days. The pie is best enjoyed within the first 2 days, as the crust may start to soften slightly after that.
Conclusion:
This Nutter Butter Pie isn’t just a dessert; it’s a nostalgic trip down memory lane with a creamy, peanut buttery twist! If you’re a peanut butter lover (and let’s be honest, who isn’t?), this recipe is practically begging to be added to your baking repertoire. The combination of the crunchy, iconic Nutter Butter crust and the smooth, decadent filling is simply irresistible. It’s the kind of dessert that disappears in minutes, leaving everyone wanting more. But what truly makes this pie a must-try is its simplicity. You don’t need to be a seasoned baker to whip up this masterpiece. The recipe is straightforward, uses readily available ingredients, and requires minimal effort. Seriously, you can have this pie chilling in your fridge in under an hour! And the best part? It’s a guaranteed crowd-pleaser, perfect for potlucks, family gatherings, or even just a special treat for yourself. Now, let’s talk about serving suggestions and variations because, while the original recipe is divine, there’s always room for a little personalization, right? For a classic presentation, simply slice the pie and serve it chilled. But if you want to elevate the experience, consider adding a dollop of whipped cream or a scoop of vanilla ice cream. The cool creaminess perfectly complements the rich peanut butter flavor. For a chocolatey twist, drizzle some melted chocolate over the top of the pie before serving. The combination of peanut butter and chocolate is a match made in heaven! You could even sprinkle some chopped peanuts or mini chocolate chips for added texture and visual appeal. Feeling adventurous? Try adding a layer of peanut butter cups to the bottom of the crust before pouring in the filling. This will create an extra layer of peanut butter goodness that will have everyone swooning. Another fun variation is to use different flavors of Nutter Butter cookies for the crust. Imagine a pie with a double chocolate Nutter Butter crust the possibilities are endless! And if you’re looking for a lighter option, you can substitute the heavy cream with light cream or even Greek yogurt. This will reduce the fat content without sacrificing the creamy texture. You can also use a sugar-free sweetener in the filling to make it a guilt-free indulgence. I’m absolutely confident that you’ll love this Nutter Butter Pie as much as I do. It’s a guaranteed winner that will impress your friends and family. So, what are you waiting for? Grab your ingredients, preheat your oven (or don’t, depending on whether you’re making a no-bake version!), and get ready to create a peanut butter masterpiece. I’m so excited for you to try this recipe! Once you’ve made it, please come back and share your experience in the comments below. I’d love to hear what you think, what variations you tried, and how much everyone enjoyed it. Don’t forget to snap a picture of your beautiful pie and tag me on social media! Happy baking! I can’t wait to see your creations and hear all about your Nutter Butter Pie adventures. Let’s spread the peanut butter love! Print
Nutter Butter Pie: The Ultimate No-Bake Dessert Recipe
- Total Time: 260 minutes
- Yield: 8 servings 1x
Description
Decadent no-bake Nutter Butter Pie with a creamy peanut butter filling and an optional whipped cream topping. A peanut butter lover’s dream!
Ingredients
- 1 ½ cups Nutter Butter cookies, finely crushed (about 36 cookies)
- 5 tablespoons unsalted butter, melted
- 2 tablespoons granulated sugar
- 8 ounces cream cheese, softened
- 1 cup creamy peanut butter
- 1 cup powdered sugar
- ½ cup heavy cream
- 1 teaspoon vanilla extract
- Pinch of salt
- ½ cup heavy cream
- 2 tablespoons powdered sugar
- ¼ teaspoon vanilla extract
- Mini Nutter Butter cookies, for garnish
- Chopped peanuts, for garnish
- Chocolate syrup, for drizzling
Instructions
- Crush Nutter Butter cookies into fine crumbs using a food processor or a zip-top bag and rolling pin.
- In a medium bowl, combine crushed cookies, melted butter, and granulated sugar. Mix well.
- Press the crumb mixture into a 9-inch pie plate, covering the bottom and sides.
- Refrigerate the crust for at least 30 minutes (or bake at 350°F (175°C) for 8-10 minutes for a firmer texture).
- In a large bowl, beat softened cream cheese until smooth.
- Add peanut butter and beat until fully incorporated.
- Gradually add powdered sugar, beating on low speed until smooth.
- Pour in heavy cream and vanilla extract. Beat on medium speed until light and fluffy.
- Add a pinch of salt and mix until combined.
- Pour the peanut butter filling into the chilled crust, spreading evenly.
- Cover and refrigerate for at least 4 hours, or preferably overnight.
- In a chilled bowl, combine heavy cream, powdered sugar, and vanilla extract. Beat until stiff peaks form.
- Spread whipped cream (if using) over the pie.
- Garnish with mini Nutter Butter cookies, chopped peanuts, and chocolate syrup.
- Slice and serve chilled.
Notes
- Cookie Crust Variations: Try Oreos, graham crackers, or shortbread cookies for the crust.
- Peanut Butter Options: Use creamy or chunky peanut butter.
- Chocolate Lovers: Add a layer of melted chocolate to the bottom of the crust or swirl it into the filling.
- Make it Vegan: Use vegan Nutter Butter cookies, vegan cream cheese, and vegan butter. Use coconut cream instead of heavy cream.
- Freezing Instructions: Freeze for up to 2 months, wrapped tightly. Thaw in the refrigerator overnight.
- No-Bake Option: This is a no-bake pie.
- Adjusting Sweetness: Reduce the amount of powdered sugar if desired.
- Serving Suggestions: Serve with vanilla ice cream or whipped cream.
- Storage Instructions: Store leftover pie in the refrigerator, covered, for up to 3-4 days.
- Prep Time: 20 minutes
- Cook Time: 8-10 minutes

Leave a Comment