
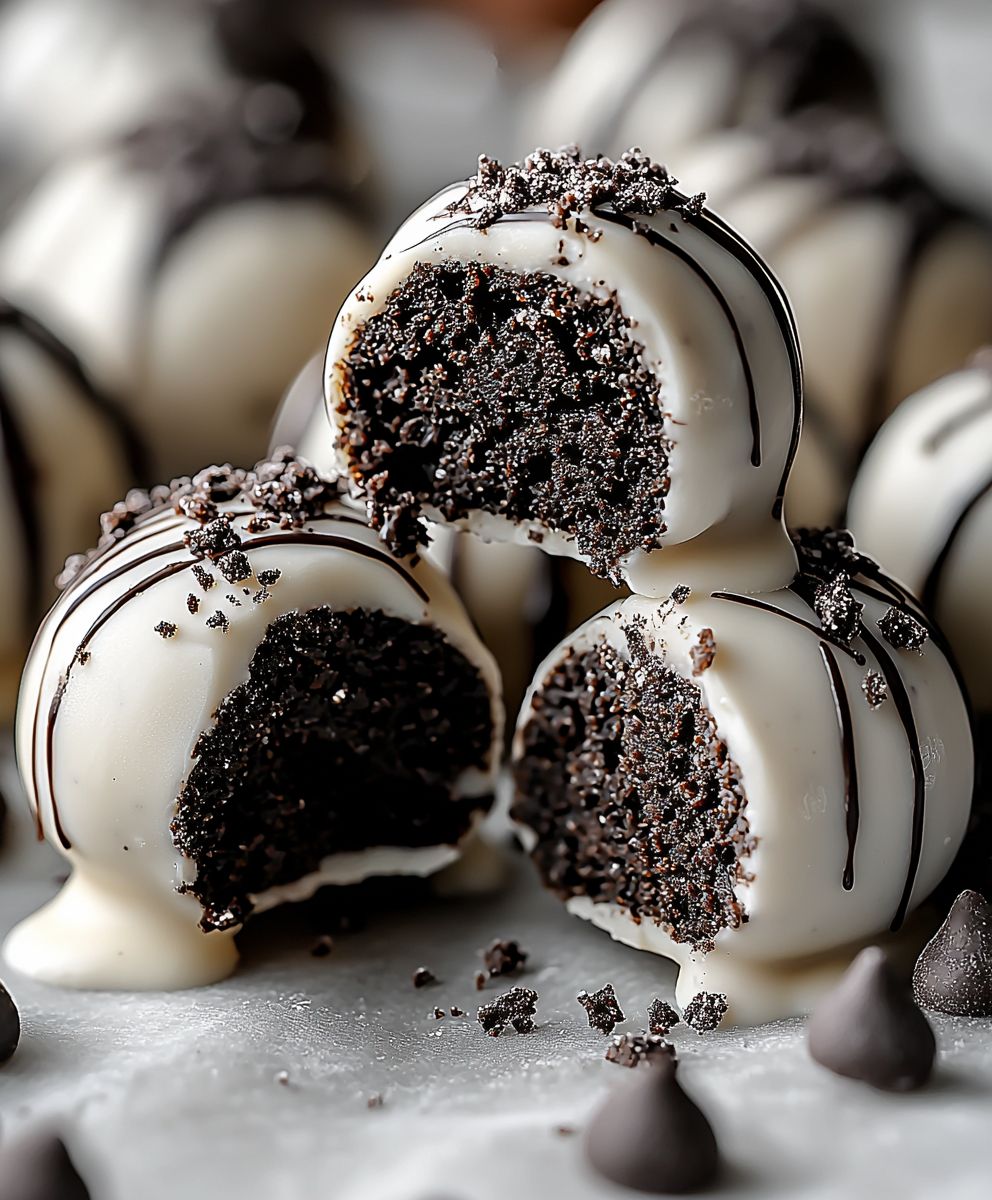
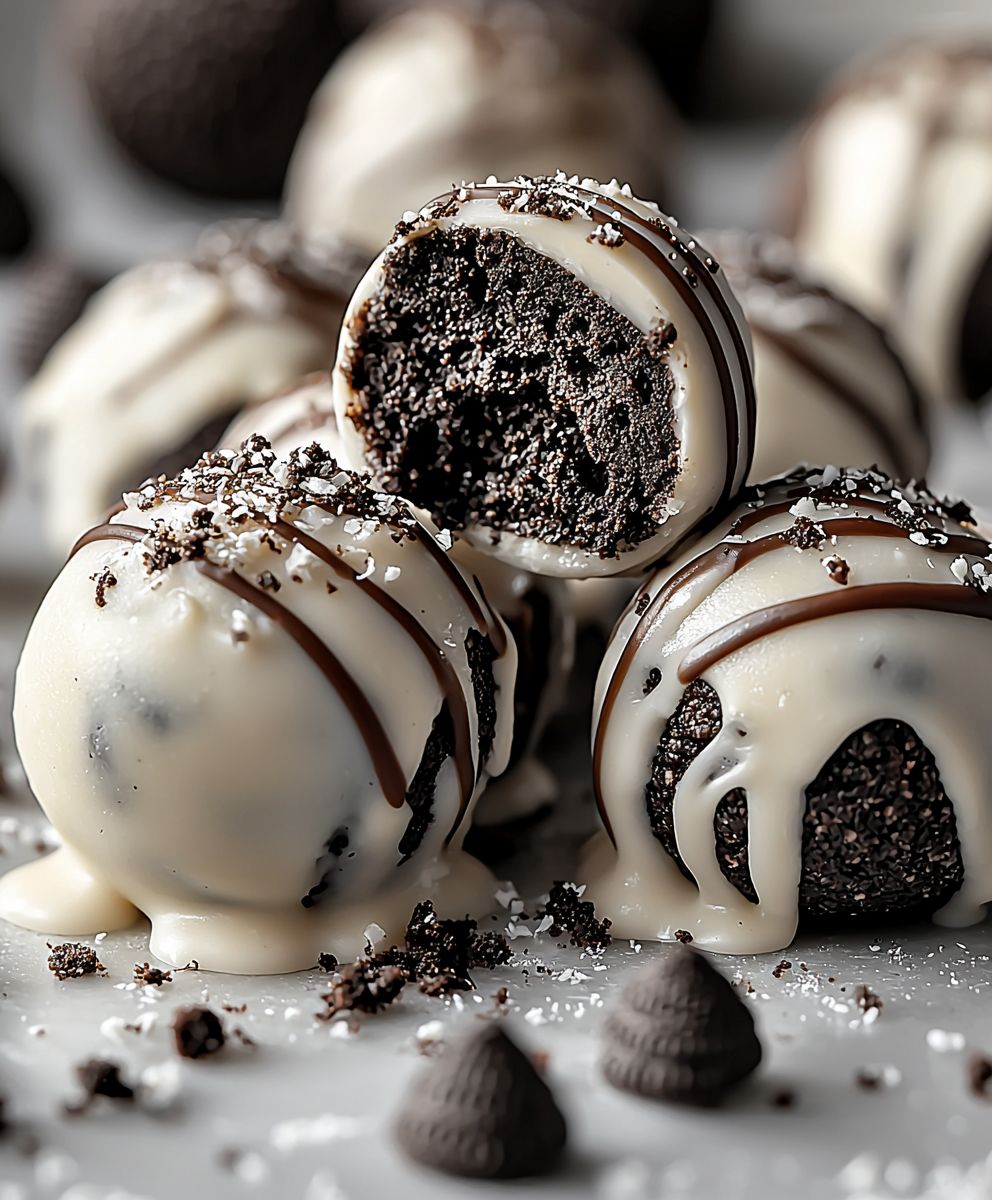
Oreo Balls: Prepare to be amazed by the easiest, most decadent, and utterly addictive treat you’ll ever make! These little bites of chocolatey, creamy bliss are so simple, they barely qualify as baking, yet they deliver a flavor explosion that will have everyone begging for the recipe. Seriously, be warned: these disappear fast!
While the exact origins of Oreo Balls are shrouded in mystery (likely born from a brilliant home baker looking for a no-bake dessert), their popularity is undeniable. They’ve become a staple at holiday gatherings, potlucks, and bake sales, and for good reason. They are incredibly versatile and can be customized with different coatings and decorations to suit any occasion.
What makes these treats so irresistible? It’s the perfect combination of textures and flavors. The slightly crunchy Oreo cookie crumbs blend seamlessly with the smooth, creamy cream cheese, creating a melt-in-your-mouth sensation. Then, the rich chocolate coating adds another layer of indulgence that is simply divine. Plus, let’s be honest, who can resist anything made with Oreos? They are incredibly convenient to make, requiring minimal ingredients and no oven time. So, whether you’re a seasoned baker or a kitchen novice, these Oreo Balls are guaranteed to be a crowd-pleaser!
Ingredients:
- 1 package (14.3 ounces) Oreo cookies, finely crushed
- 1 package (8 ounces) cream cheese, softened
- 1 package (12 ounces) semi-sweet chocolate chips
- 1 tablespoon vegetable shortening (optional, for smoother chocolate)
- Sprinkles or other decorations (optional)
Preparing the Oreo Crumbs:
Okay, let’s get started! The first thing we need to do is crush those Oreos. Now, you have a couple of options here. You can use a food processor, which is definitely the quickest and easiest way to get a super fine crumb. Just toss the whole package of Oreos (yes, the whole thing, filling and all!) into the food processor and pulse until they’re finely ground.
If you don’t have a food processor, no worries! You can use the old-fashioned method: a resealable plastic bag and a rolling pin. Place the Oreos in the bag, seal it tightly, and then roll over the bag with the rolling pin until the cookies are crushed into fine crumbs. This might take a little elbow grease, but it’s a great way to relieve some stress! Just make sure you get them nice and fine, because nobody wants big chunks of Oreo in their Oreo balls.
Once you’ve crushed your Oreos, set them aside in a large bowl. We’ll need them in just a minute.
Mixing the Oreo and Cream Cheese:
Now for the fun part: mixing the Oreo crumbs with the cream cheese! Make sure your cream cheese is nice and soft. If you forgot to take it out of the fridge ahead of time, you can microwave it for a few seconds (like 15-20 seconds) to soften it up. Just be careful not to melt it! You want it soft and pliable, not liquid.
Add the softened cream cheese to the bowl with the Oreo crumbs. Now, get ready to get your hands dirty! You can use a spoon or spatula to mix everything together, but I find that using my hands is the best way to really incorporate the cream cheese into the Oreo crumbs. Just make sure your hands are clean, of course!
Knead the cream cheese and Oreo crumbs together until they form a smooth, even mixture. It should be almost like a dough. You shouldn’t see any streaks of cream cheese. If the mixture seems too dry, you can add a tiny bit more cream cheese, a tablespoon at a time, until it comes together. If it seems too wet, add a little more Oreo crumbs. The consistency should be firm enough to hold its shape when you roll it into balls.
Forming the Oreo Balls:
Okay, now comes the really fun part: rolling the Oreo mixture into balls! This is where you can get the kids involved, if you have any. It’s a great activity for them, and they’ll love helping you make these delicious treats.
Take a small amount of the Oreo mixture (about a tablespoon or so) and roll it between your palms to form a ball. You can make them any size you like, but I find that about an inch in diameter is a good size. They’re small enough to pop into your mouth in one bite, but big enough to satisfy your sweet tooth.
Place the Oreo balls on a baking sheet lined with parchment paper or wax paper. This will prevent them from sticking to the baking sheet. Continue rolling the Oreo mixture into balls until you’ve used it all up. You should end up with about 30-40 Oreo balls, depending on the size you make them.
Once you’ve rolled all the Oreo balls, place the baking sheet in the freezer for at least 30 minutes. This will help them firm up and make them easier to dip in the chocolate. Don’t skip this step! It’s really important for getting a nice, smooth chocolate coating.
Melting the Chocolate:
While the Oreo balls are chilling in the freezer, it’s time to melt the chocolate. You have a couple of options here: you can use a double boiler or the microwave. I prefer the microwave because it’s quicker and easier, but a double boiler is a good option if you’re worried about burning the chocolate.
Microwave Method: Place the chocolate chips in a microwave-safe bowl. Microwave in 30-second intervals, stirring after each interval, until the chocolate is completely melted and smooth. Be careful not to overheat the chocolate, as it can burn easily. If the chocolate is still a little lumpy after a few intervals, continue microwaving in 15-second intervals until it’s completely melted.
Double Boiler Method: Fill a saucepan with about an inch of water and bring it to a simmer. Place a heat-safe bowl on top of the saucepan, making sure the bottom of the bowl doesn’t touch the water. Add the chocolate chips to the bowl and stir occasionally until the chocolate is completely melted and smooth.
Once the chocolate is melted, stir in the vegetable shortening (if using). The shortening will help to thin the chocolate and make it smoother and easier to dip the Oreo balls. It also gives the chocolate a nice shine.
Dipping the Oreo Balls:
Now for the final step: dipping the Oreo balls in the melted chocolate! This can be a little messy, but it’s definitely worth it.
Remove the Oreo balls from the freezer. One at a time, drop an Oreo ball into the melted chocolate. Use a fork or dipping tool to roll the Oreo ball around in the chocolate until it’s completely coated. Lift the Oreo ball out of the chocolate and tap the fork gently on the side of the bowl to remove any excess chocolate.
Place the dipped Oreo ball back on the baking sheet lined with parchment paper or wax paper. Immediately sprinkle with sprinkles or other decorations, if desired. The sprinkles will stick to the chocolate best if you add them while the chocolate is still wet.
Repeat this process until all the Oreo balls are dipped in chocolate. If the chocolate starts to harden while you’re dipping, you can microwave it for a few seconds to soften it up again.
Setting and Storing:
Once all the Oreo balls are dipped and decorated, place the baking sheet back in the refrigerator for at least 30 minutes to allow the chocolate to set completely. This will prevent the chocolate from melting when you handle them.
Once the chocolate is set, you can store the Oreo balls in an airtight container in the refrigerator for up to a week. They’re also great for freezing! Just place them in a freezer-safe container and they’ll keep for up to a month.
And that’s it! You’ve made delicious Oreo balls. Enjoy!
Conclusion:
Okay, friends, let’s be honest: you’ve scrolled this far because you know, deep down, that you need these Oreo Balls in your life. And trust me, you do! This isn’t just another dessert recipe; it’s a guaranteed crowd-pleaser, a no-bake wonder, and a ridiculously easy way to satisfy your sweet tooth. The creamy, dreamy filling combined with the crunchy Oreo cookie exterior is a textural masterpiece, and the chocolate coating? Well, that’s just the cherry (or should I say, the Oreo?) on top! But seriously, what makes these Oreo Balls a must-try? It’s the sheer simplicity. You don’t need to be a master baker, you don’t need fancy equipment, and you certainly don’t need to spend hours in the kitchen. With just a few ingredients and a little bit of patience (mostly waiting for the chocolate to set!), you can whip up a batch of these delectable treats that will disappear faster than you can say “Oreo.” And the best part? They’re incredibly versatile! While the classic recipe is divine, feel free to get creative. Want to add a little extra flavor? Try mixing in a teaspoon of peppermint extract for a festive holiday treat, or a dash of coffee liqueur for a sophisticated adult version. You could even experiment with different types of Oreos golden Oreos, mint Oreos, peanut butter Oreos the possibilities are endless!Serving Suggestions and Variations:
* Elevate your presentation: Arrange the Oreo Balls on a tiered dessert stand for a touch of elegance, or package them in small cellophane bags tied with ribbon for a thoughtful homemade gift. * Drizzle with delight: Instead of a full chocolate coating, try drizzling melted white chocolate or dark chocolate over the Oreo Balls for a visually appealing and equally delicious variation. * Sprinkle some fun: Before the chocolate sets, sprinkle the Oreo Balls with colorful sprinkles, chopped nuts, or even crushed Oreo cookies for added texture and flavor. * Get boozy: Add a tablespoon or two of your favorite liqueur to the cream cheese mixture for an adult-friendly twist. Baileys Irish Cream or Kahlua would be fantastic additions. * Ice Cream Topping: Crumble these Oreo Balls over your favorite ice cream for an extra special dessert. I’m telling you, once you make these, you’ll be hooked. They’re perfect for parties, potlucks, holiday gatherings, or just a simple weeknight treat. They’re also a fantastic project to do with kids they’ll love crushing the Oreos and rolling the balls! So, what are you waiting for? Gather your ingredients, put on some music, and get ready to embark on an Oreo Ball adventure! I promise you won’t regret it. And when you do make them (because I know you will!), please, please, please share your experience with me! I’d love to hear what variations you tried, how much everyone loved them, and any tips or tricks you discovered along the way. Tag me in your photos on social media I can’t wait to see your creations! Happy baking (or rather, no-baking!) and enjoy every single bite! Let me know if you have any questions, and happy baking! Print
Oreo Balls: Easy No-Bake Recipe for Delicious Treats
- Total Time: 60 minutes
- Yield: 30–40 Oreo balls 1x
Description
Easy and delicious Oreo balls made with crushed Oreos, cream cheese, and dipped in melted chocolate. A perfect no-bake treat!
Ingredients
- 1 package (14.3 ounces) Oreo cookies, finely crushed
- 1 package (8 ounces) cream cheese, softened
- 1 package (12 ounces) semi-sweet chocolate chips
- 1 tablespoon vegetable shortening (optional, for smoother chocolate)
- Sprinkles or other decorations (optional)
Instructions
- Prepare Oreo Crumbs: Crush Oreos in a food processor or in a sealed bag with a rolling pin until finely ground. Place crumbs in a large bowl.
- Mix Oreo and Cream Cheese: Add softened cream cheese to the Oreo crumbs. Mix with your hands or a spatula until a smooth, even mixture forms. If too dry, add a little more cream cheese; if too wet, add more Oreo crumbs.
- Form Oreo Balls: Roll the mixture into balls (about 1 inch in diameter). Place on a baking sheet lined with parchment or wax paper.
- Freeze: Freeze the Oreo balls for at least 30 minutes to firm up.
- Melt Chocolate: Melt chocolate chips in the microwave in 30-second intervals, stirring in between, or using a double boiler. Stir in vegetable shortening (if using) for a smoother consistency.
- Dip Oreo Balls: Remove Oreo balls from the freezer. Dip each ball in the melted chocolate, coating completely. Use a fork to remove excess chocolate.
- Decorate: Place dipped Oreo balls back on the baking sheet and immediately sprinkle with sprinkles or other decorations.
- Set and Store: Refrigerate for at least 30 minutes to allow the chocolate to set. Store in an airtight container in the refrigerator for up to a week, or freeze for up to a month.
Notes
- Make sure the cream cheese is softened for easy mixing.
- Freezing the Oreo balls before dipping is crucial for a smooth chocolate coating.
- Use vegetable shortening for a smoother, shinier chocolate coating (optional).
- Get creative with decorations!
- Prep Time: 20 minutes
- Cook Time: 10 minutes
Leave a Comment