
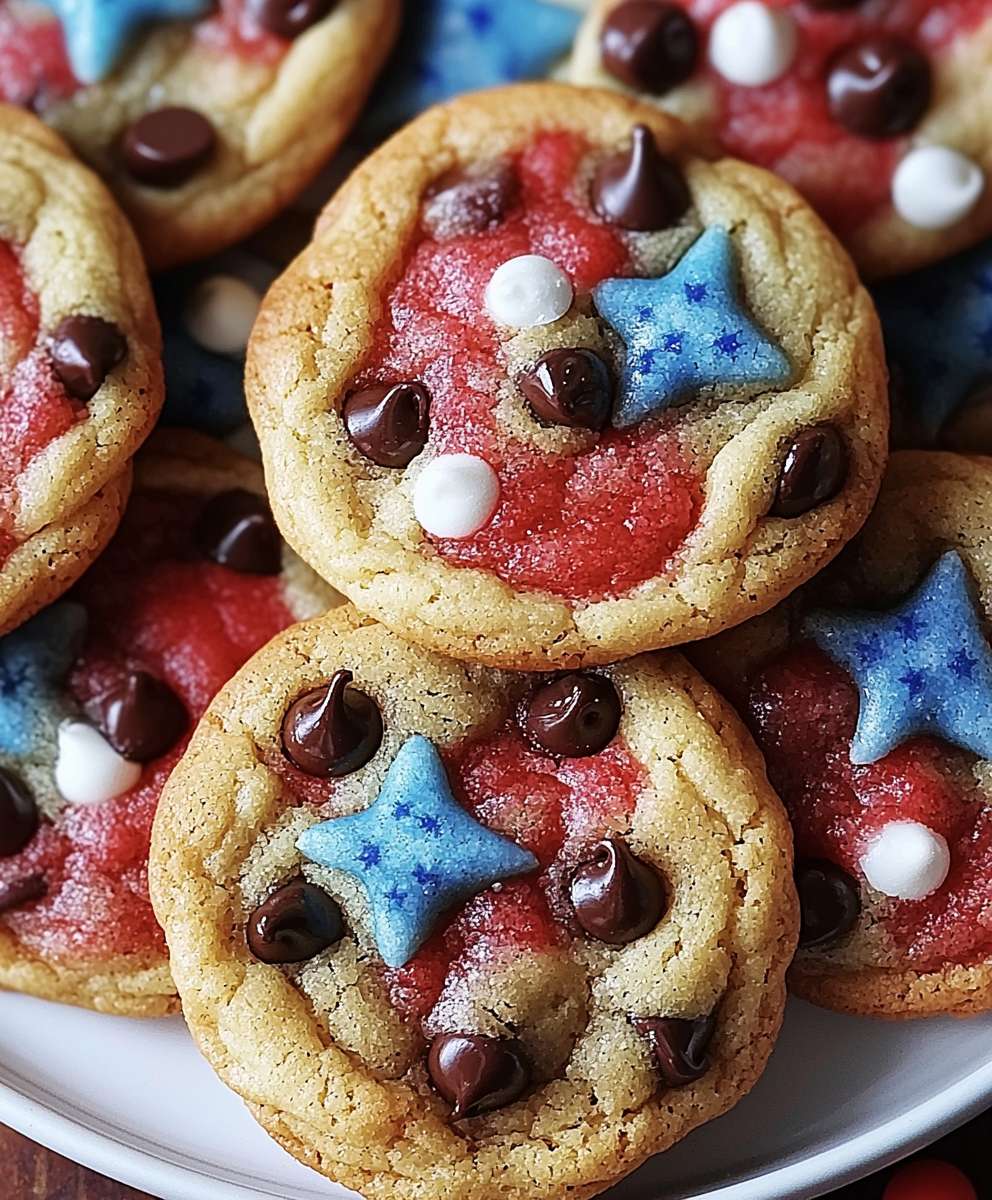
Patriotic Chocolate Chip Cookies: Get ready to bake up a batch of pure American delight! Imagine sinking your teeth into a warm, chewy cookie bursting with chocolate chips and festive red, white, and blue sprinkles. These aren’t just any cookies; they’re a celebration of flavor and freedom, perfect for your next Fourth of July barbecue, Memorial Day gathering, or any occasion where you want to show your stars-and-stripes spirit.
While the classic chocolate chip cookie has its roots in the 1930s, these Patriotic Chocolate Chip Cookies add a modern, festive twist to a beloved American treat. The simple addition of patriotic sprinkles transforms a familiar favorite into a visually stunning and thematically appropriate dessert. They’re a delicious way to honor our nation’s heritage and create lasting memories with family and friends.
What makes these cookies so irresistible? It’s the perfect combination of textures a slightly crisp edge giving way to a soft, gooey center. The rich, buttery flavor is enhanced by the sweetness of the chocolate chips and the playful crunch of the sprinkles. Plus, they’re incredibly easy to make, making them a fantastic option for bakers of all skill levels. Whether you’re a seasoned pro or a kitchen novice, these cookies are guaranteed to be a crowd-pleaser. So, grab your mixing bowls and let’s get baking!
Ingredients:
- 1 cup (2 sticks) unsalted butter, softened
- ¾ cup granulated sugar
- ¾ cup packed brown sugar
- 2 large eggs
- 1 teaspoon vanilla extract
- 2 ¼ cups all-purpose flour
- 1 teaspoon baking soda
- 1 teaspoon salt
- 2 cups semi-sweet chocolate chips
- ½ cup red, white, and blue sprinkles (or a mix of red, white, and blue candies)
Preparing the Dough:
- Cream the Butter and Sugars: In a large bowl, or the bowl of your stand mixer, cream together the softened butter, granulated sugar, and brown sugar until light and fluffy. This usually takes about 3-5 minutes. Make sure to scrape down the sides of the bowl occasionally to ensure everything is evenly mixed. I like to use a stand mixer with the paddle attachment for this, but a hand mixer works just as well!
- Add the Eggs and Vanilla: Beat in the eggs one at a time, mixing well after each addition. Then, stir in the vanilla extract. The mixture should be smooth and creamy at this point. Don’t overmix, just combine until everything is incorporated.
- Combine Dry Ingredients: In a separate medium bowl, whisk together the all-purpose flour, baking soda, and salt. Whisking helps to evenly distribute the baking soda and salt throughout the flour, which is crucial for proper leavening and flavor.
- Gradually Add Dry Ingredients to Wet Ingredients: Gradually add the dry ingredients to the wet ingredients, mixing on low speed until just combined. Be careful not to overmix! Overmixing can develop the gluten in the flour, resulting in tough cookies. Mix until you see the flour disappear, then stop.
- Stir in Chocolate Chips and Sprinkles: Gently fold in the chocolate chips and red, white, and blue sprinkles (or candies). Make sure they are evenly distributed throughout the dough. I like to use a rubber spatula for this step to avoid overmixing.
- Chill the Dough (Important!): Cover the bowl with plastic wrap and chill the dough in the refrigerator for at least 30 minutes, or up to 2 hours. Chilling the dough helps to prevent the cookies from spreading too much during baking and also allows the flavors to meld together. This step is crucial for achieving thick, chewy cookies. If you’re short on time, 30 minutes will do, but longer chilling times (up to 2 hours) will result in even better cookies.
Baking the Cookies:
- Preheat the Oven: Preheat your oven to 375°F (190°C). Make sure your oven rack is in the center position. An oven thermometer is a great tool to ensure your oven is accurately heated.
- Prepare Baking Sheets: Line baking sheets with parchment paper or silicone baking mats. This will prevent the cookies from sticking and make cleanup a breeze. Parchment paper also helps to distribute heat evenly, resulting in more evenly baked cookies.
- Scoop the Dough: Use a cookie scoop or spoon to drop rounded tablespoons of dough onto the prepared baking sheets, leaving about 2 inches between each cookie. I prefer using a cookie scoop for uniform size and even baking.
- Add Extra Sprinkles (Optional): For an extra festive touch, you can gently press a few more red, white, and blue sprinkles onto the tops of the cookies before baking. This will make them even more visually appealing.
- Bake the Cookies: Bake for 9-11 minutes, or until the edges are golden brown and the centers are still slightly soft. Keep a close eye on the cookies, as baking times can vary depending on your oven. The cookies will continue to bake slightly as they cool on the baking sheet.
- Cool the Cookies: Remove the baking sheets from the oven and let the cookies cool on the baking sheets for a few minutes before transferring them to a wire rack to cool completely. This allows the cookies to firm up slightly and prevents them from breaking when you transfer them.
Tips and Variations:
- For Chewier Cookies: Use more brown sugar than granulated sugar. Brown sugar contains molasses, which adds moisture and chewiness to the cookies.
- For Crispier Cookies: Use more granulated sugar than brown sugar. Granulated sugar helps to create a crispier texture.
- Add Nuts: Feel free to add ½ cup of chopped nuts, such as walnuts or pecans, to the dough for added flavor and texture.
- Use Different Chocolate: Experiment with different types of chocolate chips, such as milk chocolate, dark chocolate, or white chocolate.
- Make Them Gluten-Free: Substitute the all-purpose flour with a gluten-free all-purpose flour blend. Be sure to use a blend that contains xanthan gum for best results.
- Storage: Store the cooled cookies in an airtight container at room temperature for up to 3 days.
- Freezing: You can freeze the cookie dough for up to 2 months. Scoop the dough into balls and place them on a baking sheet lined with parchment paper. Freeze until solid, then transfer the frozen dough balls to a freezer bag. When ready to bake, bake from frozen, adding a few extra minutes to the baking time. You can also freeze the baked cookies for up to 2 months.
- Adjusting Sweetness: If you prefer less sweet cookies, reduce the amount of sugar by ¼ cup.
- High Altitude Baking: If you live at a high altitude, you may need to adjust the recipe slightly. Try reducing the amount of baking soda by ¼ teaspoon and adding 1-2 tablespoons of extra flour.
- Even Baking: To ensure even baking, rotate the baking sheets halfway through the baking time.
Troubleshooting:
- Cookies Spreading Too Much: If your cookies are spreading too much, make sure your butter is not too soft. Also, try chilling the dough for a longer period of time.
- Cookies Too Dry: If your cookies are too dry, try adding a tablespoon or two of milk to the dough.
- Cookies Too Hard: If your cookies are too hard, try baking them for a shorter period of time.
- Cookies Not Baking Evenly: If your cookies are not baking evenly, make sure your oven is properly calibrated and that you are rotating the baking sheets halfway through the baking time.
Enjoy your delicious and festive Patriotic Chocolate Chip Cookies! They’re perfect for celebrating holidays or any occasion where you want to show your American pride.

Conclusion:
This recipe for Patriotic Chocolate Chip Cookies isn’t just another cookie recipe; it’s a celebration baked into every bite! The combination of the classic, comforting chocolate chip cookie with the festive flair of red, white, and blue sprinkles makes it a must-try, especially for holidays like the Fourth of July, Memorial Day, or even just a fun summer barbecue. The soft, chewy texture, the rich chocolate chips, and the delightful crunch of the sprinkles create a symphony of flavors and textures that will have everyone reaching for seconds (and thirds!). But the real reason you absolutely have to try these cookies is because they’re incredibly easy to make. Seriously! Even if you’re a novice baker, you can whip up a batch of these in no time. The recipe is straightforward, the ingredients are readily available, and the results are guaranteed to impress. Plus, the process of decorating them with the patriotic sprinkles is a fun activity for the whole family. Get the kids involved, put on some music, and make it a baking party! Beyond the basic recipe, there are so many ways to customize these cookies to your liking. For a richer, more decadent flavor, try using dark chocolate chips instead of semi-sweet. Or, if you’re feeling adventurous, add a handful of chopped pecans or walnuts to the dough for a nutty crunch. You could even swirl in a bit of red and blue food coloring to create a marbled effect. Serving Suggestions and Variations: * Serve these cookies warm with a scoop of vanilla ice cream for a truly indulgent dessert. * Crumble them over yogurt or oatmeal for a festive breakfast treat. * Pack them in lunchboxes for a sweet surprise. * Use them to make ice cream sandwiches with vanilla or strawberry ice cream. * For a grown-up twist, drizzle them with a bit of melted white chocolate and sprinkle with sea salt. * Consider adding a touch of almond extract to the dough for a subtle, nutty flavor. * If you’re not a fan of sprinkles, you can use red, white, and blue M&Ms instead. * For a softer cookie, slightly underbake them. For a crispier cookie, bake them a little longer. I truly believe that these Patriotic Chocolate Chip Cookies will become a new family favorite. They’re perfect for any occasion, and they’re guaranteed to bring a smile to everyone’s face. The vibrant colors and delicious flavor make them a standout treat that’s sure to impress. So, what are you waiting for? Preheat your oven, gather your ingredients, and get ready to bake up a batch of these delightful cookies. I’m confident that you’ll love them as much as I do. And most importantly, I want to hear about your experience! Did you try the recipe? Did you make any variations? What did your family and friends think? Share your photos and stories in the comments below. I can’t wait to see your creations and hear all about your baking adventures. Happy baking! Let’s spread some patriotic cheer, one delicious cookie at a time! Print
Patriotic Chocolate Chip Cookies: A Deliciously Festive Recipe
- Total Time: 54 minutes
- Yield: 24 cookies 1x
Description
Soft, chewy chocolate chip cookies with red, white, and blue sprinkles, perfect for celebrations!
Ingredients
- 1 cup (2 sticks) unsalted butter, softened
- ¾ cup granulated sugar
- ¾ cup packed brown sugar
- 2 large eggs
- 1 teaspoon vanilla extract
- 2 ¼ cups all-purpose flour
- 1 teaspoon baking soda
- 1 teaspoon salt
- 2 cups semi-sweet chocolate chips
- ½ cup red, white, and blue sprinkles (or a mix of red, white, and blue candies)
Instructions
- In a large bowl, or the bowl of your stand mixer, cream together the softened butter, granulated sugar, and brown sugar until light and fluffy. This usually takes about 3-5 minutes. Make sure to scrape down the sides of the bowl occasionally to ensure everything is evenly mixed.
- Beat in the eggs one at a time, mixing well after each addition. Then, stir in the vanilla extract. The mixture should be smooth and creamy at this point. Don’t overmix, just combine until everything is incorporated.
- In a separate medium bowl, whisk together the all-purpose flour, baking soda, and salt.
- Gradually add the dry ingredients to the wet ingredients, mixing on low speed until just combined. Be careful not to overmix! Mix until you see the flour disappear, then stop.
- Gently fold in the chocolate chips and red, white, and blue sprinkles (or candies). Make sure they are evenly distributed throughout the dough.
- Cover the bowl with plastic wrap and chill the dough in the refrigerator for at least 30 minutes, or up to 2 hours.
- Preheat your oven to 375°F (190°C). Make sure your oven rack is in the center position.
- Line baking sheets with parchment paper or silicone baking mats.
- Use a cookie scoop or spoon to drop rounded tablespoons of dough onto the prepared baking sheets, leaving about 2 inches between each cookie.
- For an extra festive touch, you can gently press a few more red, white, and blue sprinkles onto the tops of the cookies before baking.
- Bake for 9-11 minutes, or until the edges are golden brown and the centers are still slightly soft.
- Remove the baking sheets from the oven and let the cookies cool on the baking sheets for a few minutes before transferring them to a wire rack to cool completely.
Notes
- For Chewier Cookies: Use more brown sugar than granulated sugar.
- For Crispier Cookies: Use more granulated sugar than brown sugar.
- Add Nuts: Feel free to add ½ cup of chopped nuts, such as walnuts or pecans, to the dough for added flavor and texture.
- Use Different Chocolate: Experiment with different types of chocolate chips, such as milk chocolate, dark chocolate, or white chocolate.
- Make Them Gluten-Free: Substitute the all-purpose flour with a gluten-free all-purpose flour blend. Be sure to use a blend that contains xanthan gum for best results.
- Storage: Store the cooled cookies in an airtight container at room temperature for up to 3 days.
- Freezing: You can freeze the cookie dough for up to 2 months. Scoop the dough into balls and place them on a baking sheet lined with parchment paper. Freeze until solid, then transfer the frozen dough balls to a freezer bag. When ready to bake, bake from frozen, adding a few extra minutes to the baking time. You can also freeze the baked cookies for up to 2 months.
- Adjusting Sweetness: If you prefer less sweet cookies, reduce the amount of sugar by ¼ cup.
- High Altitude Baking: If you live at a high altitude, you may need to adjust the recipe slightly. Try reducing the amount of baking soda by ¼ teaspoon and adding 1-2 tablespoons of extra flour.
- Even Baking: To ensure even baking, rotate the baking sheets halfway through the baking time.
- Cookies Spreading Too Much: If your cookies are spreading too much, make sure your butter is not too soft. Also, try chilling the dough for a longer period of time.
- Cookies Too Dry: If your cookies are too dry, try adding a tablespoon or two of milk to the dough.
- Cookies Too Hard: If your cookies are too hard, try baking them for a shorter period of time.
- Cookies Not Baking Evenly: If your cookies are not baking evenly, make sure your oven is properly calibrated and that you are rotating the baking sheets halfway through the baking time.
- Prep Time: 15 minutes
- Cook Time: 9 minutes


Leave a Comment