
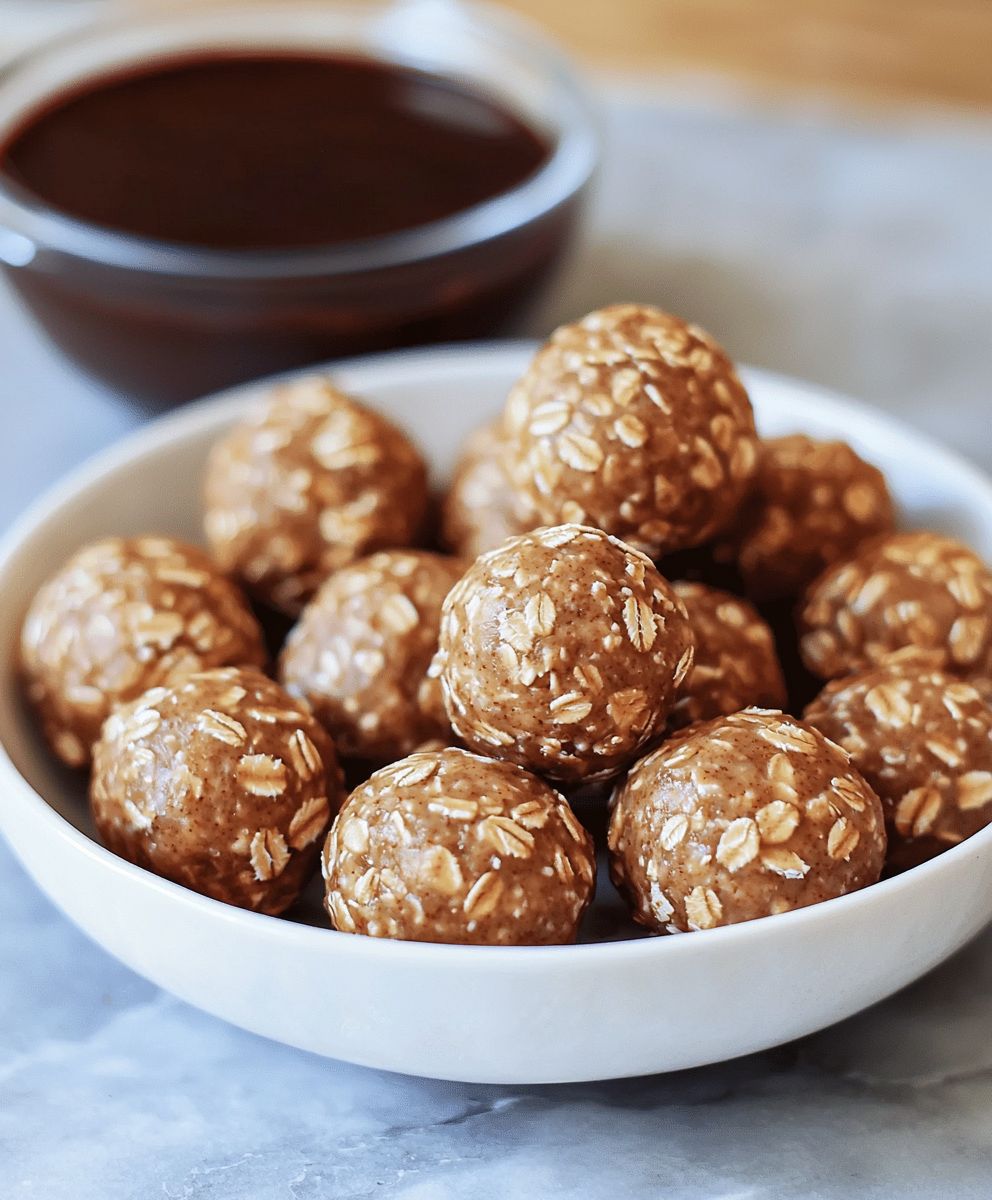
Peanut Butter Oatmeal Balls: the no-bake energy bites that will revolutionize your snack game! Are you tired of reaching for processed snacks when that afternoon slump hits? Do you crave something delicious, satisfying, and packed with wholesome ingredients? Then look no further! These little spheres of goodness are the answer to your prayers.
While the exact origins of energy balls are debated, the concept of combining oats, nut butter, and sweeteners for a quick and nutritious boost has likely been around for generations. Think of them as a modern, more convenient take on traditional oat-based snacks. What makes these Peanut Butter Oatmeal Balls so irresistible? It’s the perfect marriage of creamy peanut butter, chewy oats, and a touch of sweetness. The texture is divine slightly firm, yet melt-in-your-mouth soft.
But beyond the taste and texture, these energy bites are incredibly convenient. They require no baking, minimal ingredients, and can be whipped up in under 15 minutes. They’re perfect for busy mornings, post-workout fuel, or a healthy treat any time of day. Plus, they’re easily customizable to suit your dietary needs and preferences. So, get ready to ditch the processed snacks and embrace the deliciousness and convenience of these amazing Peanut Butter Oatmeal Balls!
Ingredients:
- 1 cup rolled oats (not instant)
- 1/2 cup creamy peanut butter (natural or regular)
- 1/4 cup honey or maple syrup
- 2 tablespoons chia seeds (optional, for added nutrients)
- 1/4 cup unsweetened shredded coconut (optional, for flavor and texture)
- 1/4 cup chocolate chips (mini or regular, your preference!)
- 1 teaspoon vanilla extract
- 1/4 teaspoon ground cinnamon (optional, for warmth)
- Pinch of salt (to enhance the flavors)
- 1-2 tablespoons milk (dairy or non-dairy, if needed to bind)
Getting Started: Preparing the Mixture
- First things first, grab a large mixing bowl. This will give you plenty of room to work without making a mess. Trust me, you’ll appreciate the extra space!
- Now, pour in your 1 cup of rolled oats. Make sure they’re the old-fashioned kind, not the instant ones. Instant oats tend to get too mushy and won’t give you the nice chewy texture we’re aiming for.
- Next, add in that creamy, dreamy 1/2 cup of peanut butter. I personally love using natural peanut butter because it has a richer flavor, but regular peanut butter works just as well. Just make sure it’s nice and smooth so it blends easily.
- Time for some sweetness! Pour in 1/4 cup of honey or maple syrup. I usually go for honey because I love its floral notes, but maple syrup adds a lovely caramel-like flavor. It’s totally up to you!
- If you’re feeling fancy (and want a boost of nutrients), toss in 2 tablespoons of chia seeds. These little guys are packed with fiber and omega-3s. You won’t even taste them, I promise!
- For a touch of tropical flavor and some added texture, sprinkle in 1/4 cup of unsweetened shredded coconut. If you’re not a fan of coconut, feel free to skip this step.
- Who can resist chocolate? Add in 1/4 cup of chocolate chips. I usually use mini chocolate chips because they distribute more evenly, but regular-sized ones are perfectly fine too. Dark chocolate, milk chocolate, semi-sweet the choice is yours!
- A splash of 1 teaspoon of vanilla extract will enhance all the other flavors. Don’t skip this!
- For a hint of warmth and spice, add 1/4 teaspoon of ground cinnamon. This is totally optional, but I think it adds a nice cozy touch.
- Finally, add a pinch of salt. This might seem counterintuitive in a sweet recipe, but it actually helps to balance out the flavors and make everything taste even better.
- Now, it’s time to get your hands dirty! Use a sturdy spoon or spatula to mix everything together. At first, it might seem like the mixture is too dry, but keep stirring. The peanut butter and honey will eventually start to bind everything together.
- If the mixture is still too dry and crumbly, add 1-2 tablespoons of milk (dairy or non-dairy) to help it come together. Add it one tablespoon at a time, mixing well after each addition, until the mixture is moist enough to form balls.
- Once everything is well combined, cover the bowl with plastic wrap or a lid and pop it in the refrigerator for at least 30 minutes. This will allow the oats to soften and the mixture to firm up, making it easier to roll into balls. You can even leave it in the fridge overnight if you want to prep ahead!
Rolling and Finishing the Oatmeal Balls
- After the mixture has chilled, take it out of the refrigerator. It should be much firmer now.
- Line a baking sheet with parchment paper or a silicone mat. This will prevent the oatmeal balls from sticking.
- Now, it’s time to roll the mixture into balls. I like to use a small cookie scoop to ensure that they’re all the same size, but you can also just use your hands.
- Take a spoonful of the mixture and roll it between your palms until it forms a smooth ball. Aim for about 1-inch in diameter.
- Place the rolled ball onto the prepared baking sheet.
- Repeat steps 4 and 5 until you’ve used up all of the mixture.
- If you want to add an extra touch of flair, you can roll the oatmeal balls in additional toppings. Some ideas include:
- More shredded coconut
- Chopped nuts (like peanuts, almonds, or walnuts)
- Cocoa powder
- Sprinkles
- Once all the oatmeal balls are rolled and (optionally) coated, you can either enjoy them immediately or store them in the refrigerator for later.
Storing and Serving Your Peanut Butter Oatmeal Balls
- To store the oatmeal balls, place them in an airtight container and keep them in the refrigerator for up to a week. They’ll stay fresh and delicious!
- You can also freeze the oatmeal balls for longer storage. Place them in a freezer-safe container or bag and freeze for up to 2-3 months. When you’re ready to eat them, simply thaw them in the refrigerator for a few hours or overnight.
- These peanut butter oatmeal balls are perfect for a quick and easy breakfast, a healthy snack, or even a guilt-free dessert.
- Enjoy them straight from the refrigerator for a cool and refreshing treat, or let them sit at room temperature for a few minutes to soften up a bit.
- Get creative with your toppings and mix-ins! Try adding dried fruit, different types of nuts, or even a drizzle of melted chocolate. The possibilities are endless!
- These oatmeal balls are also a great way to use up leftover ingredients in your pantry. Don’t be afraid to experiment and see what you can come up with!
- They are also a great snack for kids. They are easy to eat and packed with nutrients. You can even get your kids involved in making them!
- These peanut butter oatmeal balls are a versatile and delicious treat that you can enjoy any time of day. So go ahead and give them a try! I’m sure you’ll love them as much as I do.
Tips and Tricks for Perfect Oatmeal Balls
- Don’t overmix the mixture. Overmixing can make the oatmeal balls tough. Just mix until everything is combined.
- Adjust the sweetness to your liking. If you prefer a sweeter oatmeal ball, add more honey or maple syrup. If you prefer a less sweet oatmeal ball, reduce the amount of honey or maple syrup.
- Use a good quality peanut butter. The quality of the peanut butter will affect the flavor of the oatmeal balls. I recommend using a natural peanut butter for the best flavor.
- Chill the mixture before rolling. Chilling the mixture will make it easier to roll into balls.
- Use a cookie scoop to make uniform balls. A cookie scoop will help you make uniform oatmeal balls.
- Store the oatmeal balls in an airtight container. Storing the oatmeal balls in an airtight container will help them stay fresh.
- Freeze the oatmeal balls for longer storage. You can freeze the oatmeal balls for up to 2-3 months.
- Get creative with your toppings and mix-ins. The possibilities are endless! Try adding dried fruit, different types of nuts, or even a drizzle of melted chocolate.
- Make them vegan. Use maple syrup instead of honey and a plant-based milk.
- Make them gluten-free. Ensure your rolled oats are certified gluten-free.

Conclusion:
So there you have it! These Peanut Butter Oatmeal Balls are truly a must-try for anyone looking for a quick, healthy, and utterly delicious snack or treat. I know I’ve already made several batches this week alone! The beauty of this recipe lies in its simplicity and adaptability. It’s perfect for busy mornings when you need a grab-and-go breakfast, a satisfying afternoon pick-me-up, or even a guilt-free dessert after dinner. What makes these little bites so special? First, the combination of creamy peanut butter and hearty oats creates a wonderfully satisfying texture and flavor profile. The peanut butter provides healthy fats and protein, while the oats offer fiber and sustained energy. Second, the recipe is incredibly versatile. You can easily customize it to suit your own preferences and dietary needs. Looking for serving suggestions? These Peanut Butter Oatmeal Balls are fantastic on their own, but you can also enjoy them in a variety of ways. Try crumbling them over yogurt or ice cream for added texture and flavor. Pack them in your lunchbox for a convenient and healthy snack. Or, serve them as a fun and interactive treat at your next party. And speaking of variations, the possibilities are endless! Want to add a little extra sweetness? Stir in a tablespoon or two of honey or maple syrup. Craving some chocolate? Fold in some mini chocolate chips or cocoa powder. Need a boost of energy? Add a scoop of protein powder or some chia seeds. For a nuttier flavor, try using almond butter or cashew butter instead of peanut butter. You could even add dried cranberries, raisins, or chopped nuts for extra texture and flavor. Get creative and experiment with different ingredients to find your perfect combination!Serving and Storage Tips
For optimal freshness, store your Peanut Butter Oatmeal Balls in an airtight container in the refrigerator. They will keep for up to a week, making them a great make-ahead snack. You can also freeze them for longer storage. Simply place them in a freezer-safe bag or container and they will keep for up to two months. When you’re ready to enjoy them, just thaw them in the refrigerator or at room temperature.Why You Should Try This Recipe
I truly believe that everyone should try this recipe at least once. It’s so easy to make, requires minimal ingredients, and is incredibly satisfying. Plus, it’s a great way to get your kids involved in the kitchen. They’ll love helping you mix the ingredients and roll the balls. And who knows, they might even discover a new favorite snack! So, what are you waiting for? Gather your ingredients and get ready to whip up a batch of these delicious Peanut Butter Oatmeal Balls. I promise you won’t be disappointed. And when you do, please come back and share your experience in the comments below. I’d love to hear what variations you tried and how much you enjoyed them. Happy baking (or should I say, no-baking)! I can’t wait to hear all about your Peanut Butter Oatmeal Balls adventures! Let me know if you have any questions, and happy snacking! Print
Peanut Butter Oatmeal Balls: The Ultimate No-Bake Recipe
- Total Time: 40 minutes
- Yield: 12–15 balls 1x
Description
Easy, no-bake peanut butter oatmeal energy balls packed with healthy ingredients like oats, peanut butter, and chia seeds. A perfect quick breakfast, snack, or healthy dessert!
Ingredients
- 1 cup rolled oats (not instant)
- 1/2 cup creamy peanut butter (natural or regular)
- 1/4 cup honey or maple syrup
- 2 tablespoons chia seeds (optional, for added nutrients)
- 1/4 cup unsweetened shredded coconut (optional, for flavor and texture)
- 1/4 cup chocolate chips (mini or regular, your preference!)
- 1 teaspoon vanilla extract
- 1/4 teaspoon ground cinnamon (optional, for warmth)
- Pinch of salt (to enhance the flavors)
- 1–2 tablespoons milk (dairy or non-dairy, if needed to bind)
Instructions
- Prepare the Mixture: In a large mixing bowl, combine rolled oats, peanut butter, honey or maple syrup, chia seeds (if using), shredded coconut (if using), chocolate chips, vanilla extract, cinnamon (if using), and salt.
- Mix well with a sturdy spoon or spatula. If the mixture is too dry, add milk, one tablespoon at a time, until it comes together.
- Cover the bowl and refrigerate for at least 30 minutes (or overnight) to allow the oats to soften and the mixture to firm up.
- Roll and Finish: Line a baking sheet with parchment paper.
- Remove the mixture from the refrigerator.
- Roll the mixture into 1-inch balls using a cookie scoop or your hands.
- Place the balls on the prepared baking sheet.
- (Optional) Roll the balls in additional toppings like shredded coconut, chopped nuts, or cocoa powder.
- Store and Serve: Enjoy immediately or store in an airtight container in the refrigerator for up to a week, or freeze for up to 2-3 months.
Notes
- Don’t overmix the mixture.
- Adjust the sweetness to your liking.
- Use a good quality peanut butter.
- Chill the mixture before rolling.
- Use a cookie scoop to make uniform balls.
- Store the oatmeal balls in an airtight container.
- Freeze the oatmeal balls for longer storage.
- Get creative with your toppings and mix-ins.
- Make them vegan. Use maple syrup instead of honey and a plant-based milk.
- Make them gluten-free. Ensure your rolled oats are certified gluten-free.
- Prep Time: 10 minutes
- Cook Time: 0 minutes

Leave a Comment