
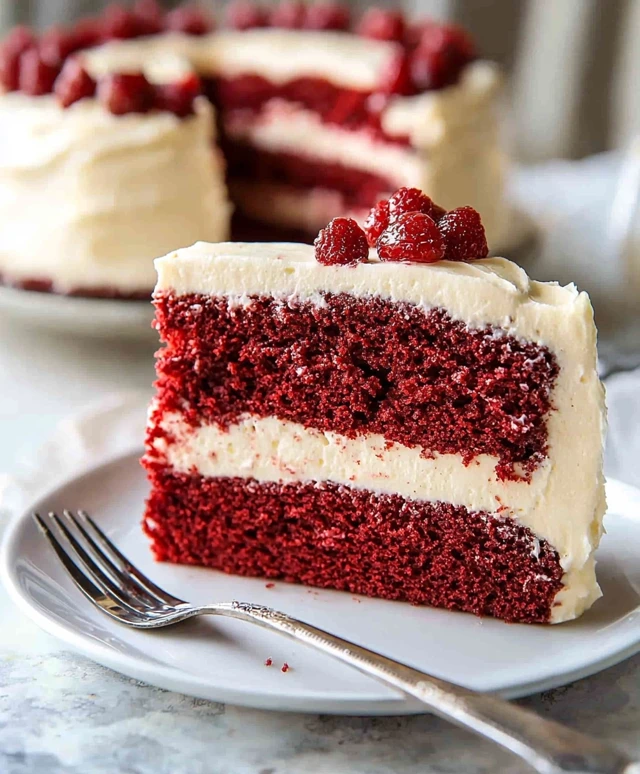
Red Velvet Cake is not just a dessert; its a celebration on a plate! This strikingly beautiful cake, with its vibrant red hue and creamy white frosting, has a rich history that dates back to the 1920s. Originating in the southern United States, it quickly became a beloved staple at special occasions, particularly during Valentines Day and weddings. The unique combination of cocoa powder, buttermilk, and vinegar gives Red Velvet Cake its signature flavor and moist texture, making it a favorite among cake lovers everywhere.
People adore this cake not only for its stunning appearance but also for its delightful taste and velvety crumb. The subtle chocolate flavor paired with the tangy cream cheese frosting creates a perfect balance that keeps everyone coming back for more. Plus, its surprisingly easy to make, which is why I often whip up a Red Velvet Cake for gatherings and celebrations. Join me as we dive into this delicious recipe that is sure to impress your family and friends!
Ingredients:
- 2 ½ cups all-purpose flour
- 1 ½ cups granulated sugar
- 1 teaspoon baking soda
- 1 teaspoon salt
- 1 teaspoon cocoa powder
- 1 ½ cups vegetable oil
- 1 cup buttermilk, room temperature
- 2 large eggs, room temperature
- 2 tablespoons red food coloring
- 1 teaspoon vanilla extract
- 1 teaspoon white vinegar
For the Cream Cheese Frosting:
- 1 cup unsalted butter, softened
- 8 oz cream cheese, softened
- 4 cups powdered sugar
- 1 teaspoon vanilla extract
- 1-2 tablespoons heavy cream (optional, for consistency)
Preparing the Batter
1. **Preheat the Oven**: Start by preheating your oven to 350°F (175°C). This ensures that your cake bakes evenly. 2. **Prepare the Cake Pans**: Grease and flour two 9-inch round cake pans. You can also line the bottoms with parchment paper for easier removal later. 3. **Mix Dry Ingredients**: In a large mixing bowl, sift together the flour, sugar, baking soda, salt, and cocoa powder. Sifting helps to aerate the flour and remove any lumps, which is crucial for a light and fluffy cake. 4. **Combine Wet Ingredients**: In another bowl, whisk together the vegetable oil, buttermilk, eggs, red food coloring, vanilla extract, and white vinegar. Make sure everything is well combined. The vinegar reacts with the baking soda to give the cake its lift, while the buttermilk adds moisture and richness. 5. **Combine Wet and Dry Ingredients**: Gradually add the wet mixture to the dry ingredients. Using a spatula or a hand mixer on low speed, mix until just combined. Be careful not to overmix; a few lumps are okay. Overmixing can lead to a dense cake. 6. **Divide the Batter**: Once the batter is ready, divide it evenly between the two prepared cake pans. I like to use a kitchen scale for accuracy, but you can also eyeball it. 7. **Bake the Cakes**: Place the pans in the preheated oven and bake for 25-30 minutes, or until a toothpick inserted into the center comes out clean. Keep an eye on them, as oven temperatures can vary. 8. **Cool the Cakes**: Once baked, remove the cakes from the oven and let them cool in the pans for about 10 minutes. Then, carefully turn them out onto a wire rack to cool completely. This step is crucial; if you frost the cakes while theyre still warm, the frosting will melt.Making the Cream Cheese Frosting
9. **Beat the Butter and Cream Cheese**: In a large mixing bowl, beat the softened butter and cream cheese together using a hand mixer or stand mixer on medium speed until smooth and creamy. This usually takes about 2-3 minutes. 10. **Add Powdered Sugar**: Gradually add the powdered sugar, one cup at a time, mixing on low speed until combined. Once all the sugar is added, increase the speed to medium and beat until fluffy, about 3-4 minutes. 11. **Add Vanilla and Cream**: Mix in the vanilla extract. If the frosting is too thick, add heavy cream one tablespoon at a time until you reach your desired consistency. I like my frosting to be spreadable but still hold its shape.Assembling the Cake
12. **Level the Cakes**: If your cakes have domed tops, use a serrated knife to level them. This will help the layers stack evenly and make for a prettier presentation. 13. **First Layer**: Place one cake layer on a serving plate or cake stand. Spread a generous amount of cream cheese frosting on top of the first layer. Use an offset spatula for a smooth finish. 14. **Add the Second Layer**: Carefully place the second cake layer on top of the frosted first layer. Press down gently to ensure it adheres. 15. **Frost the Sides and Top**: Use the remaining cream cheese frosting to frost the top and sides of the cake. I like to create a rustic look by using the spatula to create swirls and peaks in the frosting. 16. **Decorate (Optional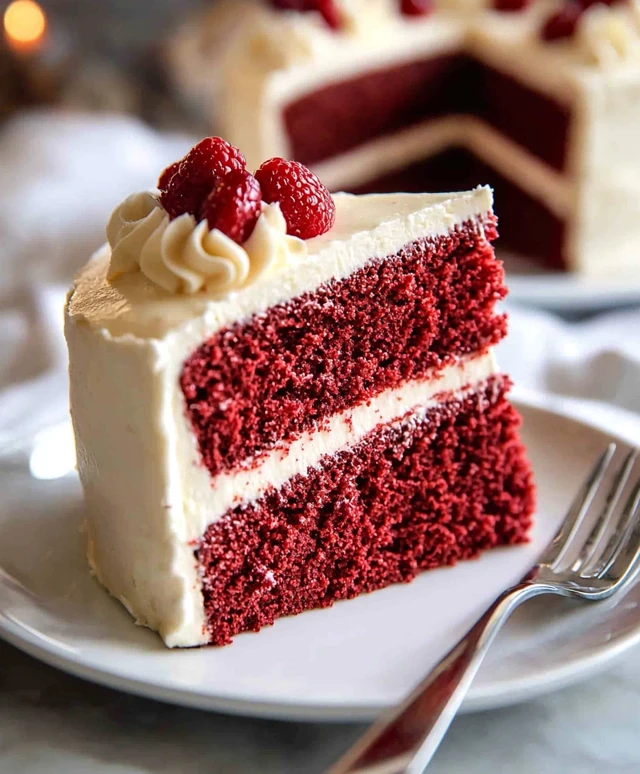
Conclusion:
In summary, this Red Velvet Cake recipe is an absolute must-try for anyone looking to impress at their next gathering or simply indulge in a slice of something truly special. The rich, velvety texture combined with the subtle hint of cocoa and the tangy cream cheese frosting creates a delightful balance that is simply irresistible. Whether youre celebrating a birthday, an anniversary, or just treating yourself on a Tuesday, this cake is sure to be the star of the show. For serving suggestions, consider pairing your Red Velvet Cake with a scoop of vanilla ice cream or a dollop of whipped cream for an extra touch of decadence. You can also experiment with variations by adding a layer of chocolate ganache or incorporating some crushed nuts for added texture. If youre feeling adventurous, try making cupcakes instead of a traditional cake, or even a Red Velvet trifle for a fun twist! I wholeheartedly encourage you to give this recipe a try and share your experience with friends and family. Id love to hear how your Red Velvet Cake turns out and any creative twists you add to make it your own. Remember, baking is all about having fun and experimenting, so dont hesitate to make it uniquely yours. Happy baking! PrintRed Velvet Cake: The Ultimate Guide to Baking and Decorating This Classic Dessert
- Total Time: 60 minutes
- Yield: 12 servings 1x
Description
Experience the decadence of a classic Red Velvet Cake, featuring a moist and flavorful cake layered with rich cream cheese frosting. Perfect for any celebration or a sweet treat, this dessert is sure to impress with its vibrant color and delightful taste.
Ingredients
- 2 ½ cups all-purpose flour
- 1 ½ cups granulated sugar
- 1 teaspoon baking soda
- 1 teaspoon salt
- 1 teaspoon cocoa powder
- 1 ½ cups vegetable oil
- 1 cup buttermilk, room temperature
- 2 large eggs, room temperature
- 2 tablespoons red food coloring
- 1 teaspoon vanilla extract
- 1 teaspoon white vinegar
- 1 cup unsalted butter, softened
- 8 oz cream cheese, softened
- 4 cups powdered sugar
- 1 teaspoon vanilla extract
- 1–2 tablespoons heavy cream (optional, for consistency)
Instructions
- Preheat your oven to 350°F (175°C).
- Grease and flour two 9-inch round cake pans, or line the bottoms with parchment paper.
- In a large mixing bowl, sift together the flour, sugar, baking soda, salt, and cocoa powder.
- In another bowl, whisk together the vegetable oil, buttermilk, eggs, red food coloring, vanilla extract, and white vinegar until well combined.
- Gradually add the wet mixture to the dry ingredients, mixing until just combined. Avoid overmixing.
- Evenly divide the batter between the two prepared cake pans.
- Bake in the preheated oven for 25-30 minutes, or until a toothpick inserted into the center comes out clean.
- Let the cakes cool in the pans for about 10 minutes, then turn them out onto a wire rack to cool completely.
- In a large mixing bowl, beat the softened butter and cream cheese together until smooth and creamy.
- Gradually add the powdered sugar, mixing on low speed until combined, then beat on medium speed until fluffy.
- Mix in the vanilla extract. If the frosting is too thick, add heavy cream one tablespoon at a time until desired consistency is reached.
- If necessary, level the tops of the cakes with a serrated knife.
- Place one cake layer on a serving plate and spread a generous amount of cream cheese frosting on top.
- Carefully place the second cake layer on top of the frosted first layer.
- Use the remaining cream cheese frosting to frost the top and sides of the cake.
- Add any desired decorations to finish your cake.
Notes
- Ensure all ingredients are at room temperature for the best results.
- For a more intense red color, you can adjust the amount of food coloring used.
- Store any leftover cake in an airtight container in the refrigerator.
- Prep Time: 30 minutes
- Cook Time: 30 minutes
Leave a Comment