
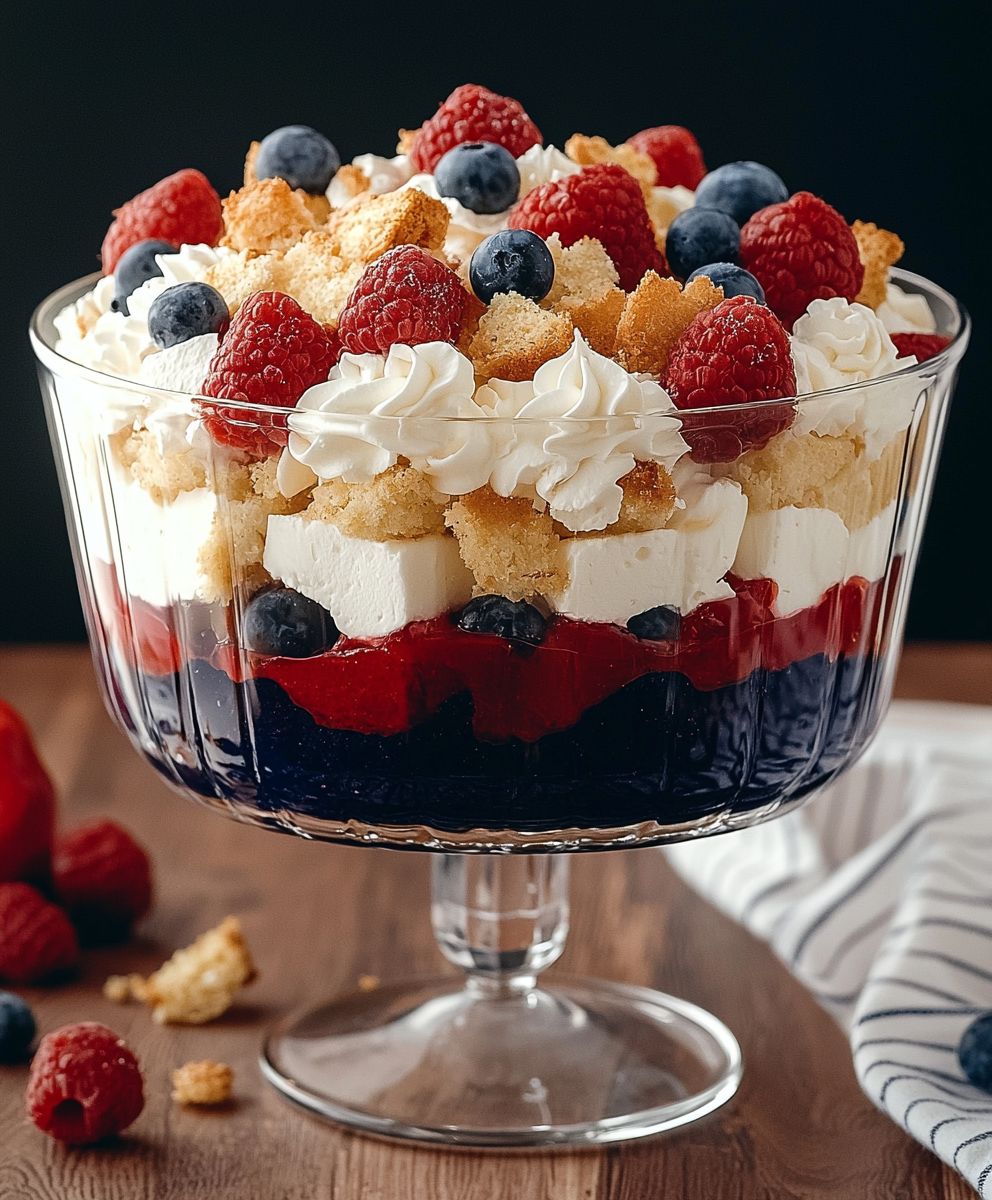
Red White Blue Trifle: the ultimate showstopper dessert for your patriotic celebrations! Imagine layers of fluffy angel food cake, luscious berries bursting with flavor, and creamy vanilla custard, all coming together in a stunning visual display. This isn’t just a dessert; it’s a centerpiece that embodies the spirit of summer gatherings and national pride.
While the exact origins of trifle are debated, its roots can be traced back to England, evolving from simple fruit fools to the elaborate layered desserts we know and love today. The American adaptation, especially the Red White Blue Trifle, has become synonymous with Fourth of July festivities, Memorial Day barbecues, and any occasion where a touch of patriotic flair is desired. It’s a dessert that speaks to our shared history and love for simple, delicious pleasures.
What makes this trifle so irresistible? It’s the perfect combination of textures and flavors. The light and airy cake contrasts beautifully with the juicy berries and smooth custard. The sweetness is balanced by the slight tartness of the fruit, creating a symphony of sensations in every bite. Plus, it’s incredibly easy to assemble, making it a stress-free option for busy hosts. Whether you’re a seasoned baker or a kitchen novice, this Red White Blue Trifle is guaranteed to impress your guests and become a cherished tradition for years to come. Get ready to dive into a dessert that’s as beautiful as it is delicious!
Ingredients:
- For the Pound Cake:
- 2 cups all-purpose flour
- 1 teaspoon baking powder
- 1/2 teaspoon baking soda
- 1/4 teaspoon salt
- 1 cup (2 sticks) unsalted butter, softened
- 1 3/4 cups granulated sugar
- 4 large eggs
- 1 teaspoon vanilla extract
- 1 cup buttermilk
- For the Strawberry Layer:
- 2 pounds fresh strawberries, hulled and sliced
- 1/2 cup granulated sugar
- 2 tablespoons lemon juice
- For the Blueberry Layer:
- 2 pints fresh blueberries, rinsed and sorted
- 1/4 cup granulated sugar
- 1 tablespoon lemon juice
- For the Vanilla Pastry Cream:
- 2 cups whole milk
- 1 vanilla bean, split and scraped (or 2 teaspoons vanilla extract)
- 6 large egg yolks
- 3/4 cup granulated sugar
- 1/4 cup cornstarch
- 2 tablespoons unsalted butter
- 1/4 teaspoon salt
- For the Whipped Cream Topping:
- 2 cups heavy cream
- 1/2 cup powdered sugar
- 1 teaspoon vanilla extract
- Optional Garnish:
- Fresh strawberries
- Fresh blueberries
- Mint sprigs
Making the Pound Cake
- Preheat and Prep: First things first, preheat your oven to 350°F (175°C). Grease and flour a 9×5 inch loaf pan. This will prevent the cake from sticking and ensure easy removal. I like to use baking spray with flour already in it its a lifesaver!
- Dry Ingredients: In a medium bowl, whisk together the flour, baking powder, baking soda, and salt. Whisking ensures that everything is evenly distributed, which is key for a good rise.
- Cream Butter and Sugar: In a large bowl (or the bowl of your stand mixer), cream together the softened butter and sugar until light and fluffy. This usually takes about 3-5 minutes. Don’t rush this step; it’s important for incorporating air into the batter.
- Add Eggs: Beat in the eggs one at a time, making sure each egg is fully incorporated before adding the next. Then, stir in the vanilla extract.
- Alternate Wet and Dry: Gradually add the dry ingredients to the wet ingredients, alternating with the buttermilk, beginning and ending with the dry ingredients. So, add about 1/3 of the dry ingredients, then 1/2 of the buttermilk, then another 1/3 of the dry ingredients, the remaining buttermilk, and finally the last of the dry ingredients. Mix until just combined. Be careful not to overmix, as this can result in a tough cake.
- Bake: Pour the batter into the prepared loaf pan and bake for 50-60 minutes, or until a wooden skewer inserted into the center comes out clean.
- Cool: Let the cake cool in the pan for 10 minutes before transferring it to a wire rack to cool completely. Once cooled, wrap it tightly in plastic wrap and refrigerate for at least 2 hours (or overnight). This makes it easier to slice.
Preparing the Fruit Layers
- Strawberry Layer: In a medium bowl, combine the sliced strawberries, sugar, and lemon juice. Gently toss to combine. Let this mixture sit for about 30 minutes, allowing the strawberries to macerate and release their juices. This creates a delicious, syrupy strawberry layer.
- Blueberry Layer: In a separate medium bowl, combine the blueberries, sugar, and lemon juice. Toss to combine. You don’t need to macerate the blueberries for as long as the strawberries; 15 minutes is usually sufficient.
Making the Vanilla Pastry Cream
- Infuse the Milk: In a medium saucepan, combine the milk and vanilla bean (if using). Heat over medium heat until just simmering. Remove from heat, cover, and let steep for 30 minutes to infuse the milk with vanilla flavor. If you’re using vanilla extract, you’ll add it later.
- Whisk Egg Yolks and Sugar: In a medium bowl, whisk together the egg yolks, sugar, and cornstarch until pale and smooth. This is important to prevent lumps in your pastry cream.
- Temper the Egg Yolks: Slowly pour about 1/2 cup of the warm milk into the egg yolk mixture, whisking constantly to temper the eggs. This prevents them from scrambling when you add them to the hot milk.
- Combine and Cook: Pour the tempered egg yolk mixture back into the saucepan with the remaining milk. Cook over medium heat, whisking constantly, until the mixture thickens and comes to a simmer. Continue to cook for 1-2 minutes more, whisking vigorously, to ensure the cornstarch is fully cooked.
- Finish and Cool: Remove from heat and stir in the butter and salt (and vanilla extract, if not using a vanilla bean). Pour the pastry cream into a clean bowl, cover the surface with plastic wrap (to prevent a skin from forming), and refrigerate for at least 2 hours, or until completely chilled.
Making the Whipped Cream Topping
- Chill Everything: Make sure your bowl and whisk attachment (or beaters) are well-chilled. This helps the cream whip up faster and hold its shape better. I often put them in the freezer for about 15 minutes before starting.
- Whip the Cream: In the chilled bowl, combine the heavy cream, powdered sugar, and vanilla extract. Beat on medium speed until stiff peaks form. Be careful not to overwhip, or you’ll end up with butter!
Assembling the Trifle
- Slice the Cake: Cut the chilled pound cake into 1/2-inch thick slices. You can also cut the slices into cubes if you prefer.
- Layering Time: In a large trifle bowl (or individual serving dishes), begin by layering some of the pound cake on the bottom.
- Add Strawberries: Spoon a layer of the macerated strawberries and their juices over the cake.
- Add Pastry Cream: Spread a layer of the chilled vanilla pastry cream over the strawberries.
- Add Blueberries: Sprinkle a layer of blueberries over the pastry cream.
- Repeat Layers: Repeat the layers (cake, strawberries, pastry cream, blueberries) until all the ingredients are used, ending with a layer of pastry cream.
- Top with Whipped Cream: Spread the whipped cream evenly over the top layer of pastry cream.
- Garnish (Optional): Garnish with fresh strawberries, blueberries, and mint sprigs, if desired.
- Chill: Cover the trifle and refrigerate for at least 2 hours before serving. This allows the flavors to meld together and the cake to soften slightly. I find it’s even better if it sits overnight!
Conclusion:
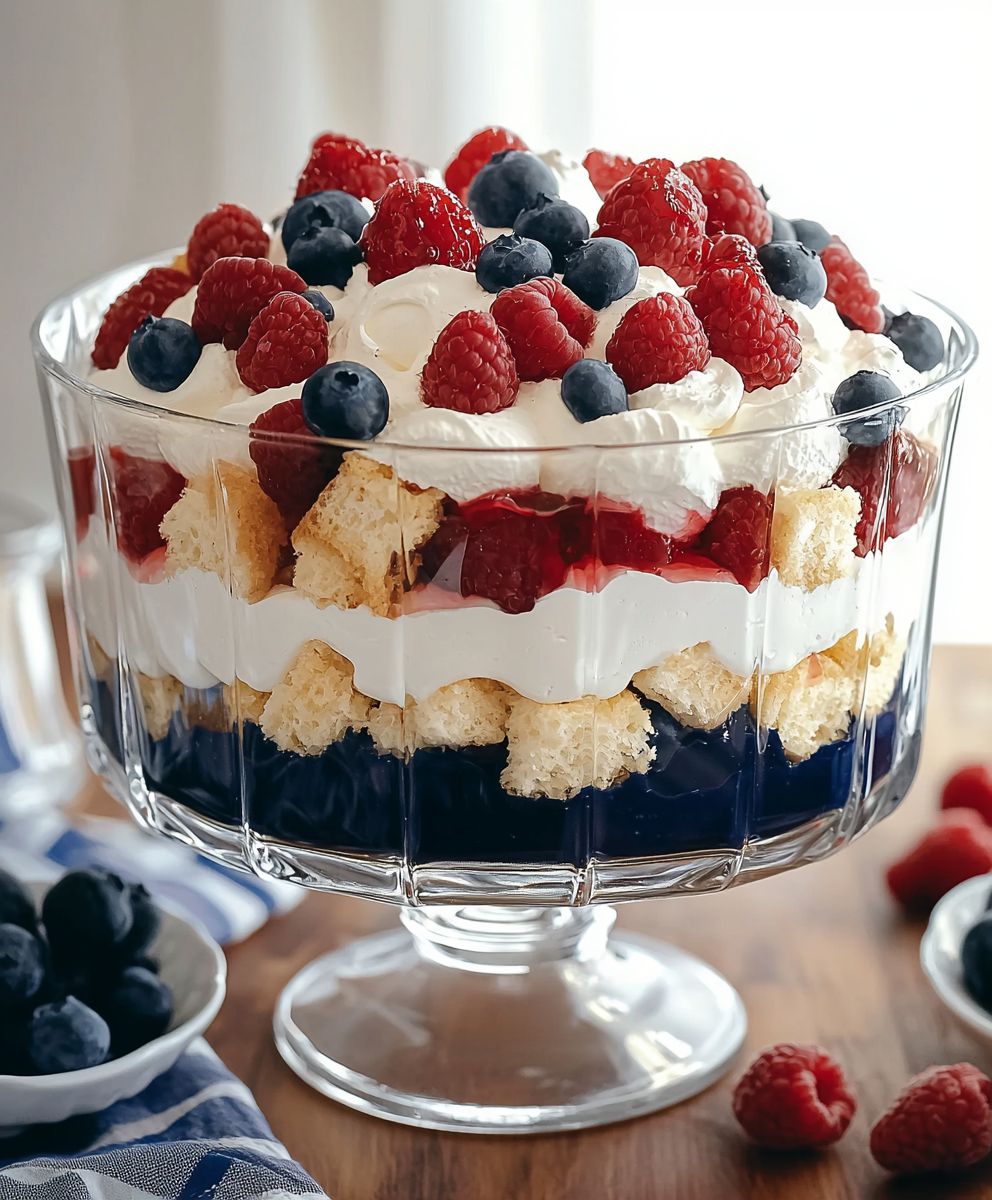
This Red White Blue Trifle isn’t just a dessert; it’s a celebration in a bowl! From the vibrant layers to the delightful combination of textures and flavors, it’s guaranteed to be a showstopper at your next gathering. The sweetness of the berries, the creamy richness of the custard, and the light, airy sponge cake all come together in perfect harmony. Trust me, once you take that first bite, you’ll understand why I’m so enthusiastic about this recipe. It’s the kind of dessert that brings smiles and creates lasting memories. But the best part? It’s incredibly easy to make! Even if you’re not a seasoned baker, you can absolutely nail this trifle. The recipe is straightforward, and the results are always impressive. Plus, you can easily customize it to your liking.Serving Suggestions and Variations:
Want to take your trifle to the next level? Here are a few ideas: * Boozy Berry Boost: For an adult twist, consider soaking the sponge cake in a little bit of berry liqueur or even a splash of rum. Just be sure to adjust the sweetness of the custard accordingly. * Chocolate Indulgence: Add a layer of chocolate shavings or even a thin layer of chocolate mousse for a richer, more decadent experience. * Nutty Delight: Sprinkle some toasted almonds or pecans between the layers for added crunch and flavor. * Individual Trifles: Instead of making one large trifle, assemble individual trifles in small glasses or jars for a more elegant presentation. This is perfect for parties or special occasions. * Seasonal Fruit Swap: While the classic Red White Blue Trifle uses strawberries, blueberries, and raspberries, feel free to experiment with other seasonal fruits. Blackberries, cherries, or even peaches would be delicious additions. * Dairy-Free Delight: Easily adapt this recipe for those with dairy sensitivities by using dairy-free custard and whipped cream alternatives. There are some fantastic options available these days that taste just as good as the real thing! * Cake Alternatives: If you’re not a fan of sponge cake, you can substitute it with angel food cake, ladyfingers, or even pound cake. Just make sure the cake is light and airy so it doesn’t weigh down the trifle. I truly believe that this Red White Blue Trifle is a must-try for anyone who loves a delicious and visually stunning dessert. It’s perfect for summer barbecues, holiday gatherings, or any occasion that calls for a little bit of sweetness and celebration. So, what are you waiting for? Gather your ingredients, put on your apron, and get ready to create a masterpiece! I’m confident that you’ll love this recipe as much as I do. And most importantly, I want to hear about your experience! Did you try the recipe? Did you make any variations? What did your friends and family think? Share your photos and stories in the comments below. I can’t wait to see your creations and hear all about your trifle adventures! Happy baking! Print
Red White Blue Trifle: A Delicious & Festive Dessert Recipe
- Total Time: 180 minutes
- Yield: 12–16 servings 1x
Description
A stunning and delicious trifle featuring layers of homemade pound cake, macerated strawberries, fresh blueberries, creamy vanilla pastry cream, and fluffy whipped cream. Perfect for a show-stopping dessert!
Ingredients
- 2 cups all-purpose flour
- 1 teaspoon baking powder
- 1/2 teaspoon baking soda
- 1/4 teaspoon salt
- 1 cup (2 sticks) unsalted butter, softened
- 1 3/4 cups granulated sugar
- 4 large eggs
- 1 teaspoon vanilla extract
- 1 cup buttermilk
- 2 pounds fresh strawberries, hulled and sliced
- 1/2 cup granulated sugar
- 2 tablespoons lemon juice
- 2 pints fresh blueberries, rinsed and sorted
- 1/4 cup granulated sugar
- 1 tablespoon lemon juice
- 2 cups whole milk
- 1 vanilla bean, split and scraped (or 2 teaspoons vanilla extract)
- 6 large egg yolks
- 3/4 cup granulated sugar
- 1/4 cup cornstarch
- 2 tablespoons unsalted butter
- 1/4 teaspoon salt
- 2 cups heavy cream
- 1/2 cup powdered sugar
- 1 teaspoon vanilla extract
- Fresh strawberries
- Fresh blueberries
- Mint sprigs
Instructions
- Preheat your oven to 350°F (175°C). Grease and flour a 9×5 inch loaf pan.
- In a medium bowl, whisk together the flour, baking powder, baking soda, and salt.
- In a large bowl (or the bowl of your stand mixer), cream together the softened butter and sugar until light and fluffy (3-5 minutes).
- Beat in the eggs one at a time, making sure each egg is fully incorporated before adding the next. Then, stir in the vanilla extract.
- Gradually add the dry ingredients to the wet ingredients, alternating with the buttermilk, beginning and ending with the dry ingredients. Mix until just combined.
- Pour the batter into the prepared loaf pan and bake for 50-60 minutes, or until a wooden skewer inserted into the center comes out clean.
- Let the cake cool in the pan for 10 minutes before transferring it to a wire rack to cool completely. Once cooled, wrap it tightly in plastic wrap and refrigerate for at least 2 hours (or overnight).
- In a medium bowl, combine the sliced strawberries, sugar, and lemon juice. Gently toss to combine. Let this mixture sit for about 30 minutes, allowing the strawberries to macerate and release their juices.
- In a separate medium bowl, combine the blueberries, sugar, and lemon juice. Toss to combine. Let this mixture sit for about 15 minutes.
- In a medium saucepan, combine the milk and vanilla bean (if using). Heat over medium heat until just simmering. Remove from heat, cover, and let steep for 30 minutes to infuse the milk with vanilla flavor. If you’re using vanilla extract, you’ll add it later.
- In a medium bowl, whisk together the egg yolks, sugar, and cornstarch until pale and smooth.
- Slowly pour about 1/2 cup of the warm milk into the egg yolk mixture, whisking constantly to temper the eggs.
- Pour the tempered egg yolk mixture back into the saucepan with the remaining milk. Cook over medium heat, whisking constantly, until the mixture thickens and comes to a simmer. Continue to cook for 1-2 minutes more, whisking vigorously, to ensure the cornstarch is fully cooked.
- Remove from heat and stir in the butter and salt (and vanilla extract, if not using a vanilla bean). Pour the pastry cream into a clean bowl, cover the surface with plastic wrap (to prevent a skin from forming), and refrigerate for at least 2 hours, or until completely chilled.
- Make sure your bowl and whisk attachment (or beaters) are well-chilled.
- In the chilled bowl, combine the heavy cream, powdered sugar, and vanilla extract. Beat on medium speed until stiff peaks form.
- Cut the chilled pound cake into 1/2-inch thick slices. You can also cut the slices into cubes if you prefer.
- In a large trifle bowl (or individual serving dishes), begin by layering some of the pound cake on the bottom.
- Spoon a layer of the macerated strawberries and their juices over the cake.
- Spread a layer of the chilled vanilla pastry cream over the strawberries.
- Sprinkle a layer of blueberries over the pastry cream.
- Repeat the layers (cake, strawberries, pastry cream, blueberries) until all the ingredients are used, ending with a layer of pastry cream.
- Spread the whipped cream evenly over the top layer of pastry cream.
- Garnish with fresh strawberries, blueberries, and mint sprigs, if desired.
- Cover the trifle and refrigerate for at least 2 hours before serving.
Notes
- Chilling the pound cake makes it easier to slice.
- Macerating the strawberries helps to create a delicious, syrupy layer.
- Make sure to temper the egg yolks when making the pastry cream to prevent them from scrambling.
- Chill the bowl and whisk attachment before whipping the cream to help it whip up faster and hold its shape better.
- The trifle is even better if it sits overnight, allowing the flavors to meld together and the cake to soften slightly.
- Prep Time: 90 minutes
- Cook Time: 1 hour


Leave a Comment